Are gluten-free Oreos dairy-free? That’s a common question people ask before making allergy-friendly desserts, especially when cravings for rich gluten-free Oreo balls hit during the holidays.
Between confusing labels, changing ingredients, and mixed information online, it can be surprisingly difficult to figure out whether gluten-free Oreos actually fit a dairy-free lifestyle.
Table of Contents
Making gluten-free Oreo balls can be frustrating when the filling turns too soft, crumbly, or difficult to coat properly.
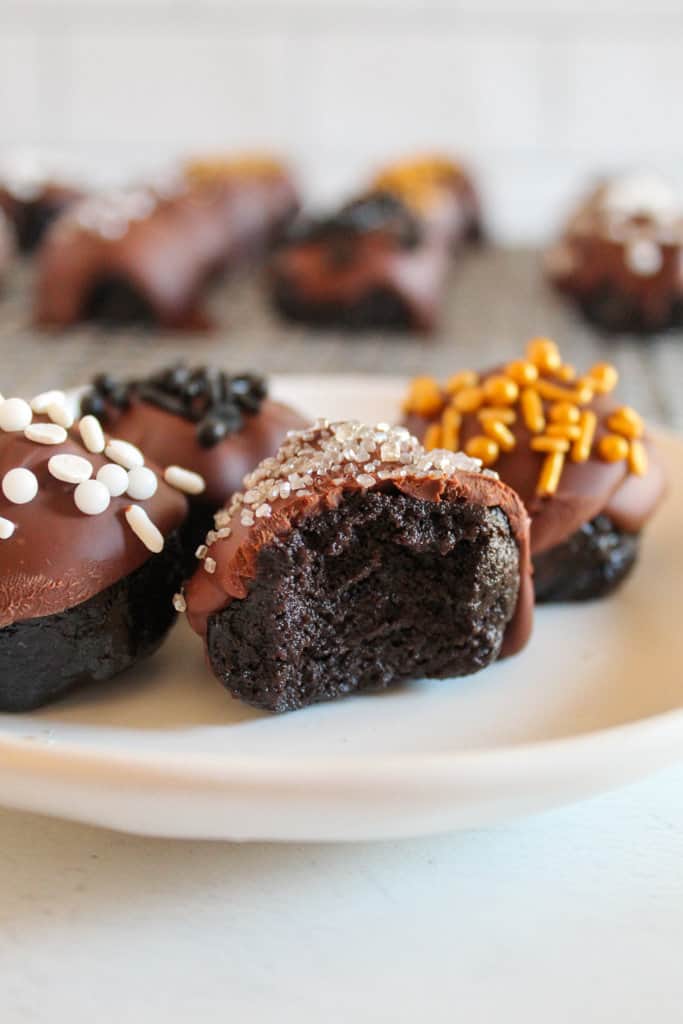
This recipe creates gluten-free Oreo truffles with a smooth filling and a firm chocolate coating that closely resembles the classic version.
That said, if you love cookies-and-cream desserts, you should also try this Gluten-Free Oreo Cake for another rich gluten-free treat packed with Oreo flavor.
Why These Gluten-Free Oreo Balls Work
These gluten-free, dairy-free Oreo balls work because the crushed cookies, dairy-free cream cheese, chill time, and chocolate coating each play a role in the final texture.
- Fine cookie crumbs help the balls hold together. Finely crushed gluten-free Oreos absorb moisture from the dairy-free cream cheese and create a smooth, stable filling. Large cookie pieces can make the balls crack or fall apart.
- Dairy-free cream cheese binds the mixture. It turns the cookie crumbs into a soft, dough-like filling that is creamy but still easy to roll.
- The ratio matters. Too much cream cheese can make the Oreo balls too soft and messy to coat. Too little can make the mixture dry and crumbly.
- Chilling keeps them firm. Cold Oreo balls hold their shape better and are easier to dip in melted chocolate.
- The chocolate shell adds contrast. Dairy-free chocolate creates a firm outer coating around the creamy Oreo center. A little oil helps the chocolate melt smoothly and coat evenly.
Once chilled, the coating firms up into a thin shell with a soft, rich Oreo filling inside.
Looking for another soft, rich gluten-free dessert? See our Amazing Gluten Free Banana Cake (Dairy Free).
Gluten-Free Oreo Balls Ingredients and Their Substitutes
Each ingredient plays an important role in creating the recipe’s smooth truffle filling and crisp chocolate coating. Also, there’s plenty of flexibility if you need substitutions for allergies, texture preferences, or flavor variations.

Gluten-Free Oreo Balls Ingredient Quick List
You only need a handful of simple ingredients below to make these rich, creamy gluten-free Oreo truffles.
- Gluten-free Oreo cookies
- Dairy-free cream cheese
- Semi-sweet dairy-free chocolate chips
- Vegetable oil
- Sprinkles or decorations
Gluten-Free Oreo Cookies
Gluten-free Oreos deliver the classic cookies-and-cream flavor and a soft truffle texture that make Oreo balls so addictive. This recipe uses gluten-free Oreo cookies made with rice and oat flours, not wheat flour.
But if you cannot find gluten-free Oreos, you can substitute:
- gluten-free chocolate sandwich cookies
- gluten-free vanilla sandwich cookies for a lighter flavor
- homemade gluten-free chocolate cookies
Different cookie brands absorb moisture differently, affecting the filling’s texture.
Dairy-Free Cream Cheese
Dairy-free cream cheese helps bind the crushed cookies into a smooth filling. I recommend Violife dairy-free cream cheese for this recipe because it blends smoothly and firms up well after chilling.
However, you can try the following substitutes:
- Kite Hill cream cheese
- Miyoko’s cream cheese
- Trader Joe’s vegan cream cheese
Having said that, avoid spreads that are too soft because they can make the Oreo balls difficult to roll.
Dairy-Free Chocolate Chips
Semi-sweet dairy-free chocolate coats the Oreo truffles. A good chocolate coating should melt evenly and set properly after chilling.
Good dairy-free chocolate options include Enjoy Life, Hu Kitchen, Pascha, and Lindt Oat Milk Chocolate. When choosing among them, keep in mind that dark chocolate adds a richer flavor, while semi-sweet chocolate keeps the dessert closer to classic Oreo balls.
Vegetable Oil
The small amount of vegetable oil helps thin the melted chocolate, allowing it to coat the Oreo truffles smoothly without becoming thick or clumpy.
You can substitute coconut oil or avocado oil. However, do not skip this ingredient entirely unless your chocolate already melts very fluidly.
Sprinkles and Decorations
Sprinkles are optional and work well for decorating Oreo balls. You can use gluten-free sprinkles, crushed peppermint, Oreo crumbs, dairy-free white chocolate drizzle, or crushed nuts.
For another soft gluten-free dessert that works well for celebrations and parties, try our Easy Oat Flour Dessert.
Are Gluten-Free Oreos Dairy-Free?
Gluten-free Oreos are made without wheat and do not list milk as an allergen on the current official Oreo product page. However, they do contain soy, and ingredient labels can change, so always check the package before using them for someone with allergies.
Here’s what to know before making gluten-free, dairy-free Oreo balls:
- No wheat flour: Gluten-free Oreos use ingredients like white rice flour, tapioca starch, oat flour, and cornstarch instead of wheat flour.
- No listed milk allergen: The current official ingredient listing does not list milk, but packaging should still be checked for cross-contact warnings.
- Contains soy: Gluten-free Oreos contain soy lecithin and list soy as an allergen.
- Not officially vegan: Many people treat Oreos as vegan-friendly, but they are not typically marketed as certified vegan.
- Always check the label: Ingredients and manufacturing warnings can change over time.
If you’re making these Oreo balls for someone with celiac disease, a dairy allergy, or another food allergy, use the package label as the final source before baking or serving.
Want another gluten-free dessert? Try our Classic Coffee Cake Recipe with Cinnamon Streusel Topping.
Essential Kitchen Tools
Before we go into the steps, get these tools ready:
- Food Processor: It helps crush the Oreos into fine crumbs for a smooth filling.
- Large Mixing Bowl: A big bowl is useful for mixing the filling by hand rather than using a food processor.
- Parchment Paper: It keeps the Oreo balls from sticking together while they chill.
- Cookie Scoop: A cookie scoop makes evenly sized Oreo balls for consistent chilling and coating.
- Microwave-Safe Bowl: This Bowl safely melts the dairy-free chocolate without burning it.
- Wire Rack: Using a wire rack helps excess chocolate drip off, resulting in a cleaner coating.
- Spoon or Fork: Either helps dip and coat the Oreo balls evenly.

Printable Gluten-Free Oreo Balls Recipe Card
Ingredients
- 32 gluten-free Oreo cookies about a 14-ounce package
- 7 ounces dairy-free cream cheese softened
- 10 ounces semi-sweet dairy-free chocolate chips
- ½ teaspoon vegetable oil
- Decorations: sprinkles
Instructions
- Step 1: Prepare the Baking DishLine a 9×13-inch baking dish with parchment paper and set aside.
- Step 2: Crush the CookiesAdd the gluten-free Oreo cookies to a large food processor. Pulse for 5–7 seconds until fine crumbs form.
- Step 3: Mix the FillingCut the dairy-free cream cheese into 4 pieces and add it to the cookie crumbs. Pulse for about 10 seconds until the mixture fully comes together and looks thick and sticky.
- Step 4: Roll the Oreo BallsScoop about 1 1/2 tablespoons of mixture and roll into smooth balls. Place each ball onto the parchment-lined baking dish.
- Step 5: Chill OvernightCover the dish and refrigerate overnight or for at least 12 hours. This step helps the Oreo balls firm up properly before coating.
- Step 6: Melt the ChocolateIn a microwave-safe bowl, combine the dairy-free chocolate chips and vegetable oil. Microwave in 30-second increments, stirring between each interval, until smooth and melted. Total melting time is usually around 2 minutes.
- Step 7: Coat the Oreo BallsPlace a wire rack over wax paper. Then arrange the chilled Oreo balls on the rack. Use a spoon to coat each ball with melted chocolate.
- Step 8: DecorateImmediately add sprinkles or decorations before the chocolate hardens.
- Step 9: Chill Before ServingTransfer the coated Oreo balls back to the baking dish, cover, and refrigerate until ready to serve.
Notes
Doneness Cues
- The Oreo filling should feel firm after chilling and hold its shape easily.
- The chocolate coating should look glossy at first, then firm up completely after refrigeration.
- Properly chilled Oreo balls should not collapse or become sticky when coated.
- The filling should look evenly combined and easy to roll.
Recipe Tips
- Use regular gluten-free Oreos, not Double Stuf, for the best texture.
- Refrigerate overnight before coating for the best texture.
- Use softened dairy-free cream cheese for easier mixing.
- A wire rack placed over wax paper makes decorating easier and reduces mess.
- Add decorations immediately before the chocolate hardens.
- Use a small spoon to help coat the Oreo balls evenly with chocolate.
- Coconut oil can replace vegetable oil if preferred.
Storage Notes
- Store the completed Oreo balls, covered, in the refrigerator for up to 5 days, as they are best served cold.
- Freezing is not recommended because the texture and chocolate coating may change after thawing.
- These Oreo truffles are perfect for making ahead because the overnight chill improves both flavor and texture.
Nutrition
Did you make and love this recipe? Give it your review and rating below! And make sure to follow me on Instagram, Pinterest, and Facebook , too!
How to Make Gluten-Free Oreo Balls
These gluten-free desserts come together with a few simple steps. Following the steps in order helps the filling and coating set properly.
Step 1: Crush the Oreos
Add the gluten-free Oreos to a food processor. Then pulse for 5–7 seconds until the cookies turn into fine crumbs.
The crumbs should look soft and sandy with no large cookie chunks remaining. Fine crumbs create a more even filling.
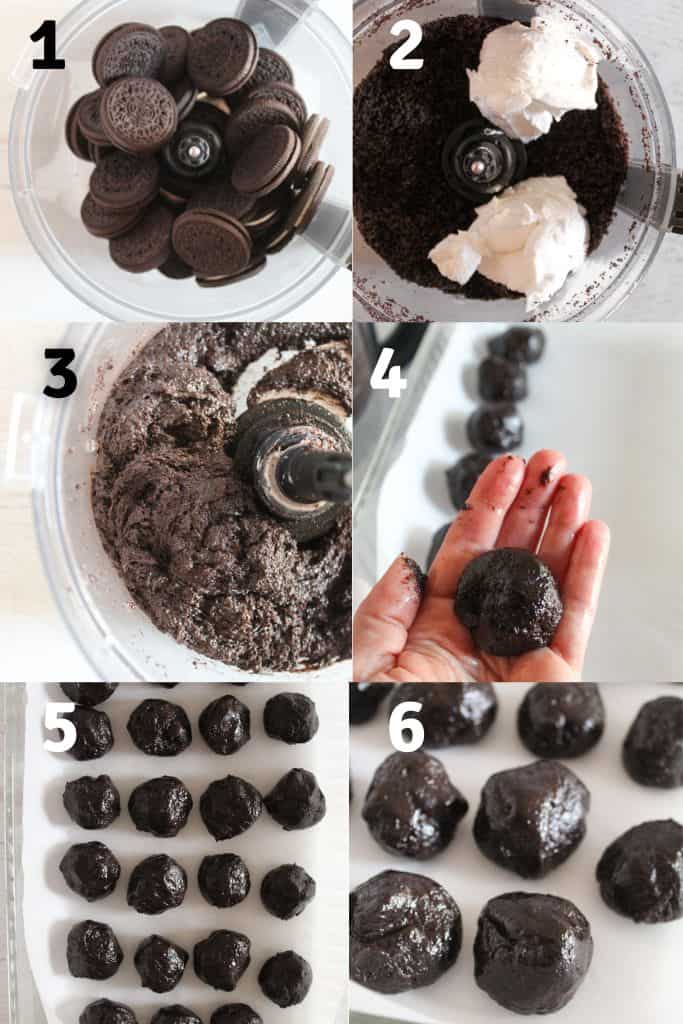
Step 2: Mix the Filling
Add the softened dairy-free cream cheese to the Oreo crumbs, and pulse again until the mixture becomes thick and evenly combined.
The filling should look smooth, sticky, and dough-like. If dry crumbs remain, continue mixing until fully incorporated.
Step 3: Roll the Balls
Scoop about 1 ½ tablespoons of filling. Next, roll the mixture between your hands until smooth. Then place each Oreo ball onto a parchment-lined tray or baking dish.
The balls should feel compact and hold their shape without cracking.
Step 4: Chill Before Coating
Cover the tray with plastic wrap or foil. Afterward, refrigerate the Oreo balls overnight or for at least 12 hours.
The balls should feel firm and cold before coating.
Step 5: Melt the Chocolate
Add the dairy-free chocolate chips and vegetable oil to a microwave-safe bowl.

Next, microwave in 30-second intervals, stirring after each interval. Continue heating until the chocolate fully melts.
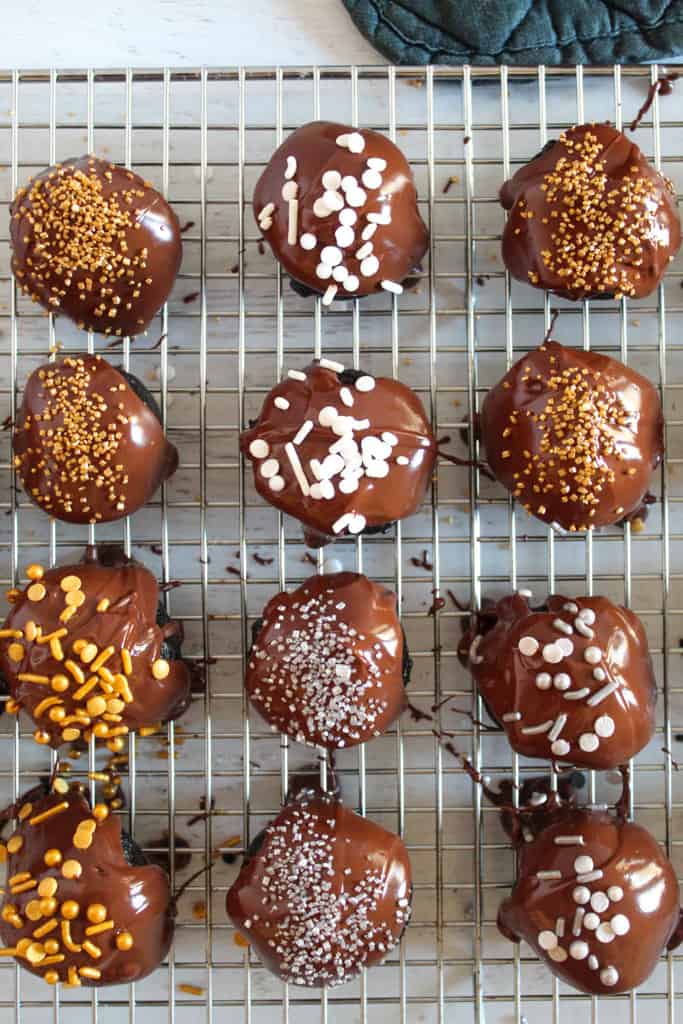
Step 6: Dip and Decorate
Place the chilled Oreo balls on a wire rack lined with wax paper. Then, spoon or drizzle melted chocolate over each ball until fully coated. Immediately add sprinkles or decorations before the chocolate sets.
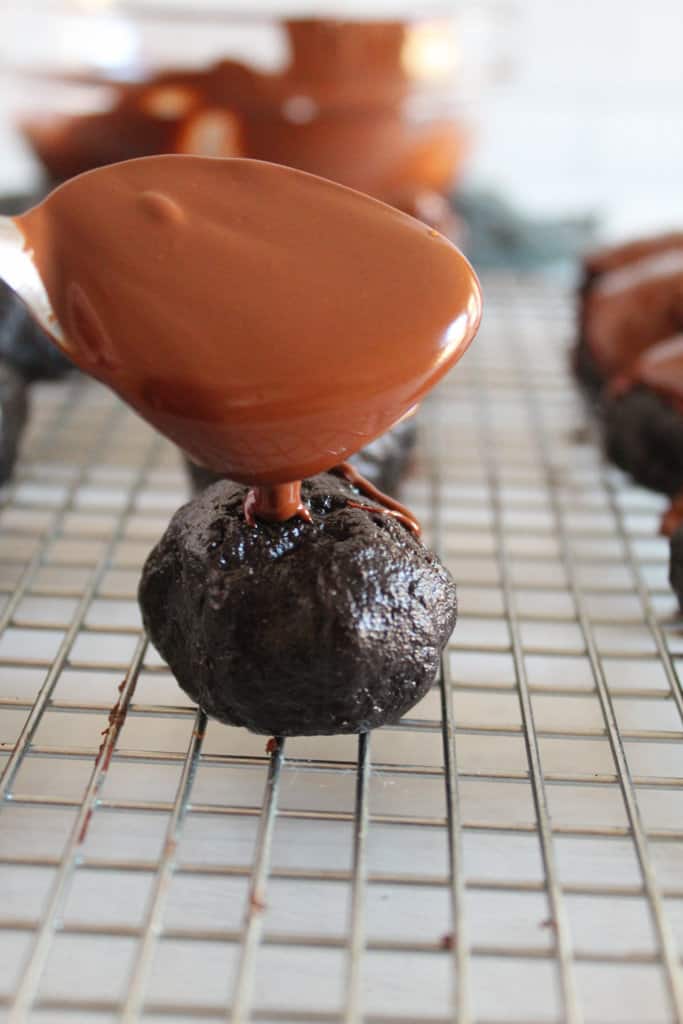
The coating should look smooth and evenly covered without thick clumps of chocolate.
Step 7: Chill Until Firm
Transfer the coated Oreo balls back to the tray and refrigerate until the chocolate shell fully hardens.
The Oreo truffles are ready once the chocolate coating fully hardens.
Common Oreo Ball Problems and How to Fix Them
Most Oreo ball problems come from temperature, moisture balance, or chocolate handling. These fixes help improve texture and coating consistency.
Why Are My Oreo Balls Too Soft?
Soft Oreo balls are usually caused by too much dairy-free cream cheese, not chilling long enough, or warm room temperature.
To fix this issue, refrigerate overnight, freeze for 15–20 minutes before coating, and add extra crushed Oreo crumbs if the filling feels wet. The filling should feel cold and firm before dipping.
Why Is the Mixture Crumbly?
Crumbly filling usually means the Oreos were not crushed finely enough, there is not enough cream cheese, or the mixture was undermixed.
Fixing this mishap requires you to pulse the food processor longer, add small amounts of softened dairy-free cream cheese, and press the mixture together firmly before rolling. The filling should look smooth and dough-like.
Why Is the Chocolate Cracking?
Chocolate cracks when you coat cold Oreo balls with very warm chocolate. Other causes are thick chocolate coating and overheated chocolate.
To reduce cracking, let the Oreo balls sit at room temperature for 2–3 minutes before coating, use thinner layers of chocolate, and melt the chocolate slowly.
Why Is My Chocolate Seizing?
Seized chocolate becomes thick and grainy. This happens when water gets into the chocolate or when the chocolate overheats.
Prevent this problem by using dry bowls and utensils, microwaving in short intervals, and stirring between each interval. Also, adding vegetable oil helps keep the chocolate smooth.
Why Are the Balls Falling Apart?
Oreo balls usually fall apart because they were not chilled long enough, the mixture is too dry, or the balls were rolled too loosely.
Resolve this issue by chilling longer before coating, rerolling firmly, and adding a small amount of dairy-free cream cheese if needed. The Oreo balls should feel compact before dipping.
Why Does the Coating Look Thick or Lumpy?
A thick coating typically indicates that the chocolate is too cool or too thick.
To resolve this mistake, stir the chocolate often, gently reheat if needed, and add a small amount of vegetable oil or coconut oil. The chocolate should look glossy and pour easily.
Do you enjoy decorated gluten-free dessert recipes? If so, try our Soft Gluten-Free Sugar Cookies.
Easy Flavor Variations for This Recipe
Small ingredient changes can give these gluten-free Oreo balls a completely different flavor, texture, or decoration style.
- Peppermint Oreo Balls: Add 1/4 teaspoon peppermint extract to the filling for a mint-chocolate flavor. For a holiday finish, coat with dark chocolate, drizzle with dairy-free white chocolate, and sprinkle crushed candy canes on top. This version works especially well for Christmas dessert trays.
- Peanut Butter Oreo Balls: Mix 2–3 tablespoons creamy peanut butter into the filling before rolling. For a stronger peanut butter flavor, coat with dark chocolate, drizzle with peanut butter, and top with chopped peanuts. Standard creamy peanut butter works best because natural peanut butter can make the filling too soft.
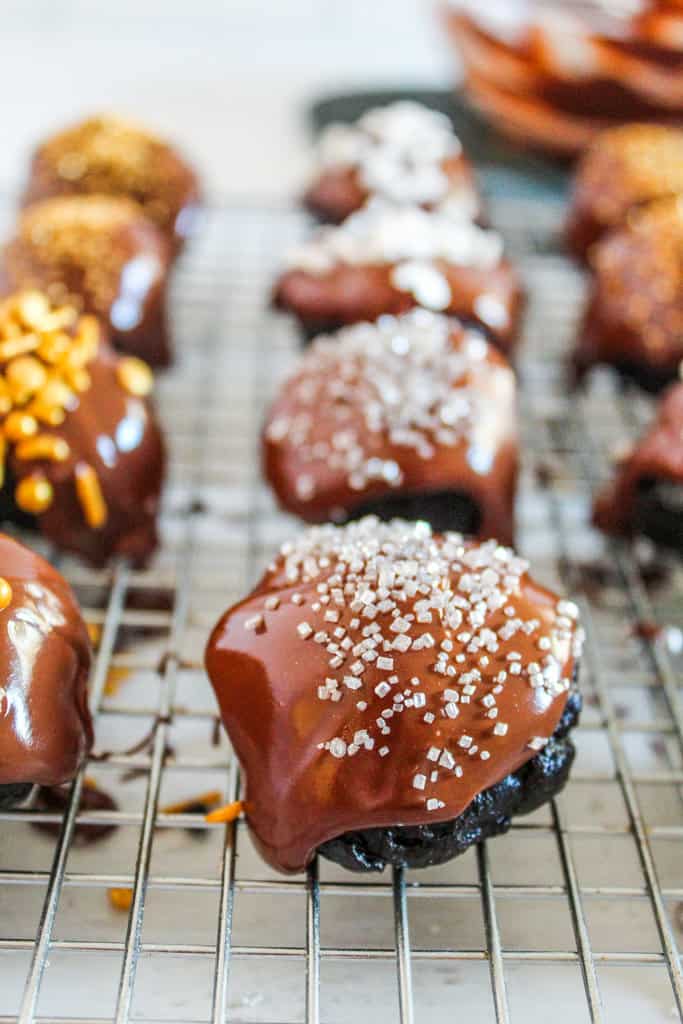
- Dark Chocolate Oreo Truffles: Use dairy-free dark chocolate instead of semi-sweet chocolate for a richer, less sweet coating. Add a small pinch of sea salt on top to balance the sweetness and bring out the chocolate flavor.
- Vanilla-Coated Oreo Balls: Use dairy-free white chocolate or vanilla-flavored coating instead of dark chocolate. Decorate with Oreo crumbs, gluten-free sprinkles, or a dark chocolate drizzle for a cookies-and-cream look.
- Birthday Cake Oreo Balls: Mix colorful gluten-free sprinkles into the filling before rolling. Coat with vanilla chocolate, add more sprinkles on top, and drizzle with colored dairy-free chocolate for a birthday or celebration version.

How to Store and Freeze Oreo Balls
Proper storage helps Oreo balls maintain their texture after chilling.
Refrigerator Storage
Store the balls in an airtight container in the refrigerator. To get the best texture, keep them chilled until serving, separate layers with parchment paper, and avoid leaving them at room temperature for long periods.
If you’re wondering how long Oreo balls last in the refrigerator, properly stored Oreo truffles usually stay fresh for up to 5 days.
Can You Freeze Oreo Balls?
Although Oreo balls can be frozen, the texture of the chocolate coating may slightly change after thawing.
To freeze them, do the following:
- Place the Oreo balls on a tray until firm.
- Transfer them to an airtight freezer-safe container.
- Separate layers with parchment paper.
Note that frozen Oreo truffles are best used within 1–2 months.
How to Prevent Condensation
Condensation can make the chocolate coating sticky or dull after freezing.
Do the following to reduce moisture and prevent water droplets from forming on the chocolate shell:
- Thaw the Oreo balls slowly in the refrigerator.
- Keep them inside the container while thawing.
- Avoid sudden temperature changes.
Best Containers for Storage
Use airtight food storage containers, shallow containers with flat lids, and freezer-safe containers for long-term storage. However, avoid overcrowding the Oreo balls to help protect the chocolate coating.
Make-Ahead Tips
Gluten-free Oreo balls are great as a make-ahead dessert because the filling firms up as it chills.
For best results, make the filling and roll the balls 1 day ahead, coat in chocolate the next day, and store chilled until serving.
Gluten-Free Oreo Balls FAQs
The following are answers to common questions we get about making, decorating, and serving these yummy balls. Have another question about these gluten-free Oreo balls? Leave it in the comments below, and we’ll do our best to help you troubleshoot.
Can I Use Homemade Gluten-Free Sandwich Cookies for Oreo Balls?
Homemade gluten-free chocolate sandwich cookies work well if they have a crisp texture similar to Oreos. Softer cookies may make the filling wetter, so you may need extra cookie crumbs to balance the texture.
How Do I Make Oreo Balls Less Sweet?
To reduce sweetness, use dark chocolate coating, add a pinch of sea salt, and use less chocolate drizzle or sprinkles. Dark chocolate creates a more balanced flavor than semi-sweet or white chocolate.
Can I Use Almond Bark Instead of Chocolate Chips?
You can, but make sure the almond bark is dairy-free if needed for allergies or dietary restrictions. Almond bark usually melts more smoothly and creates a firmer coating than chocolate chips.
Why Are My Oreo Balls Oily After Chilling?
This usually happens when the chocolate overheats, the filling becomes too warm, or the cream cheese separates during mixing. Keeping the mixture chilled and melting the chocolate slowly helps prevent excess oil.
Can I Use Coconut Cream Instead of Cream Cheese?
You can, but coconut cream creates a softer filling that may need additional chilling time. The coconut flavor may also slightly change the taste of the Oreo balls.
More Gluten-Free Dairy-Free Desserts to Try
If you enjoyed these gluten-free Oreo balls, there are plenty of other easy dairy-free desserts worth trying. Start with these reader favorites:
- Easy Gluten-Free Pumpkin Waffles (Dairy-Free) for a soft pumpkin breakfast with crisp edges.
- Super Soft Gluten Free Dairy Free Pumpkin Cookies, if you want another soft and chewy gluten-free dessert.
- Gluten Free Pumpkin Pie {Dairy Free} for a classic holiday dessert with a creamy pumpkin filling.
Whether you need a no-bake party treat, a cozy pumpkin dessert, or another allergy-friendly sweet, these gluten-free dairy-free recipes are easy places to start.
Share Your Experience With Us
Did you make classic Oreo truffles, add peppermint, or try a birthday cake version? We’d love to hear how they turned out.
Have you tried a different brand or flavor of dairy-free cream cheese? Let us know in the comments and share your favorite way to decorate these Oreo balls.