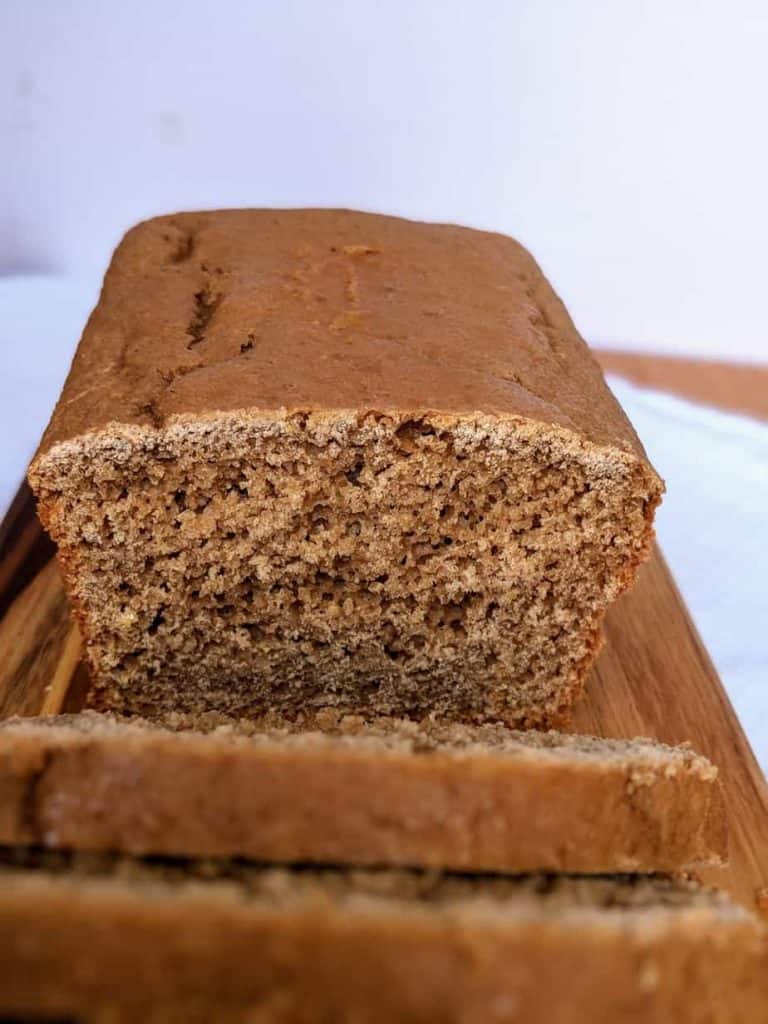
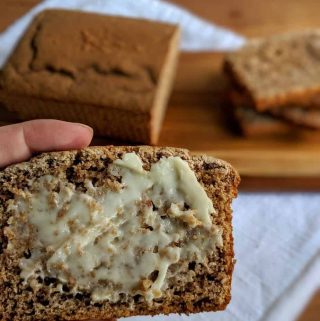
This Gluten-Free Outback Bread recreates the dark, slightly sweet steakhouse loaf that many people miss after going gluten-free. Unlike many store-bought gluten-free breads that are dry or crumbly, this recipe produces a soft, tender loaf without xanthan gum.
I tested this recipe repeatedly to recreate the rich color, subtle sweetness, and fluffy texture of the original while keeping it completely gluten-free. Whether you’re serving it with soup, chili, or your favorite steak dinner, it’s an easy way to enjoy the classic restaurant bread at home.
Table of Contents
Why This Recipe Works
Great gluten-free bread depends on balancing structure, moisture, and lift. Instead of relying on a single flour or xanthan gum, this Gluten-Free Outback Bread recipe combines several ingredients to create a loaf that’s soft, flavorful, and easy to slice. Let me show you how I made it work.
1) A Blend of Gluten-Free Flours Creates Better Structure
Unlike wheat flour, gluten-free flours each bring different strengths. Combining whole-grain flours with starches produces a lighter loaf with better flavor and texture than using a single gluten-free flour alone.
2) Starches Keep the Bread Soft
The starches improve the crumb and prevent the loaf from becoming overly dense, while imparting the slight chewiness expected from a steakhouse-style bread.
3) Moisture Helps Prevent Dryness
Honey and balanced hydration keep the bread tender for longer, reducing the dryness common in many gluten-free loaves.
4) Yeast Creates a Light Texture
Fresh yeast produces the air pockets that give the bread its rise and soft interior. Proper proofing is key to achieving a light loaf.
5) Flax Replaces Xanthan Gum
Hydrated flax meal acts as a natural binder, helping hold the loaf together without xanthan gum while contributing moisture and structure.
Looking for a quick bread instead of a yeast loaf? Try this Easy Coconut Bread Recipe: Moist & Delicious, which comes together with simple pantry ingredients.
Ingredients Quick Scan
Before you start, gather the following ingredients:
Dry Ingredients
- Tapioca flour
- Oat flour
- Cornstarch
- Brown rice flour
- Sorghum flour
- Cocoa powder
- Granulated sugar
- Instant coffee granules (espresso preferred)
- Golden flax meal
- Salt
- Active dry yeast
Wet Ingredients
- Eggs
- Egg white
- Warm milk
- Butter
- Honey
Ingredients and Substitutions Notes
Each ingredient below has a specific purpose in this Gluten-Free Outback Bread recipe. If you need to make a substitution, keep in mind that even small changes can affect the final result.
Dry Ingredients
- Tapioca Flour: Creates the chew, elasticity, and light crumb that help mimic traditional wheat bread. If needed, replace it with arrowroot starch, although the bread may be slightly less chewy.
- Oat Flour: Adds a mild flavor while keeping the crumb tender and moist. For an oat-free option, use millet flour, though it will slightly change the flavor.
- Cornstarch: Softens the loaf and lightens the overall texture. Arrowroot starch makes the best substitute, while tapioca starch also works with minor texture changes.
- Brown Rice Flour: Builds structure without making the bread overly dense and adds a mild nutty flavor. If you don’t have any on hand, check out our Top 5 Brown Rice Flour Substitutes and How To Use Them to choose the best replacement for your pantry.
- Sorghum Flour: Gives the bread a mild wheat-like flavor while improving structure and protein content. Substitute millet flour or buckwheat flour if needed, keeping in mind that each changes the flavor slightly.
- Cocoa Powder: Gives the bread its signature dark color without adding a chocolate flavor. Use natural cocoa powder for the best results.
- Granulated Sugar: Feeds the yeast during proofing while adding just enough sweetness to balance the flavor. Coconut sugar can be used as a substitute, though it may slightly darken the loaf.
- Instant Coffee Granules (Espresso Preferred): Deepen the bread’s rich color while adding subtle roasted notes that enhance the overall flavor. Instant espresso powder makes the best substitute.
- Golden Flax Meal: Binds the dough and improves moisture and structure. Brown flax meal works too, but creates a darker crumb.
- Salt: Balances the sweetness while strengthening the dough for a better rise. Use either table salt or fine sea salt.
- Active Dry Yeast: Helps the bread rise for a light, airy texture. Substitute instant yeast if needed.
Wet Ingredients
- Eggs: Build structure, add richness, and help the loaf hold its shape throughout baking. Because they play such an important role, don’t substitute them.
- Egg White: Increases the protein content, helping the loaf rise higher while creating a lighter crumb. Leaving it out may produce a denser loaf.
- Warm Milk: Activates the yeast while hydrating the gluten-free flours. Unsweetened almond milk or oat milk makes a good dairy-free alternative.
- Butter: Adds richness, flavor, and a soft, tender crumb. Replace it with melted dairy-free butter if needed.
- Honey: It brings the signature sweetness while helping the bread stay moist and develop a beautifully golden crust. Maple syrup can be used as a substitute, though it gives the bread a slightly different flavor.
Recipe Card: Gluten-Free Outback Bread (PRINTABLE)
Ingredients
Dry ingredients
- 1 cup tapioca flour
- 1 cup oat flour
- ½ cup cornstarch
- ½ cup brown rice flour
- ⅔ cup sorghum flour
- 1 Tbsp. cocoa powder
- 1 Tbsp. granulated sugar
- 1 Tbsp. instant coffee granules ,espresso preferred
- 3 tsp. golden flax meal
- 1 tsp. salt
- 2 ½ tsp. active dry yeast
Wet ingredients
- 2 eggs
- 1 egg white
- 1 cup warm milk (110°F/43°C)
- 2 Tbsp. butter melted
- ½ cup honey
Instructions
- Step 1: Mix the Dry IngredientsIn a medium mixing bowl, whisk together the tapioca flour, oat flour, cornstarch, brown rice flour, sorghum flour, cocoa powder, granulated sugar, instant coffee granules, golden flax meal, salt, and active dry yeast until evenly combined.
- Step 2: Mix the Wet IngredientsIn the bowl of a stand mixer, combine the eggs, egg white, warm milk, melted butter, and honey. Mix on low speed until blended.
- Step 3: Beat the BatterGradually add the dry ingredients to the wet ingredients while mixing. Once everything is incorporated, scrape down the sides of the bowl with a spatula. Increase the mixer speed to medium and beat for 4 minutes.The batter will be very thin and pourable. Resist the urge to add more flour.
- Step 4: Fill the Loaf PansGrease and lightly flour two 8 × 4½-inch loaf pans. Divide the batter evenly between the prepared pans.
- Step 5: Let the Bread RiseCover the pans loosely with plastic wrap and place them in a warm, draft-free area. Let the batter rise for 90 minutes, or until it has noticeably increased in volume.
- Step 6: BakeDuring the final 15–20 minutes of rising, preheat the oven to 350°F (175°C). Bake for 20–25 minutes.
- Step 7: CoolAllow the loaves to cool in the pans for 10 minutes. Carefully remove them from the pans and transfer to a wire rack.Cool completely before slicing.
Notes
- Weigh the tapioca flour for the most accurate results.
- Do not substitute or adjust the flour blend.
- Use 8 × 4½-inch loaf pans for the best rise.
- This recipe makes two loaves, so you can enjoy one now and freeze one for later.
- Your bread is fully baked when:
- The tops are lightly browned and feel firm to the touch.
- The loaves sound hollow when gently tapped on the bottom.
- An instant-read thermometer inserted into the center reads 205–210°F (96–99°C).
- The bread releases easily from the sides of the pan and holds its shape after 10 minutes of cooling.
- Room Temperature: Store in an airtight container for up to 3 days.
- Refrigerator: Store for up to 1 week, though refrigeration may slightly dry the bread.
- Freezer: Slice the cooled bread and freeze in a freezer-safe bag for up to 3 months. Separate slices with parchment paper for easy thawing.
- To Reheat: Toast slices directly from frozen or warm in a 300°F oven for 5–10 minutes until heated through.
Nutrition
How to Make Gluten-Free Outback Bread
Now that your ingredients are measured and ready, it’s time to bring everything together.
Essential Kitchen Tools
Having the right equipment makes this recipe much easier and helps produce consistent results.
- Stand mixer with paddle attachment.
- Large and medium mixing bowls
- Measuring cups and spoons or a digital kitchen scale
- Silicone spatula
- Two 8 × 4½-inch loaf pans
- Plastic wrap
- Cooling rack
- Instant-read thermometer (optional, but helpful for checking doneness)
1) Combine the Dry Ingredients
In a medium bowl, whisk together the tapioca flour, oat flour, cornstarch, brown rice flour, sorghum flour, cocoa powder, granulated sugar, instant coffee granules, golden flax meal, salt, and active dry yeast.
Mix until the ingredients are evenly distributed and no streaks of cocoa or flour remain. The mixture should have a uniform light brown color with a fine, powdery texture.
2) Mix the Wet Ingredients
Add the eggs, egg white, warm milk, melted butter, and honey to the bowl of a stand mixer fitted with the paddle attachment.
Mix on low speed for about 30 seconds to 1 minute, or until the eggs are fully incorporated and the mixture looks smooth and well combined.
3) Beat the Batter
Gradually add the dry ingredients to the wet ingredients while mixing on low speed.
Once everything is incorporated, scrape down the sides and bottom of the bowl with a silicone spatula. Increase the mixer speed to medium and beat for 4 minutes.
Unlike traditional bread dough, the batter will be very thin, smooth, and pourable, almost like a thick cake batter. This is completely normal for gluten-free bread. Resist the urge to add extra flour, as doing so can negatively affect the texture.
4) Fill the Loaf Pans
Grease and lightly flour two 8 × 4½-inch loaf pans, then divide the batter evenly between them.
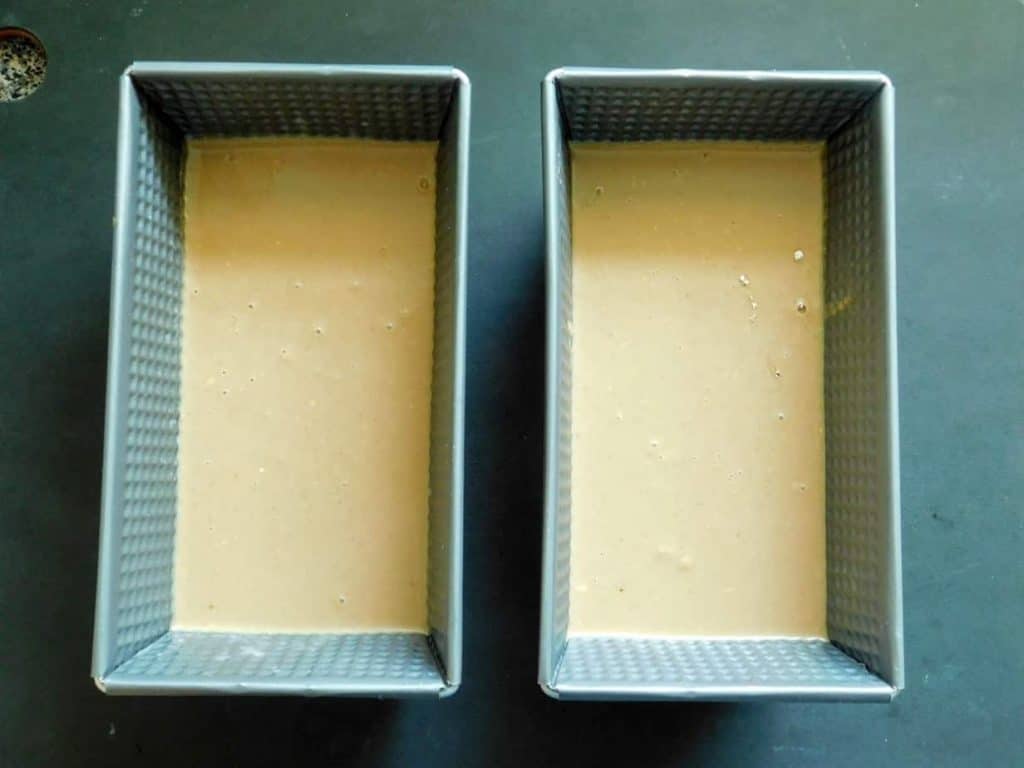
Use a spatula to smooth the tops if needed. Because the batter is pourable, it should settle into the pans on its own with very little spreading.
5) Let the Batter Rise
Cover each pan loosely with plastic wrap and place it in a warm, draft-free location.
Allow the batter to rise for 90 minutes. By the end of the rise, the batter should have increased noticeably in volume and appear light and slightly domed. Avoid moving the pans during this time to prevent the batter from rising.
6) Bake Until Fully Cooked
Toward the end of the rise, preheat your oven to 350°F (175°C).
Bake the loaves for 20 to 25 minutes.
The bread is done when the tops are lightly browned, and the loaves sound hollow when gently tapped. For the most accurate results, an instant-read thermometer inserted into the center should register 205–210°F (96–99°C). Baking gluten-free bread to the correct temperature helps prevent a gummy center.
7) Cool Before Slicing
Let the loaves cool in their pans for 10 minutes, then carefully transfer them to a wire rack.
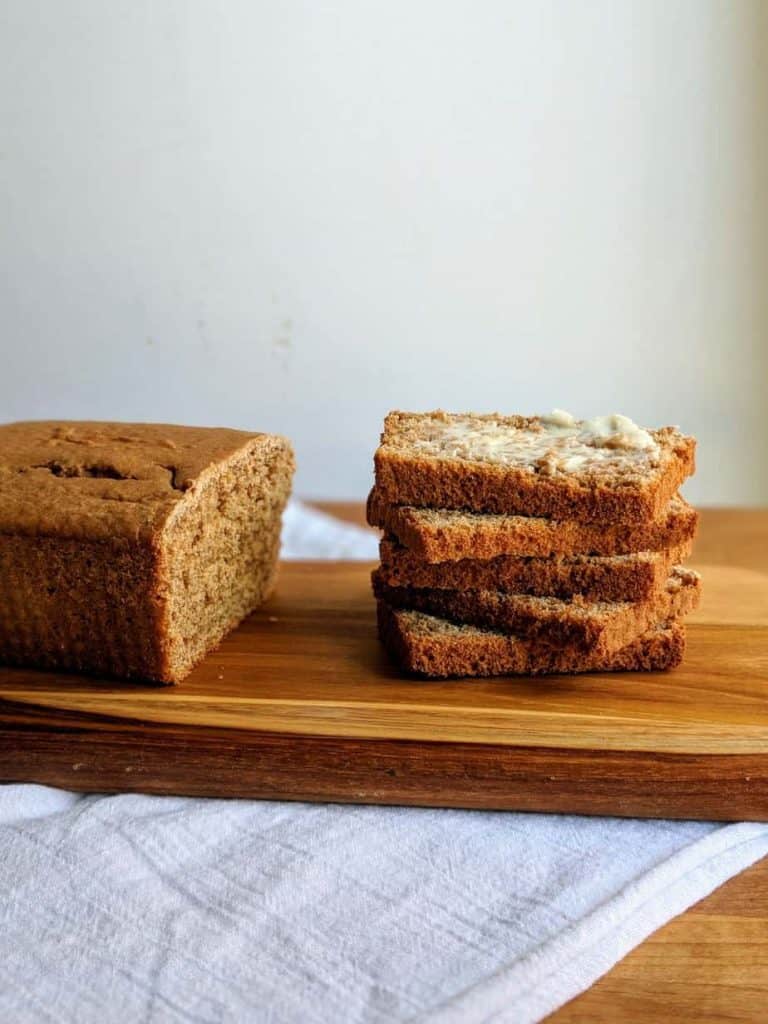
Allow the bread to cool completely before slicing. Although it may be tempting to cut into it while it’s warm, gluten-free bread continues to set as it cools. Slicing too early can result in a gummy crumb and uneven texture.
Expert Baking Tips
These simple tips will help you get the best results every time.
1) Weigh the Tapioca Flour
Tapioca flour is easy to overmeasure by volume. A kitchen scale gives the most consistent results and helps maintain the correct flour-to-liquid ratio.
2) Use Fresh Yeast
Expired yeast won’t produce enough lift. Check the expiration date and use warm milk (about 110°F) to encourage a good rise.
3) Don’t Over-Proof
Let the batter rise until noticeably puffy, then bake. Over-proofing can weaken the loaf and cause it to collapse.
4) Trust the Thin Batter
The batter should look more like thick cake batter than traditional bread dough. Resist adding extra flour.
5) Use the Right Loaf Pans
Two 8 × 4½-inch loaf pans help the bread rise upward and bake evenly.
6) Cool Before Slicing
Allow the loaves to cool completely so the crumb finishes setting.
7) Freeze Extra Slices
Freeze individual slices between sheets of parchment paper for quick breakfasts or sandwiches.
These same baking techniques also work well in How to Make Gluten-Free Cornbread Without Flour, another recipe designed for reliable results.
Common Bread Problems and Troubleshooting
Use this quick guide if your loaf doesn’t turn out exactly as expected.
| Problem | Most Likely Cause | How to Fix It |
|---|---|---|
| Bread didn’t rise | Inactive or expired yeast | Use fresh active dry yeast and make sure your milk is warm (about 110°F), not hot enough to kill the yeast. |
| Dense loaf | Incorrect flour or starch measurements | Weigh your starches and flours with a digital kitchen scale whenever possible. Accurate measurements help maintain the proper flour-to-liquid ratio. |
| Gummy middle | Bread was sliced before it had fully cooled | Let the loaf cool completely before slicing. Gluten-free bread continues to set as it cools, and cutting it too soon can leave the center sticky or gummy. |
| Dry bread | Overbaked or baked beyond the proper internal temperature | Bake until the center reaches 205–210°F, then remove it promptly from the oven. Using an instant-read thermometer helps prevent overbaking. |
| Bread collapsed after baking | Over-proofed before baking | Bake the loaf once it has risen well but before it over-expands. Over-proofing weakens the structure, causing the bread to sink as it cools. |
Want another beginner-friendly recipe? The Easiest Gluten-Free Banana Bread (No Flour Needed!) is a great next bake if you’re looking for something even simpler.
What to Serve With Outback Bread
This bread pairs well with both everyday meals and special occasions.

- Soup: Perfect for dipping into tomato, potato, vegetable, or chicken soup.
- Chili: The light sweetness balances the spiciness of beef, turkey, or vegetarian chili.
- Stew: A sturdy loaf that’s ideal for soaking up rich sauces.
- Burgers: Serve alongside burgers or use toasted slices instead of buns.
- Sandwiches: Once cooled, the bread slices cleanly for deli meats, chicken salad, or vegetables.
- Holiday Dinners: A great addition to roast turkey, ham, beef, or other holiday meals.
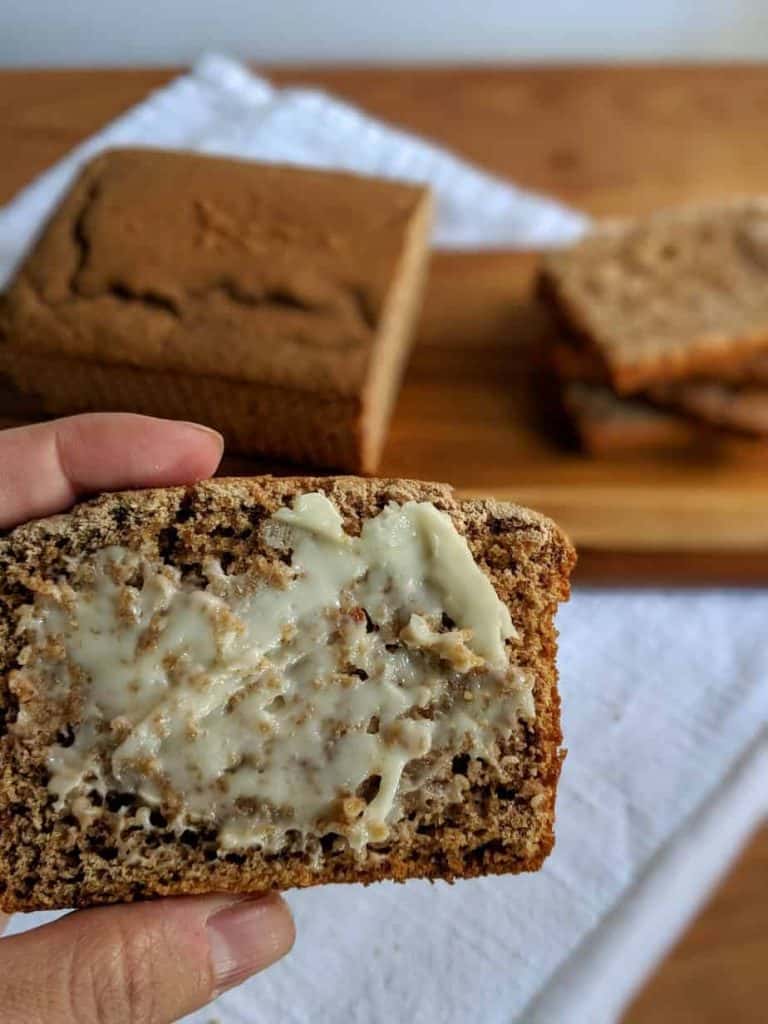
- Toast: Toast and serve with butter, jam, cream cheese, or nut butter.
Finish the meal with One Bowl Gluten Free Banana Bread: Super Moist & Easy!, a simple loaf that’s perfect for breakfast, snacks, or dessert. Dairy-Free & Gluten-Free Almond Flour Cornbread is another crowd-pleasing side.
Storage and Freezing Tips
This bread stores well, making it easy to bake ahead.
- Room Temperature: Store in an airtight container for up to 3 days.
- Refrigerator: If needed, refrigerate for up to 1 week, although the bread may dry out faster.
- Freezer: Freeze cooled bread for up to 3 months.
- Freeze Individual Slices: Separate slices with parchment paper before freezing so you can remove only what you need.
- Thaw: Thaw whole loaves at room temperature. Individual slices can go straight into the toaster.
- Reheat: Warm thawed bread in a 350°F oven for about 10 minutes to refresh the crust and crumb.
Planning for holidays? Try our Traditional Gluten-Free Easter Bread.
Personal Baking Notes
This recipe took several rounds of testing before it matched the bread I remembered from Outback Steakhouse.
1. The Flour Blend Matters
I tested several combinations before settling on this one. Each flour contributes something different, creating a loaf that’s soft, flavorful, and easy to slice.
2. Going Gum Free Was Worth It
Instead of xanthan gum, I relied on golden flax meal, eggs, and proper hydration to provide structure. It took a few adjustments, but the finished loaf held together beautifully.
3. Small Changes Made the Biggest Difference
Weighing the tapioca flour, beating the batter for the full four minutes, and allowing the bread to cool completely made the biggest improvements during testing.
Another recipe I make often is Foolproof One-Bowl Oat Flour Banana Bread. It’s just as dependable and requires only one bowl.
Frequently Asked Questions
Still have questions about this Gluten-Free Outback Bread? Here are answers to the questions readers ask most often. If you don’t see yours here, leave it in the comments below, and I’ll be happy to help.
What Kind of Bread Does Outback Steakhouse Serve?
If you’re wondering what type of bread Outback has, the restaurant’s signature loaf is a dark, honey-wheat-style bread with a soft interior and mild sweetness. Although many people refer to it as Outback pumpernickel bread, it isn’t traditional pumpernickel. Its rich brown color comes from ingredients like cocoa and coffee rather than rye flour.
Does Outback Give Bread?
Of course, they do. Outback Steakhouse is known for serving complimentary dark honey wheat bread before the main course at most locations. However, availability may vary by restaurant and dining format. The bread contains wheat and isn’t included on the restaurant’s gluten-friendly menu.
Does Outback Steakhouse have Gluten-Free Bread?
Outback Steakhouse doesn’t currently offer gluten-free bread. While the restaurant has a gluten-friendly menu, it states that its kitchens aren’t gluten-free and cross-contact may occur during preparation. Making this homemade version is the best way to enjoy the classic bread without gluten.
Is Outback Bread Pumpernickel?
Despite its appearance, Outback pumpernickel bread isn’t true pumpernickel. Traditional pumpernickel is made primarily with rye and has a denser, earthier flavor. Outback’s bread is closer to a honey wheat loaf with a softer crumb and subtle sweetness.
Why Does this Copycat Gluten-Free Outback Bread Recipe Taste So Much Like the Original?
Honey adds the signature sweetness, while cocoa powder and instant coffee give the bread its deep brown color and rich flavor. Combined with a carefully balanced gluten-free flour blend, they produce the soft texture and familiar taste that make this copycat recipe so close to the original.
More Gluten-Free Bread Recipes
If you enjoyed this Gluten-Free Outback Bread, there are plenty of other homemade bread recipes to add to your baking list.
- Sliceable Chia Seed Bread for Gluten-Free Toast and Sandwiches: Perfect when you need a sturdy loaf that won’t fall apart in the toaster or lunchbox.
- Savory Cassava Bread Recipe (Gluten & Dairy Free): A flavorful option that pairs especially well with soups, stews, and roasted meats.
- Soft Flaxseed Bread That Slices Without Crumbling: Ideal for sandwiches thanks to its soft texture and clean slices.
- Homemade Millet Bread for Sandwiches, Toast, and Everyday Slices: A mild everyday loaf that’s equally good for breakfast toast or packed lunches.
- Sorghum Bread Recipe (Soft, Fluffy & Gluten-Free): Highlights the naturally mild flavor of sorghum flour in a soft yeast bread.
- Buckwheat Banana Bread: A wholesome quick bread packed with banana flavor for breakfast or an afternoon snack.
Whether you’re baking for sandwiches, toast, dinner sides, or something sweet, these gluten-free bread recipes will help keep homemade bread back on the table.
Share Your Experience!
I’d love to know how your loaf turned out. Share your experience in the comments, let me know if you made any substitutions, or ask a question if you need help troubleshooting your bake.