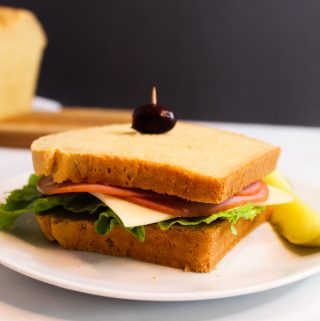
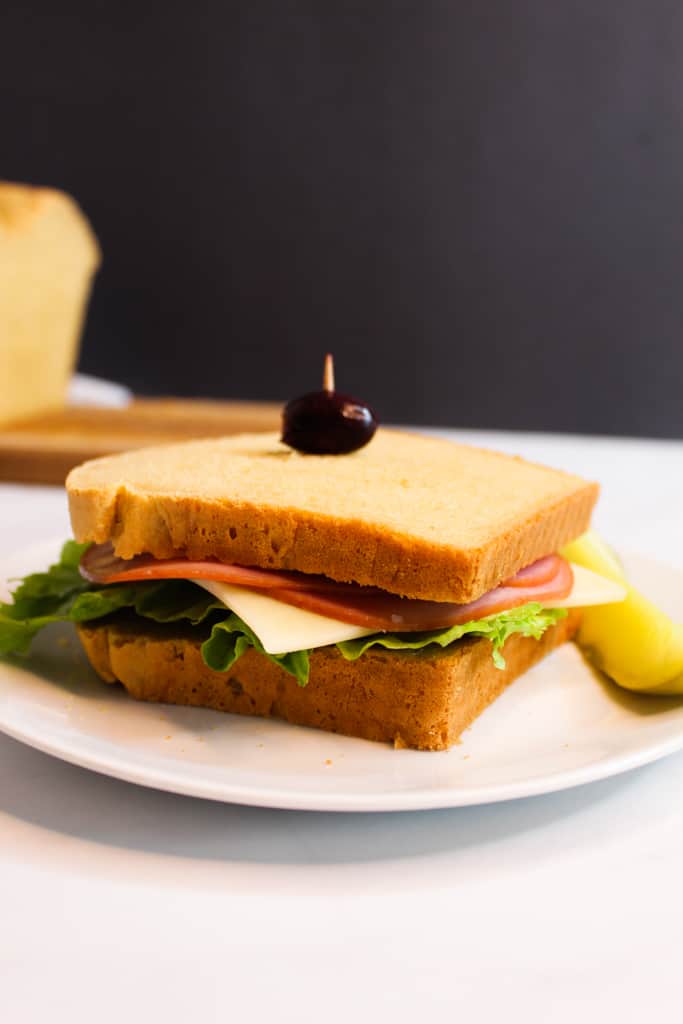
If you’ve been searching for an amazing gluten-free sandwich bread that not only makes mouthwatering sandwiches, but could also be enjoyed straight from the bag, then this is your loaf!
For so many home bakers, gluten-free sandwich bread feels like the ultimate challenge. It looks perfect in the oven and smells incredible as it bakes, but the moment you try to stack it into a sandwich or spread it with some butter, it falls apart. It’s more often than not too dense and gummy or too dry. And after a few failed loaves, it’s easy to give up and assume that fluffy sandwich bread just isn’t possible without gluten. But that’s not true.
Table of Contents
The key isn’t complicated techniques or hard-to-find ingredients. It’s understanding how gluten-free dough works, and once you understand that, everything changes. This gluten-free sandwich bread was developed to create a soft, tender loaf that slices well and holds together for sandwiches. And of course, actually tastes like real bread!

That’s what you’ll find with this recipe. A bread that is sturdy enough for packed lunches, soft for morning toast, and best of all, simple enough for beginners. You won’t need fancy equipment or long fermentation techniques. With a few key ingredients and the right mixing method, you’ll be hooked on this bread. Because once you taste a slice of homemade gluten-free bread that’s soft, flavorful, and actually holds together, you’ll never look at store-bought the same way again.
Why You’ll Love This Recipe
If the thought of a delicious sandwich bread that you can actually eat right out of the bag, one that doesn’t fall apart when you try to use it, and has the most amazing flavor, then you are going to love this recipe!
This gluten-free sandwich bread is:
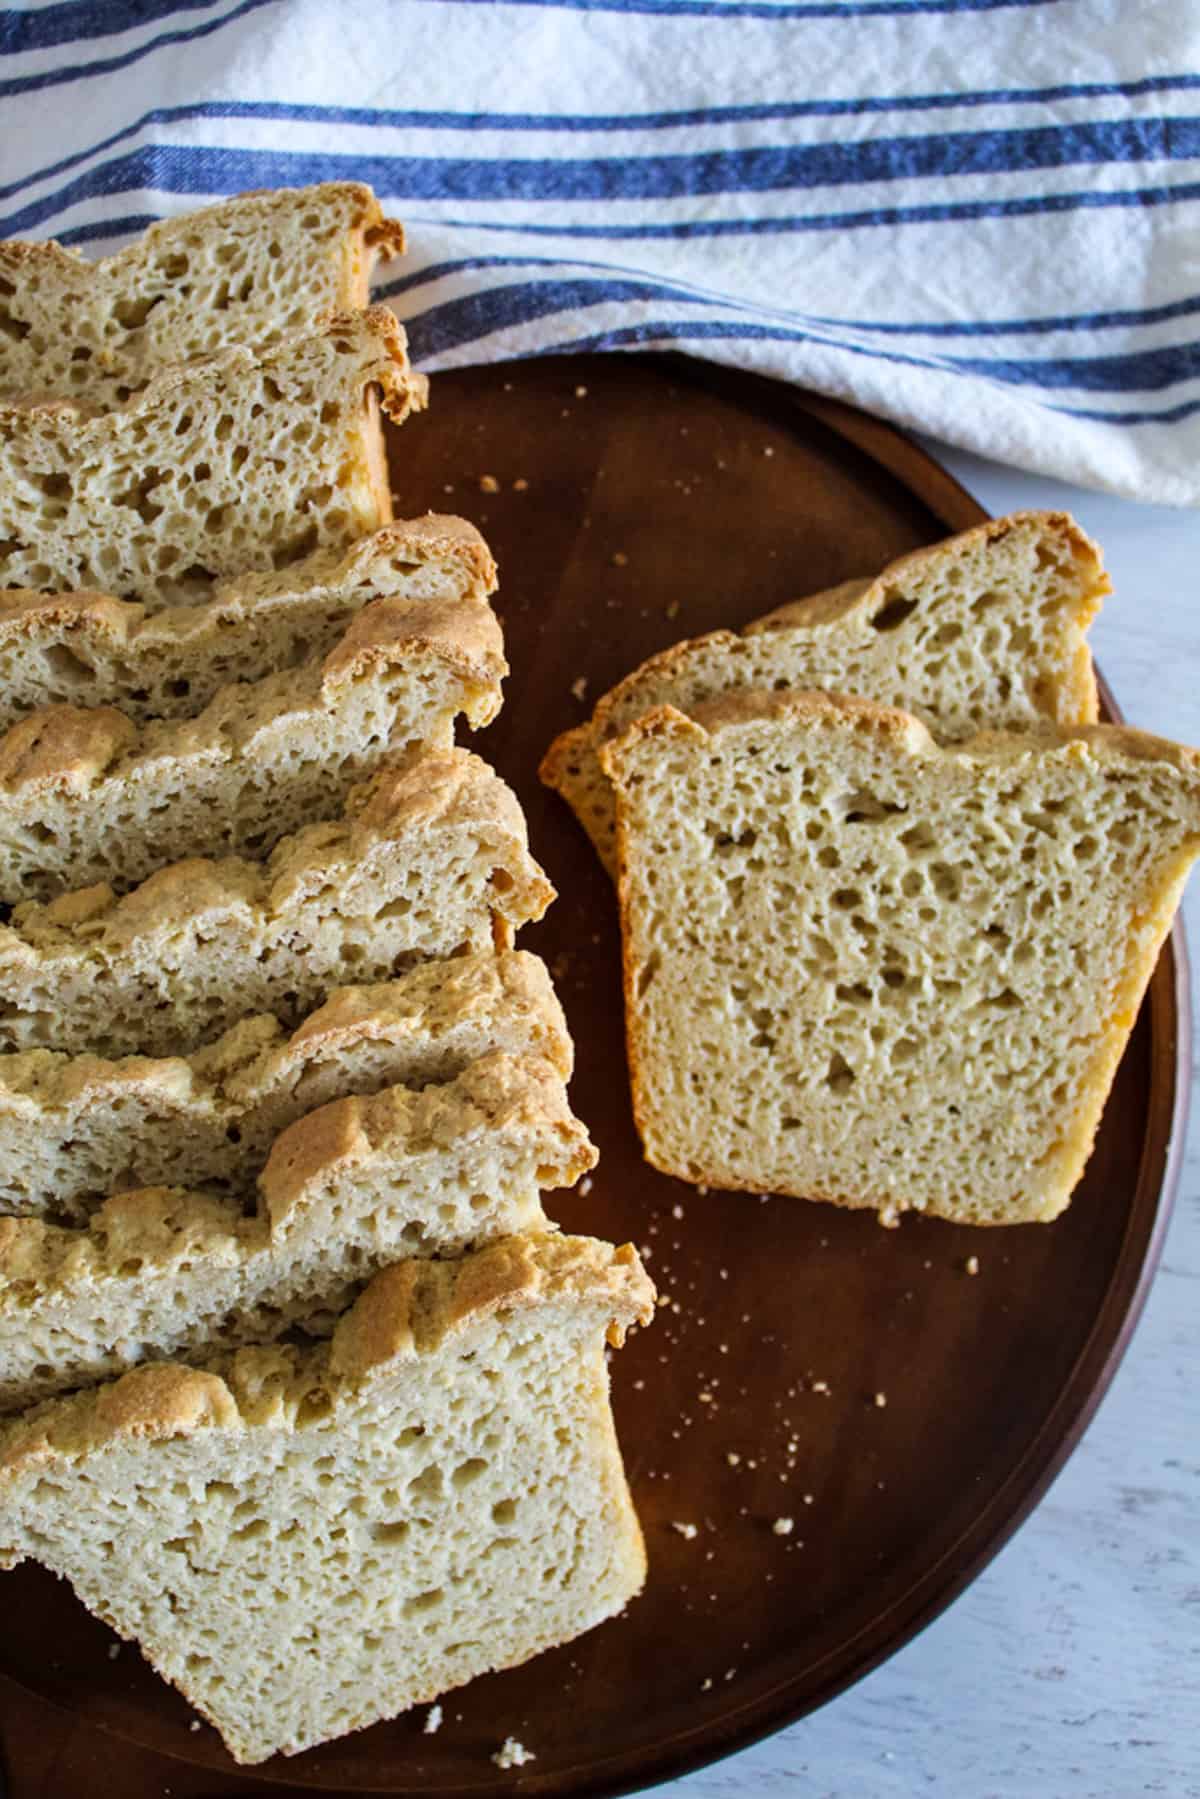
- Soft and tender with a light texture
- Golden brown with a slightly crusty exterior
- Easy to store
- Easy to slice
- Delicious in a sandwich
- Gluten-free, dairy-free, and refined sugar-free
- Made with just 9 ingredients
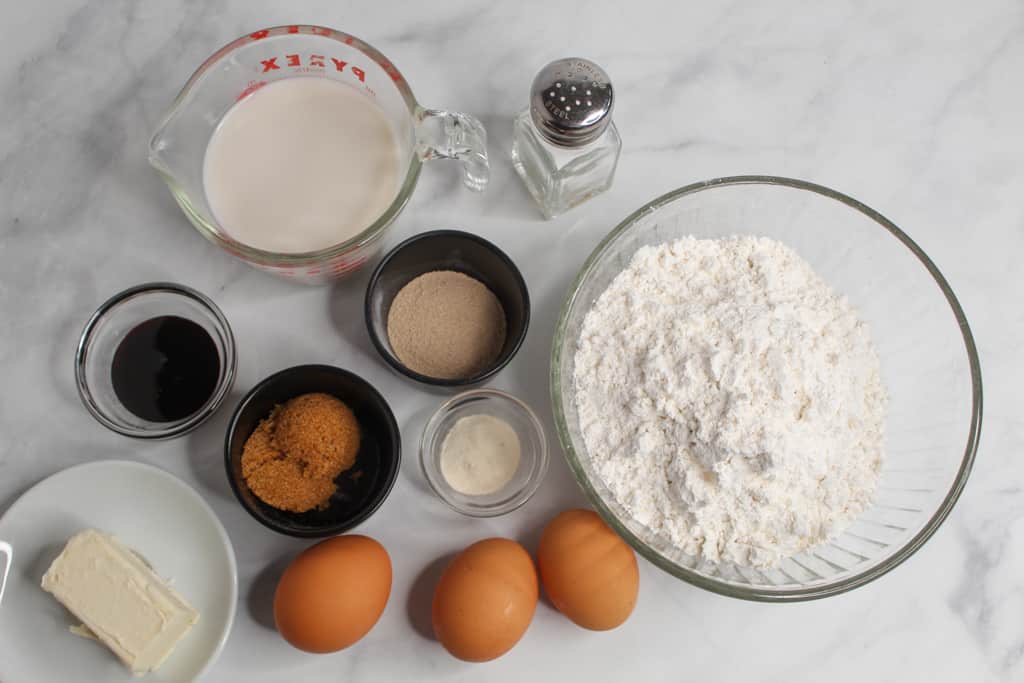
Ingredients at-a-Glance
I make this recipe with my homemade gluten-free flour blend, which uses whole, clean ingredients and works wonders with lots of my recipes, including this gluten-free banana bread. Using just these 9 ingredients, you’ll be able to make this gluten-free sandwich bread.
- Gluten-Free Flour Mix
- Brown Sugar
- Instant Yeast
- Salt
- Xanthan Gum
- Almond Milk
- Plant-Based Butter
- Molasses
- Eggs
Measurements for each ingredient, along with instructions for making this gluten-free sandwich bread, are in the printable recipe card below.
Printable Gluten-Free Sandwich Bread Recipe Card
Ingredients
- 3 cups gluten-free flour blend (420 grams)
- 2 tbsp brown sugar
- 2 tsp instant yeast
- 1 ¼ tsp salt
- 1 ½ tsp xanthan gum
- 1 cup almond milk
- 4 tbsp plant-based butter, softened
- 1 tbsp molasses
- 3 large eggs
Instructions
- Grease an 8” by 4½“ loaf pan with butter. Set aside.
- Place the flour blend, brown sugar, yeast, salt, and xanthan gum in the bowl of your stand mixer. Use the paddle attachment and mix on low speed until combined (about 30 seconds).
- Drizzle in the milk, beating on low speed; the mixture will be crumbly at first, but once all the milk is added, it’ll come together.
- Add the softened butter and beat until thoroughly blended.
- Add in the molasses. At this point, the batter will look thick, like a very thick waffle batter.
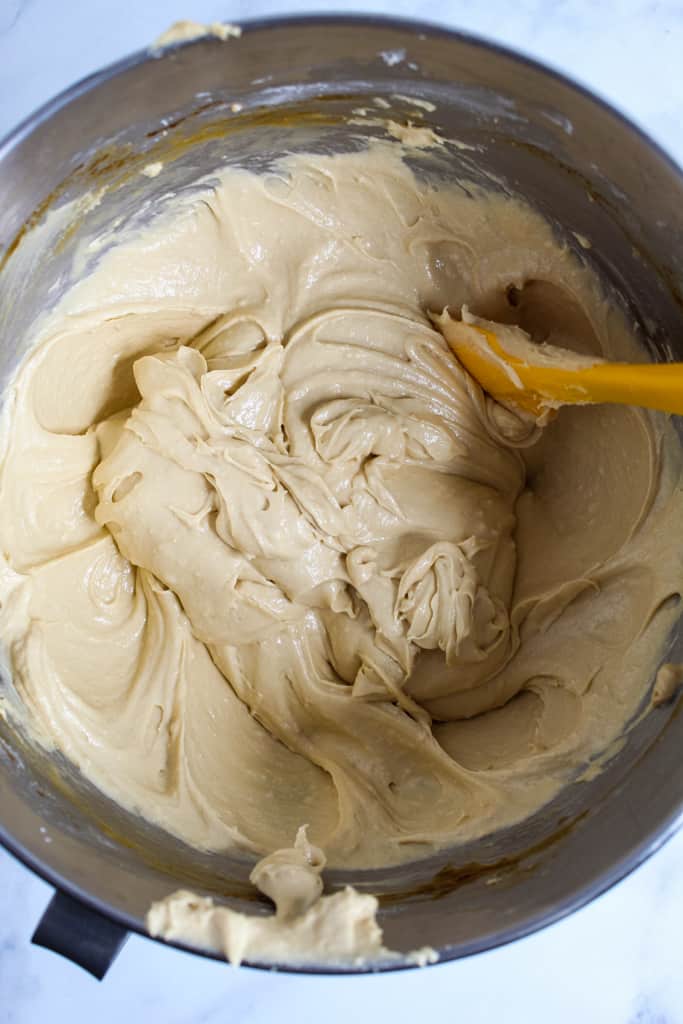
- Beat in the eggs one at a time, beating each in thoroughly before adding the next. Scrape the bottom and sides of the bowl as you add them. Mix it at low speed to incorporate them all, then beat at medium speed for 2 minutes. The batter will become very smooth and thick.
- Scrape the dough into the baking pan. Smooth the batter using a spatula. Set in a warm place to rise for 30 minutes to 1 hour. The loaf should barely crown above the rim of the 8″ x 4 1/2″ pan.
- When the bread is nearly risen, preheat the oven to 350°F.
- Bake the bread for 50 minutes, until golden brown. Check for doneness with a toothpick inserted into the center of the loaf.
- Remove the bread from the oven and let it cool in the pan on a wire rack for 5 minutes.
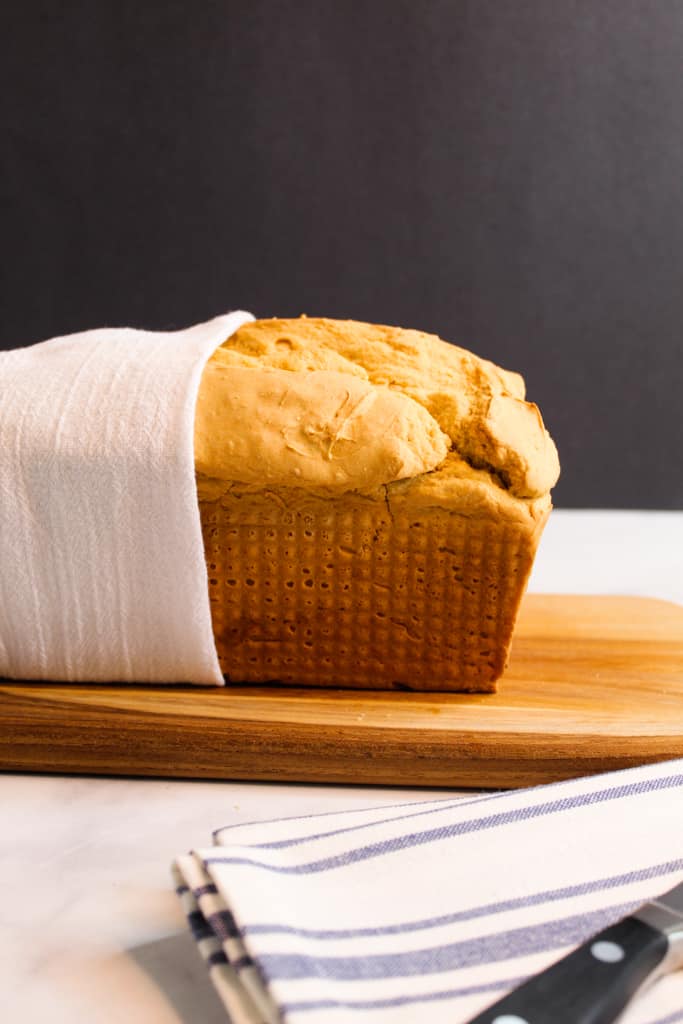
- Turn it out of the pan and lay it on its side to cool for 15 minutes. Flip to the other side and cool for an additional 15 minutes.
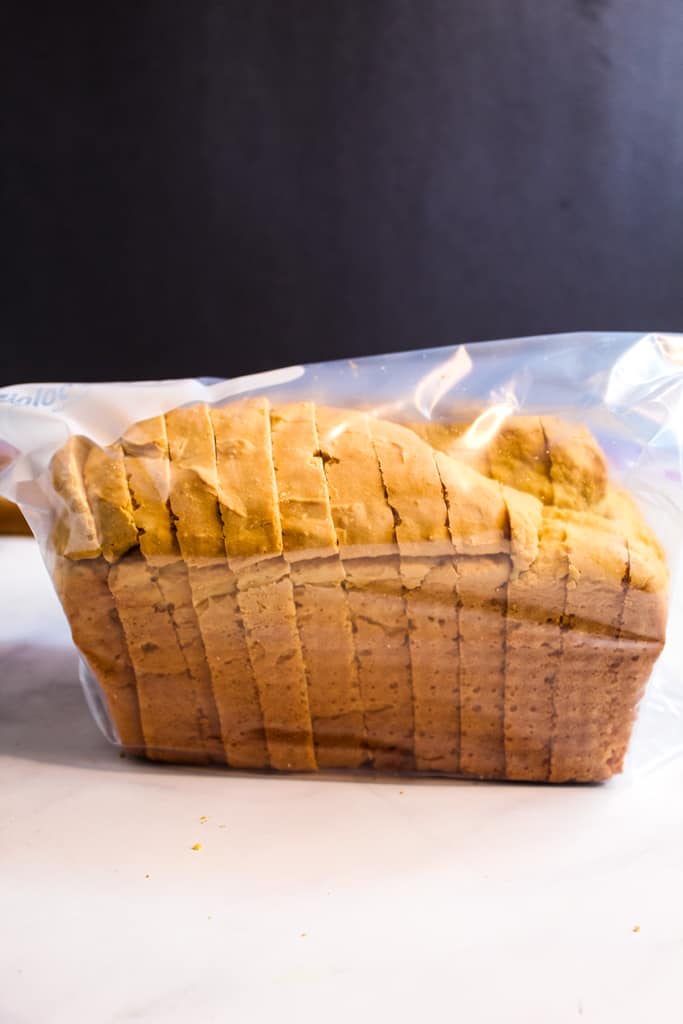
- Slice with a serrated knife when completely cooled.
Notes
- Mix the eggs one at a time into the batter, scraping down the bowl in between additions.
- Place the pan in a warm place to rise–putting it in the oven with the light on (no heat) is a great place. Rise time will vary between 30 and 60 minutes. Once the dough rises to the rim of the pan, it’s ready to bake.
- After baking, cool the bread in the pan for 5 minutes. Then remove it and allow it to cool using the ‘side cooling method’. 15 minutes on each side.
- Use a sharp, serrated knife to slice the bread into thin slices.
Nutrition
Step-by-Step Instructions
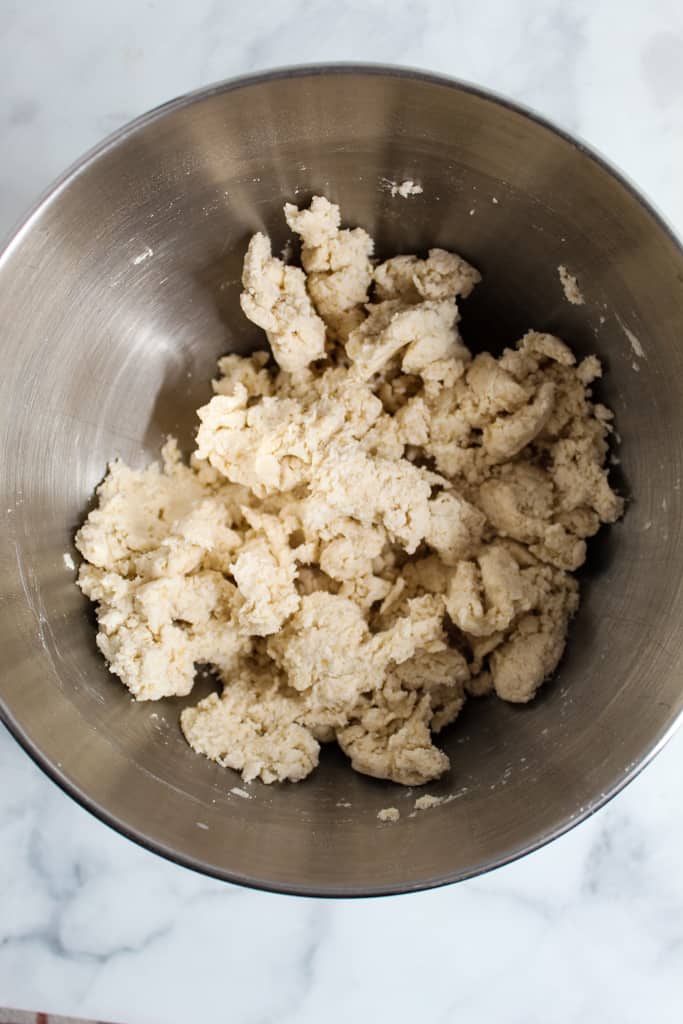
As you make this gluten-free loaf, you can compare your batter to the images below to help you know what to look for along the way.
Step 1
Grease an 8″x4.5″ loaf pan with butter and set it aside.
Step 2
In the bowl of a stand mixer fitted with the paddle attachment, combine 420 grams of flour blend, 2 tbsp brown sugar, 2 tsp instant yeast, 1 1/4 tsp salt, and 1 1/2 tsp xanthan gum. Mix on low speed for about 30 seconds to combine.
Step 3
Continue on low speed, drizzle in 1 cup of almond milk. The mixture will be crumbly at first until all the milk is added. Then it should come together.
Step 4
Add the 4 tbsp softened butter and beat until thoroughly blended.
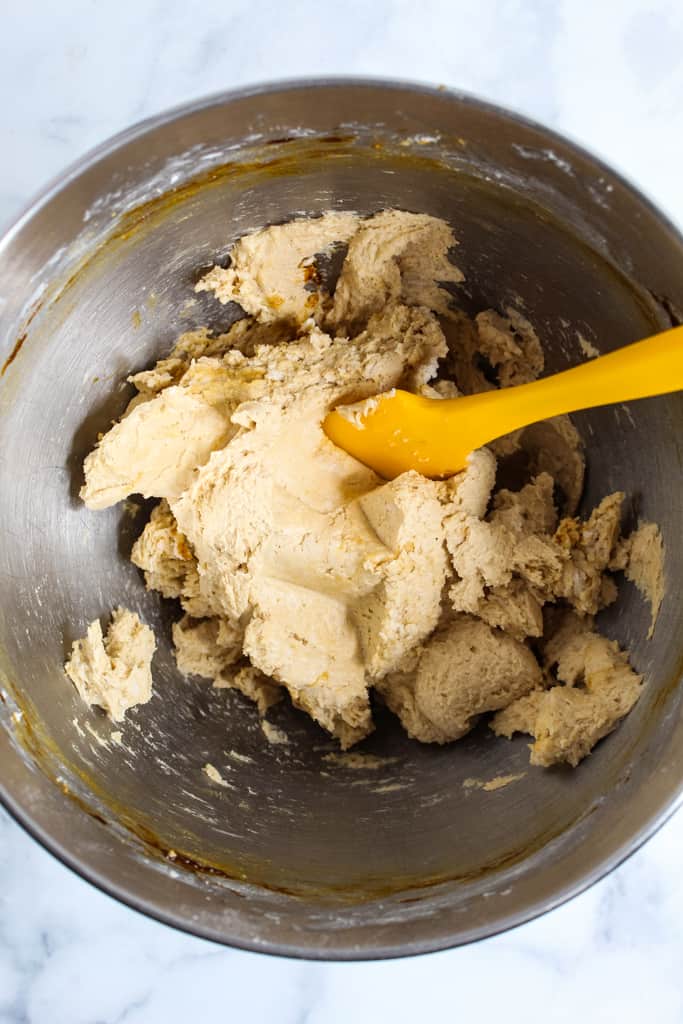
Step 5
Add in 1 tbsp of molasses. At this point, your batter should look very thick, like waffle batter.
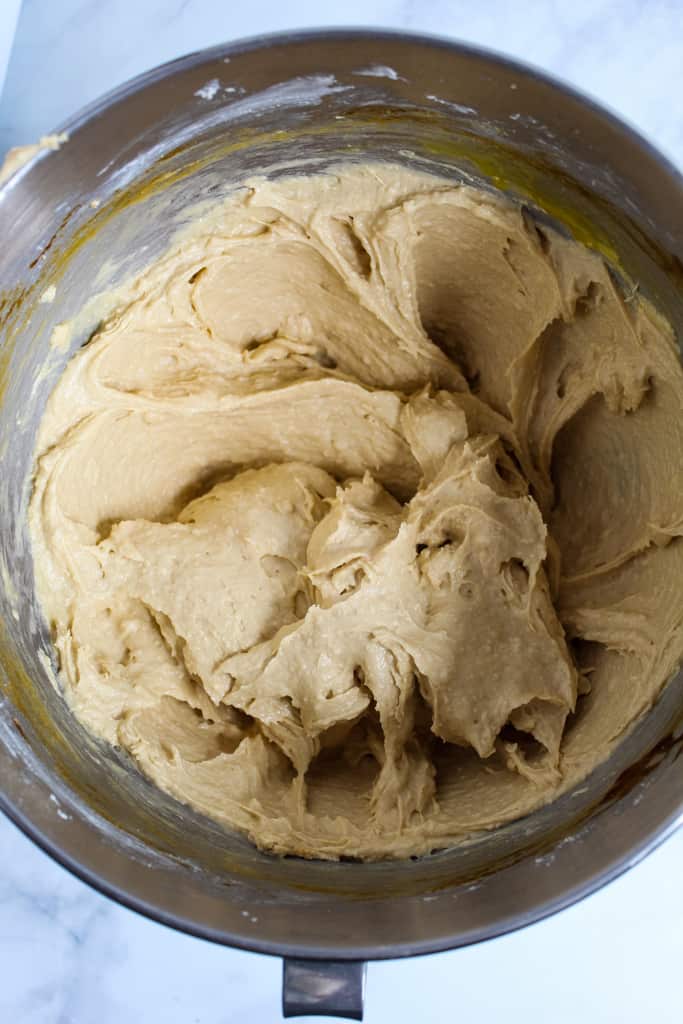
Step 6
Beat in the eggs, one at a time, making sure each one is incorporated before adding the next. Scrape down the bottom and sides of the bowl in between additions. Once all the eggs have been added, increase the speed to medium and let it mix for about 2 minutes. The batter will become very smooth and thick.
Step 7
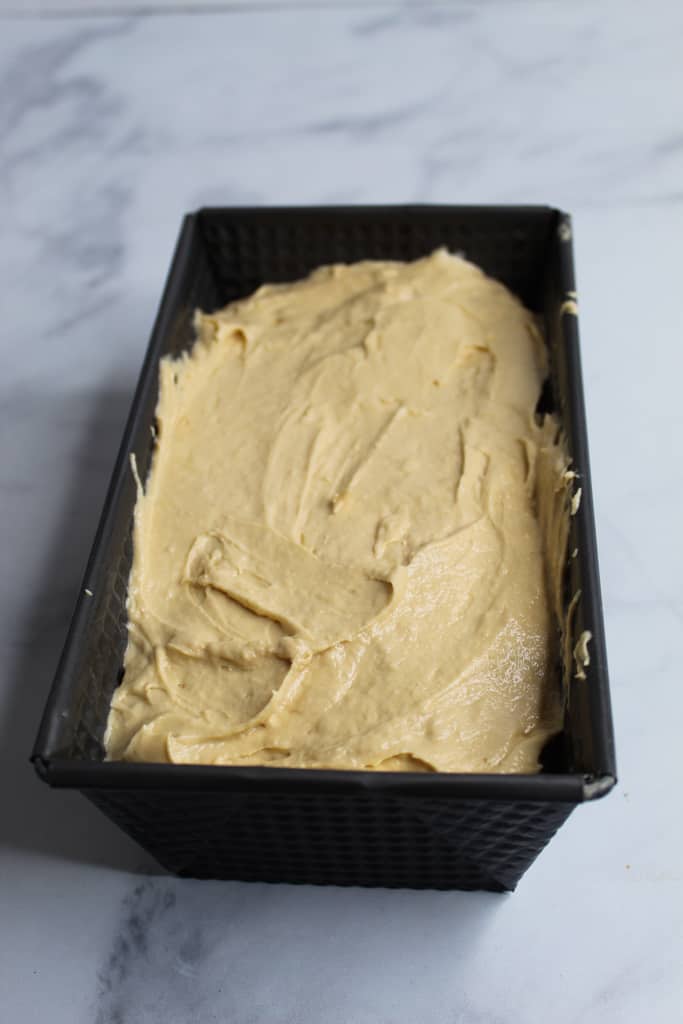
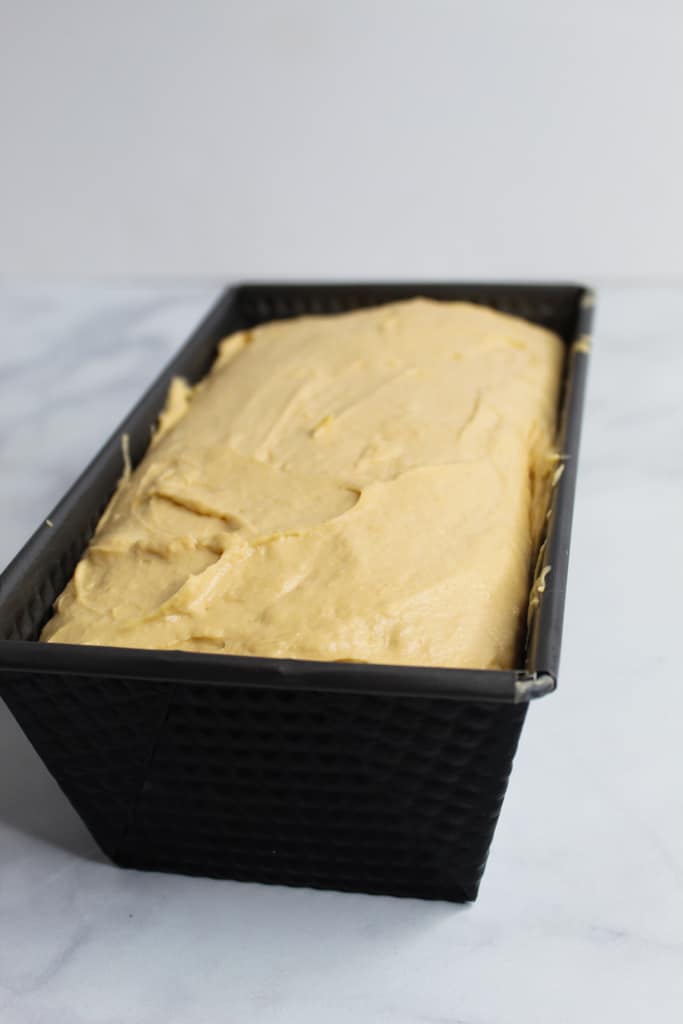
Scrape the dough into the loaf pan and level it out. Set it in a warm place to rise for 30-60 minutes, depending on how warm your house is. When ready, the loaf should just reach the rim of the baking pan.
Tip: Placing this loaf in the oven while it is off, with just the oven light on, creates a great environment for proofing the bread.
Step 8
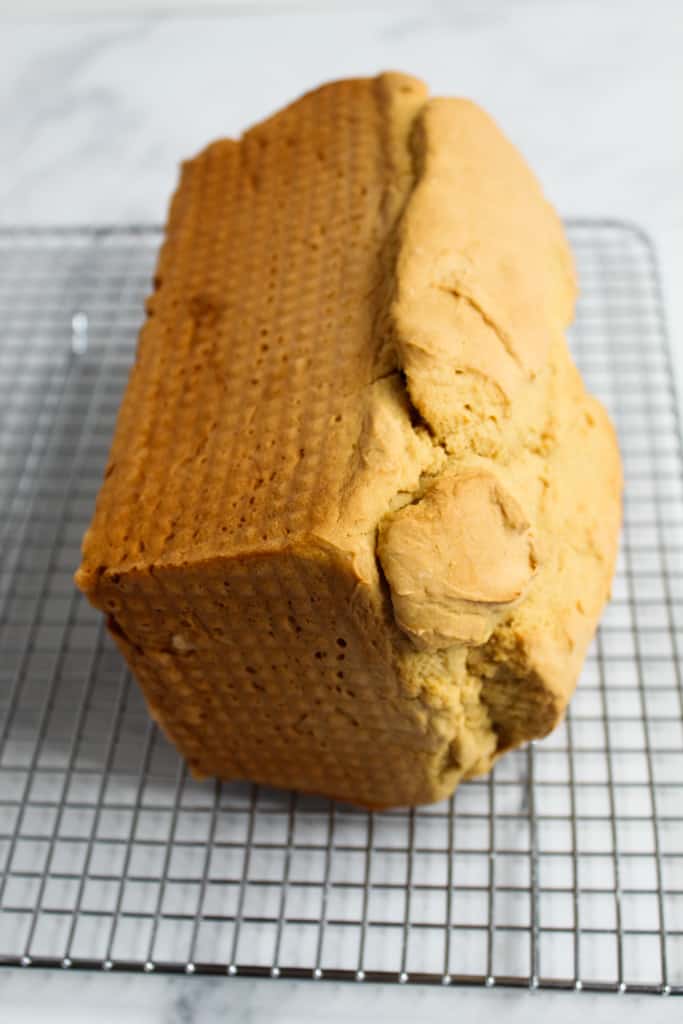
When the bread is nearly risen, preheat the oven to 350ºF. Bake the bread for 50 minutes, until golden brown, and a toothpick inserted into the center comes out clean.
Step 9
Remove the bread from the oven and allow it to cool for about 5 minutes. Then turn the bread out of the pan and lay it on its side to cool for about 15 minutes. Then flip it to cool on the other side for an additional 15 minutes. Slice with a serrated knife when it is completely cool.
Pro tip for cooling bread: Instead of placing it upright to finish cooling, turn it on its side and let it cool for 15 minutes. Then flip it over and let it cool for another 15 minutes.
As to why this works? This method seems to balance baked loaves and keep them nice and tall even as they cool, rather than sinking under their own weight when cooled upright.
Why This Recipe Works
What is the science behind gluten-free breads that makes them so different than wheat flour-based breads? In traditional baking, gluten does a lot of the heavy lifting. It forms a network that traps gas bubbles, released by yeast during baking. This creates light and airy loaves while also providing the elastic structure that allows the dough to stretch and rise while maintaining its shape.
With gluten-free recipes, trying to create a gluten structure is all part of the science of baking.
Creating “Gluten”
In gluten-free baking, a successful recipe doesn’t just swap flour; it rebuilds a structure from scratch to replicate what gluten does.
In this recipe, the flour blend and binding agent (xanthan gum) form the structure of this dough. Xanthan gum mimics gluten, and without it, your bread may rise initially but collapse later during baking.
Higher Hydration
If you’re new to gluten-free baking, the dough from this recipe may look wetter than traditional bread dough. Don’t worry, that’s to be expected. Gluten-free flours absorb liquid differently from wheat flour. They need more hydration to prevent dryness and give the loaf a soft crumb. Higher hydration keeps the loaf tender rather than dense.
Letting It Cool
Waiting for something to cool when it’s fresh and warm from the oven may be the hardest step of all. But as hard as it may seem, it’s also just as important. Gluten-free bread continues to set as it cools, and cutting into it too early can cause a gummy texture because the internal structure hasn’t had time to fully set.
Allow the loaf to cool completely so that you can have clean slices and perfectly textured sandwich bread.
Ingredient Substitutions
One of the most common questions with gluten-free baking is: “Can I swap this for that?” And my only answer to that is: sometimes. But baking is a science, and gluten-free baking is even less forgiving, so substitutions need to be thoughtful and accurate.
Here’s how to make some smart swaps in this recipe without sacrificing structure or texture.
Flour Blend
Not all gluten-free flour blends are created equal. Some are rice-based, some are more starch-heavy, and others already contain a binder like xanthan gum. I have only tested this recipe using this gluten-free flour mix, which works wonders in this and many other recipes on the blog. I love making a large batch of it so I always have this blend on hand when I want to bake.
If you’re switching flour blends, choose a 1:1 blend that is designed for yeast baking. Check whether it already contains xanthan gum. If it does, do not add extra. Too much xanthan gum can make baking goods very gummy. Also, avoid single-ingredient flours (like almond or coconut flour) as direct swaps, since they will behave completely differently. Gluten-free flour blends often combine flours and starches intended to replicate wheat-based flours.
Xanthan Gum
If you prefer not to use xanthan gum, you have some options, but keep in mind that they will slightly change the texture. Psyllium husk powder is the most effective alternative, as it mimics gluten’s elasticity much like xanthan gum.
For the closest texture to traditional sandwich bread, xanthan gum or psyllium are your best choices, but you can explore more substitutions here.
Sugar
Sugar is what feeds yeast and contributes to browning. You may substitute the brown sugar for honey, maple syrup, or coconut sugar. Coconut sugar is the best alternative, as using a liquid sweetener will change the liquid ratio in the loaf and can affect its final texture.
Troubleshooting Guide
Gluten-free bread can sometimes feel unpredictable, even with a solid recipe. Small variations in ingredients, humidity, or temperature can change the outcome. If your loaf didn’t turn out exactly as expected, don’t worry. Here’s how to diagnose and fix some of the most common issues.
The Bread Is Dense
This can happen if the bread isn’t rising enough, the yeast is inactive, or the dough is too thick. Gluten-free dough needs warmth and proper hydration to rise effectively. If your yeast is old or your milk was too cold, the yeast may not activate, preventing your bread from rising.
To fix this next time, make sure all of your ingredients are at room temperature before you begin. If you think your milk is too cold, use a thermometer and warm it up just slightly so it is around 100ºF-105ºF. Put your loaf pan somewhere warm to rise. Consider putting it in the oven with just the oven light turned on.
Finally, make this recipe using a kitchen scale. This is an easy way to ensure accurate ingredient measurements. Also, follow the pictures in the step-by-step instructions to understand which texture to look for with your batter. This gluten-free dough should be thick but not stiff.
The Bread Sank in the Middle
This is very frustrating when it happens, but it is often a result of over-proofing your dough, underbaking it, or baking it at too low a temperature.
To prevent this, bake the loaf when it has risen right to the rim of the pan. Preheat the oven at least 15 minutes before you plan to bake the bread, so the oven has plenty of time to properly heat up to the right temperature. You can also confirm the temperature of your oven with an oven thermometer for extra accuracy.
The Texture Is Gummy
If the texture is gummy, this is often a cooling issue as opposed to a baking issue. Cooling allows the interior of the bread to finish setting up its structure, resulting in the proper texture. Cutting into your bread too soon causes the bread to trap moisture inside, which gives it that wet, gummy, and underbaked texture.
Allowing the bread to cool completely is the best solution to this issue. As well, use a serrated knife to slice your bread to get nice, even slices.
Gluten-Free Bread FAQs
These are some of the most common concerns home bakers have when making gluten-free sandwich bread. For any questions or concerns that aren’t answered here, leave a comment below.
Can I Make This In a Bread Machine?
I love bread machines, but I don’t make this recipe in one because I know not everyone has one, and I like to adapt my recipes so they are accessible to most people. Gluten-free bread does not require kneading cycles designed for gluten development.
So, you can try this in your bread machine, but I would only suggest doing that if your machine has a gluten-free setting. That usually means it will only do a single rise with no kneading cycles. If you end up trying it, let me know how it works out for you. But this loaf bakes off wonderfully and just as easily with a short proof at room temperature and then into the oven.
How Should I Store Gluten-Free Sandwich Bread?
Becausethis bread lacks preservatives, homemade gluten-free bread dries out faster than store-bought versions. To store it, your best option is at room temperature in an airtight container for up to 2 days.
Or if you don’t plan on eating it within 2 days, freeze it! Let it cool completely, then slice and freeze for up to 2 months. That way, you can take out slices as needed and toast them directly from frozen. Avoid refrigerating the loaf, as it will dry out even faster.
Tip: Placing a piece of parchment paper between each slice can prevent them from sticking together in the freezer, making removal easier.
Can I Use a Different Flour Blend?
My go-to flour blend for my recipes is this gluten-free flour mix. It’s a great blend to make it bulk so you always have some on hand for recipes like this sandwich bread and even these biscuits. I haven’t tested other flour blends in the recipe, so I can’t say for certain what the resulting loaf will be like.
What Equipment Do I Need To Make This Recipe?
While it doesn’t require much in terms of tools and equipment, a stand mixer comes in really handy for making this bread. It makes the mixing process easier since you’re adding ingredients a little at a time. These bread pans are my go-to pans for baking all my gluten-free breads. A rubber spatula is also a must-have tool for scraping the batter into the pan. And a high-quality, serrated knife for slicing is also essential.
Success with Gluten-Free Baking
When you pull a loaf from the oven that turns out soft, golden, and exactly the way you hoped, it’s extremely satisfying, especially when it’s gluten-free. That’s the type of satisfaction you can expect from this recipe. This recipe is meant to give you consistency.
Once you understand why each step matters, you gain the confidence to bake it again and again. And maybe even start experimenting with your own variations.
Imagine opening your freezer and pulling out slices of homemade bread ready for toast in the morning, or packing sandwiches that actually hold together. And all of this without the additives found in store-bought bread. So you can serve a loaf that you’re proud of.
If you try this recipe, I’d truly love to hear how it turns out for you. Did you make any substitutions? Did you bake it in a bread machine? Did your family even notice that it was gluten-free? Leave a comment and share your experience. And be sure to save this recipe for later, because once you realize you can bake soft, dependable gluten-free sandwich bread in your own kitchen, you’ll want to share this recipe with everyone you know.
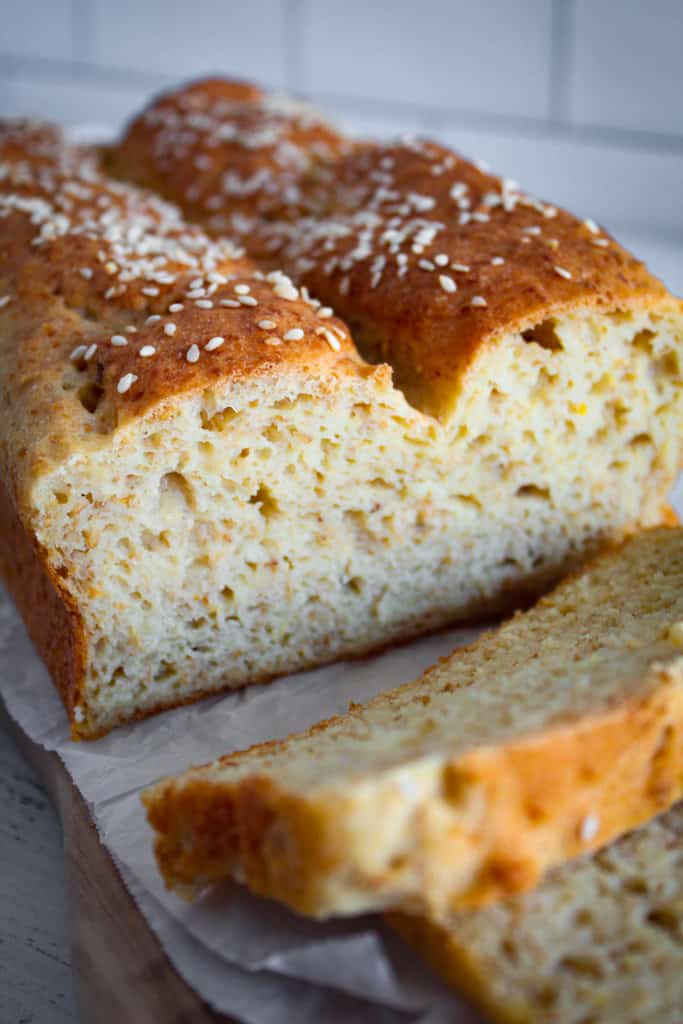
More Gluten-Free Bread Baking
Want more gluten-free bread recipes? Check out these next!
- Gluten-Free Artisan Bread
- Easy Gluten-Free Belgian Waffles
- Gluten-Free Pumpernickel Bread
- Gluten-Free Potato Bread
- Gluten-Free Apple Muffins
- Gluten-Free Chocolate Biscuits
From rustic artisan loaves to sweet breakfast bakes, these gluten-free recipes are a great place to continue your baking adventure.
Share Your Gluten-Free Baking Journey
If this recipe made gluten-free baking feel easier, be sure to drop a comment below and share your thoughts alongside other bakers!