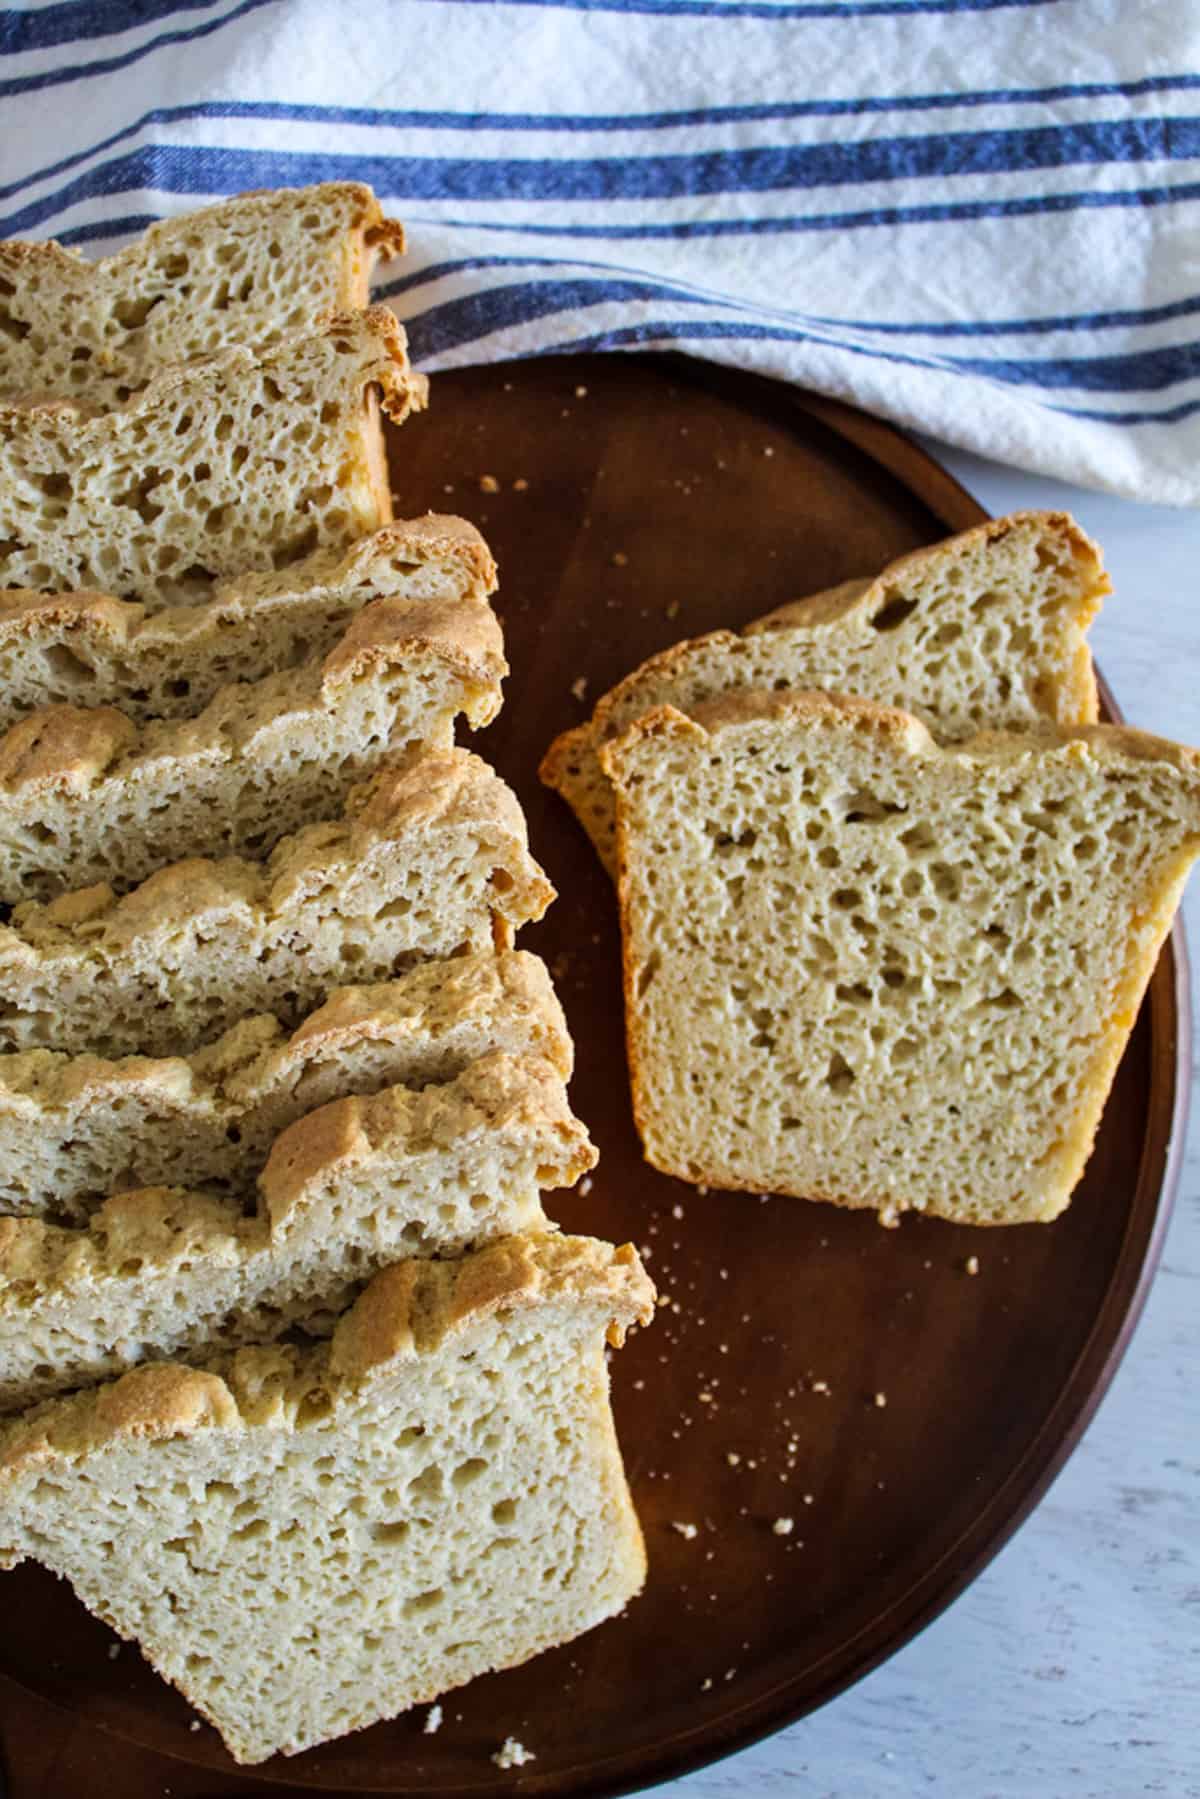
These hearty, fluffy oatmeal rolls are my go-to when I’m having company over and need dinner rolls everyone can enjoy, especially when a few guests can’t have gluten or dairy.
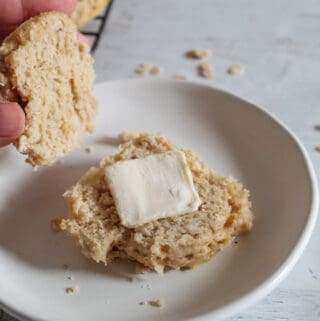
The recipe makes 12 soft, cozy rolls that pair beautifully with soup, stew, holiday dinners, or a simple weeknight meal. They’re also delicious on their own with a little butter. And yes, if I’m keeping things dairy-free, I might sneak on some vegan butter instead. Just don’t tell my nieces and nephews, who already love these rolls exactly as they are.
Table of Contents

Made with oats and oat flour, these rolls have a wholesome, slightly rustic flavor without feeling heavy. Just be sure to use certified gluten-free oats, and you’ll have a warm, crowd-pleasing roll that’s easy to serve with just about anything.
Why Is This Recipe The Best?
This is a recipe you’ll want to keep on hand and use for every occasion that calls for good allergy-friendly rolls. From dinner parties to holiday meals to a typical Tuesday night dinner, these oatmeal rolls will surely complement the meal. Here are a few more things you’ll love about these hearty oatmeal rolls:
- They are gluten- and dairy-free, so these rolls are perfect to take to gatherings, as most people will be able to enjoy them.
- You can pair them with a variety of foods or eat them with your favorite toppings as a warm, buttery snack.
- They take only a little over an hour to make, and you can be cooking other parts of a meal while you wait for the dough to rise.
- This recipe yields 12 hearty oatmeal rolls, perfect for a large family or for a smaller family to enjoy seconds.
Recipe Testing Notes
This recipe was tested with active dry yeast, certified gluten-free rolled oats, oat flour, and a gluten-free flour blend without xanthan gum. The rolls rose best when the dough increased by about 50%, not doubled. Baking to 205–210°F helped prevent the gummy center that can happen with gluten-free yeast breads.
Equipment for These Oatmeal Rolls
If you do a lot of gluten-free baking, you probably already have most of these in your kitchen. They really are handy to have around.
- Digital scale
- Stand mixer
- Mixing bowl
- Liquid measuring cup
- Food thermometer
- Rubber spatula
- 9×13 baking pan
- Flat metal spatula
- Cooling rack
- Clean kitchen towel (It shouldn’t be one of those decorative ones, even if that cat print is cute. The same one you normally use for drying dishes should work.)
No Stand Mixer Option
A stand mixer makes this dough easier to mix, but you may still be able to make these rolls without one.
Use a sturdy spoon, dough whisk, or hand mixer with dough hooks to combine the ingredients until the dough is thick, sticky, and fully hydrated. Since gluten-free dough does not need kneading the same way wheat dough does, the goal is simply to mix everything evenly.
If using a hand mixer, start on low speed so the dry ingredients do not fly out of the bowl. If mixing by hand, scrape the sides and bottom of the bowl well to make sure there are no dry pockets of flour.
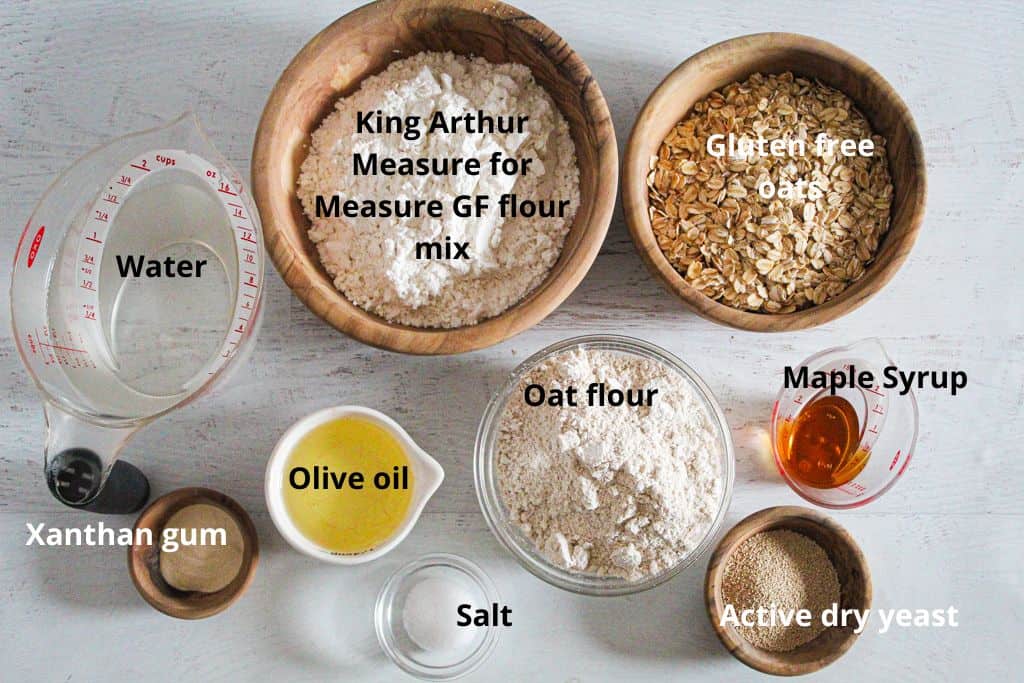
Ingredients for Oatmeal Rolls
- Active Dry Yeast
- Water
- Olive Oil
- Maple Syrup
- Old-Fashioned Rolled Oats
- Oat Flour
- Gluten-Free Flour Mix
- Salt
- Xanthan Gum
Key Ingredient Roles
You might not have thought about adding a couple of these ingredients, like maple syrup, to homemade rolls before. I actually think it’s what makes these rolls interesting! Here’s what each of these ingredients brings to this recipe.
Active Dry Yeast
3 teaspoons active dry yeast
When I need some serious leavening power, I like to use yeast. It’s a biological leavening agent that ferments sugar to produce carbon dioxide bubbles and give your rolls a nice fluffy texture.
Water
1 1/2 cups warm water
Yeast normally needs to be suspended in a warm liquid to activate. In this case, water warmed to about 80 degrees Fahrenheit does the job.
The number one thing to remember about yeast is that it is finicky about the water temperature. If the water is too cold, the yeast won’t activate. If it’s too hot, it will kill the yeast. For this reason, I will check the water temperature with a food thermometer before adding the yeast every time.
Olive Oil
1/4 cup olive oil
Baked goods like these rolls need fat to enhance flavor, add moisture, and tenderize them as they bake. Fat also helps trap air in the rolls, keeping them light and fluffy. The good news is that most of the fat in olive oil is heart-healthy monounsaturated fat.
Maple Syrup
1 tablespoon maple syrup
I will admit that I am super picky about maple syrup! I want genuine maple syrup instead of imitations like “pancake syrup” and “breakfast syrup.” One good rule of thumb is that, if it sort of “tastes like” the Aunt Jemima brand, it’s probably fake.
Genuine maple syrup has a more complex sweet flavor with notes of caramel, toffee, and vanilla. The complex tasting notes are more noticeable in darker maple syrup. I like to use the darkest I can get in baking because it has the most distinct flavor.
As you might have guessed, the complex flavor is the main reason I use maple syrup instead of sugar in these rolls. Yes, it did require adjusting the amounts of other liquid ingredients in these rolls to avoid getting them too gummy. However, it’s totally worth it!
Old-Fashioned Oats
1/4 cup old-fashioned oats
You’ll likely also see old-fashioned oats labeled “rolled oats” when you’re hunting for them in the baking aisle at the local grocery store. It’s pretty much the same thing. These oats are ideal for baking because they absorb more moisture and cook faster than steel-cut oats.
When going through the baking aisle, look for ingredients like oats and flour that are certified gluten-free. This means they weren’t processed in a space where they could have gotten cross-contaminated with other products that include gluten.
Oat Flour
112 grams (about 1 1/4 cups oat flour)
Oat flour adds to the “oat” theme of these rolls with a slight nutty flavor. The thing to remember about using oat flour is that it can make these rolls dense if you add too much, since it’s denser than some flours per cup. That’s why it’s important to measure flour precisely in gluten-free baking.
You can make your own oat flour if you don’t have any on hand. Throw some old-fashioned oats into a food processor and grind them until they are a fine powder. Store any extra oat flour in an airtight container.
Gluten-Free Flour Mix
195 grams (about 1 1/2 cups) gluten-free flour mix
I like to use this gluten-free flour mix for two reasons. First, it gives me the right balance of flours and starches for this recipe. It’s a blend of white rice flour, brown rice flour, cornstarch, tapioca, and potato flour.
Second, it omits xanthan gum, which lets me add it separately or use a substitute for xanthan gum if I want. (More on substitutes later.)
Salt
1 teaspoon salt
Salt supports many of the chemical reactions that give these rolls their flavor. It can also control the yeast’s leavening action, which helps keep the rolls from fluffing up too much and then collapsing in the oven.
Xanthan Gum
1 teaspoon xanthan gum
Xanthan gum improves moisture retention, texture, and stability in gluten-free baked goods like these rolls. Make sure you level out the xanthan gum when measuring it, because it can be hard on sensitive digestive systems if you use too much.
Printable Gluten-Free Oatmeal Rolls Recipe Card
Ingredients
- 3 teaspoons active dry yeast
- 1 1/2 cups water 80F
- 1/4 cup olive oil
- 1 Tablespoon maple syrup
- 112 grams gluten-free oats about 1 1/4 cups
- 120 grams oat flour about 1 cup
- 195 grams gluten-free flour mix about 1 1/2 cups
- 1 teaspoon salt
- 1 teaspoon xanthan gum
Instructions
- Mix the yeast with the water. Set aside to proof for 5 minutes.
- In the bowl of a stand mixer fitted with a paddle attachment, mix the oats, oat flour, gluten-free flour mix, salt, and xanthan gum for 30 seconds.
- Stir the olive oil and maple syrup into the water-yeast mixture.
- Add the water-yeast mixture to the dry ingredients in the stand mixer's bowl. Mix on low speed for 15 seconds.
- Stop the mixer and scrape down the bowl. Turn the mixer to medium speed and mix the dough for 2 minutes.
- Spray a 9" x 13" baking pan with cooking spray.
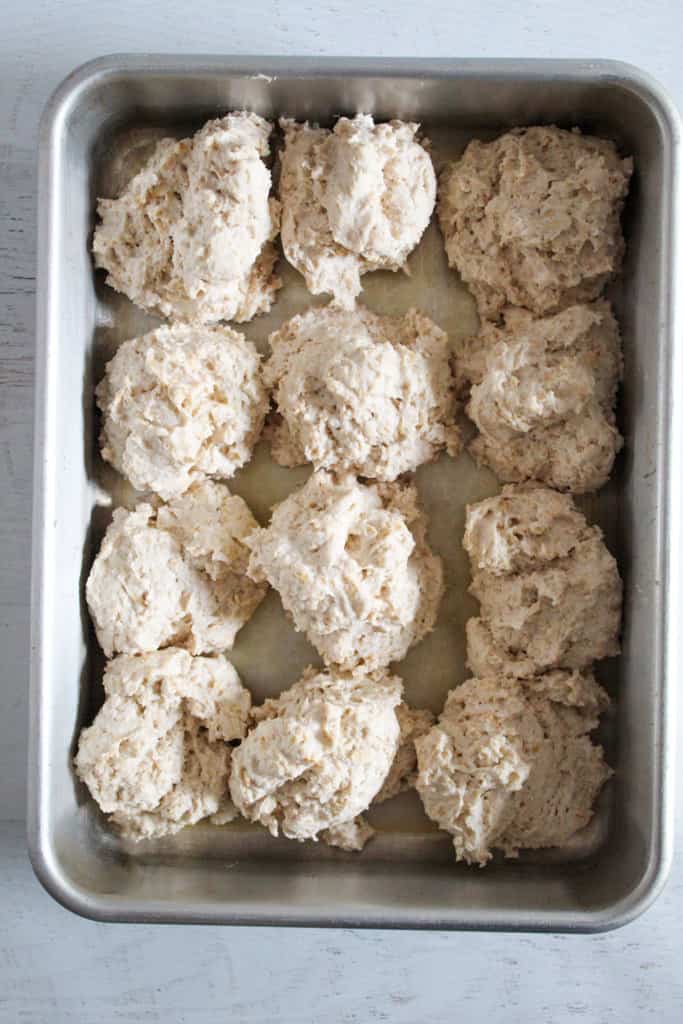
- Scoop 2/3-3/4 cup portions of dough into the pan, making 3 rows on the short side and 4 on the longer side.
- Cover the pan with a towel and let rise for 30-35 minutes or until the rolls have risen by at least half.
- Preheat the oven to 400 degrees Fahrenheit (204 degrees Celsius).
- Bake rolls for 20-25 minutes or until an instant-read thermometer registers 205-210F.
- Serve warm.
Notes
- The recipe was tested with active dry yeast, which is not the same as instant or fast-rising yeast.
- The olive oil may be substituted with vegetable oil or melted coconut oil.
- Make sure to use pure maple syrup, not maple-flavored syrup.
- Make sure your oats are certified gluten-free oats like Bob’s Red Mill or Nuts.com.
- The recipe was tested with this brand of oat flour.
- This gluten-free flour mix is recommended. Other mixes may work, but they have not been tested.
- Rolls should not double in size. They will rise to about one and a half times their original size.
- Rolls are best served the same day. They can be kept at room temperature for up to 2 days in a sealed plastic bag. To serve, warm them, covered with foil, in a 250F oven for 10 minutes.
Nutrition
Did you make and love this recipe? Give it your review and rating below! And make sure to follow me on Instagram, Pinterest, and Facebook , too!
Method for Making Gluten-Free Oatmeal Rolls
Let’s get started with making these gluten-free oatmeal rolls.
Step One: Activate Yeast
Mix the yeast with the warm water. Set aside to activate for five minutes.
Step Two: Mix Dry Ingredients
While waiting for the yeast to activate, whisk the oats, oat flour, gluten-free flour mix, salt, and xanthan gum together in the bowl of a stand mixer.
Step Three: Mix Maple Syrup and Olive Oil Into Yeast Mixture
Stir the maple syrup and olive oil into the yeast mixture.
Step Four: Add Liquid Mixture to Dry Ingredients
Pour the water-yeast mixture into the stand mixer’s bowl. Stir with the stand mixer attachment on low speed for 15 seconds. Scrape the bowl down with a rubber spatula.
Step Five: Finish Mixing Ingredients
Stir the batter with the stand mixer attachment on medium speed for about 2 minutes.

Step Six: Prepare Pan
Spray a 9X13 pan with cooking spray.
Step Seven: Form Rolls and Add to Pan
Scoop 2/3-3/4 cups of batter into a 9×13 pan. Make sure it’s roughly round, though it does not have to be perfectly spherical. (Basically, don’t overhandle it with your hands, or it can get dried out or stick to your hands.) Repeat the process until you have 12 rolls in neat rows in the pan. It should look like four rows of three rolls each.
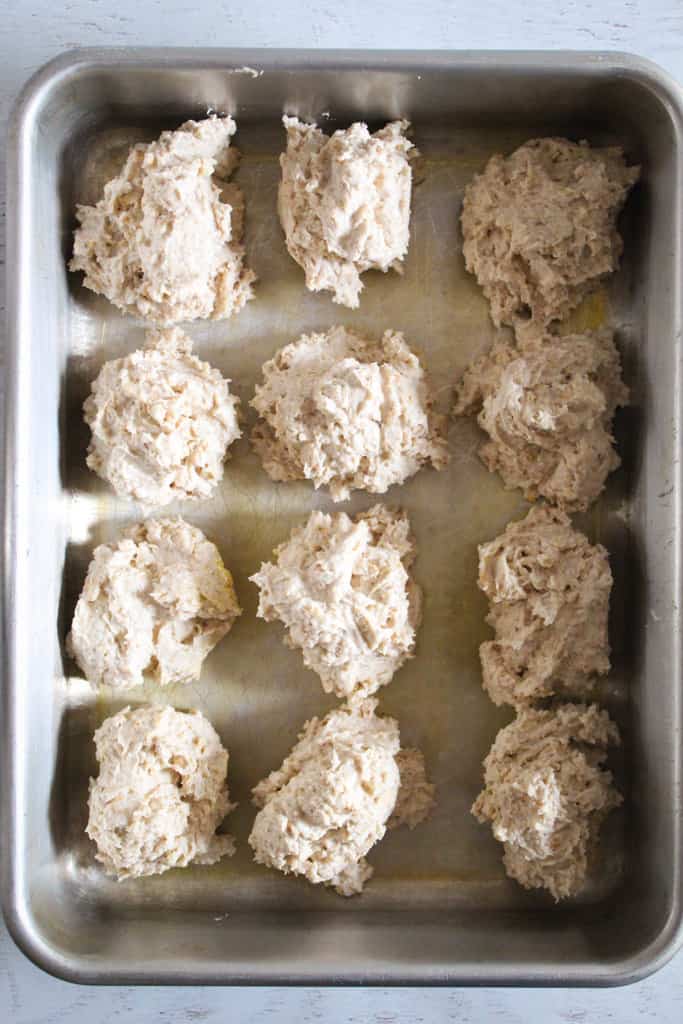
Step Eight: Let Rolls Rise
Cover the rolls with the clean towel. Allow them to rise for 30-35 minutes until they have increased in volume by about 50%.
Step Nine: Preheat Oven
While the rolls are rising, preheat the oven to 400 degrees Fahrenheit (204 degrees Celsius).
Step Ten: Bake Rolls
Place the pan with the rolls in the oven. Bake the rolls for 20-25 minutes until an internal thermometer reads 205-210 degrees Fahrenheit when inserted into the center of a roll.
Even for baked goods, I like to use the internal thermometer to make sure they’re done. Seems to me like I’ve gotten fewer gummy gluten-free baked items since I started using one to check. (Yes, it is even more handy for big bread loaves!)
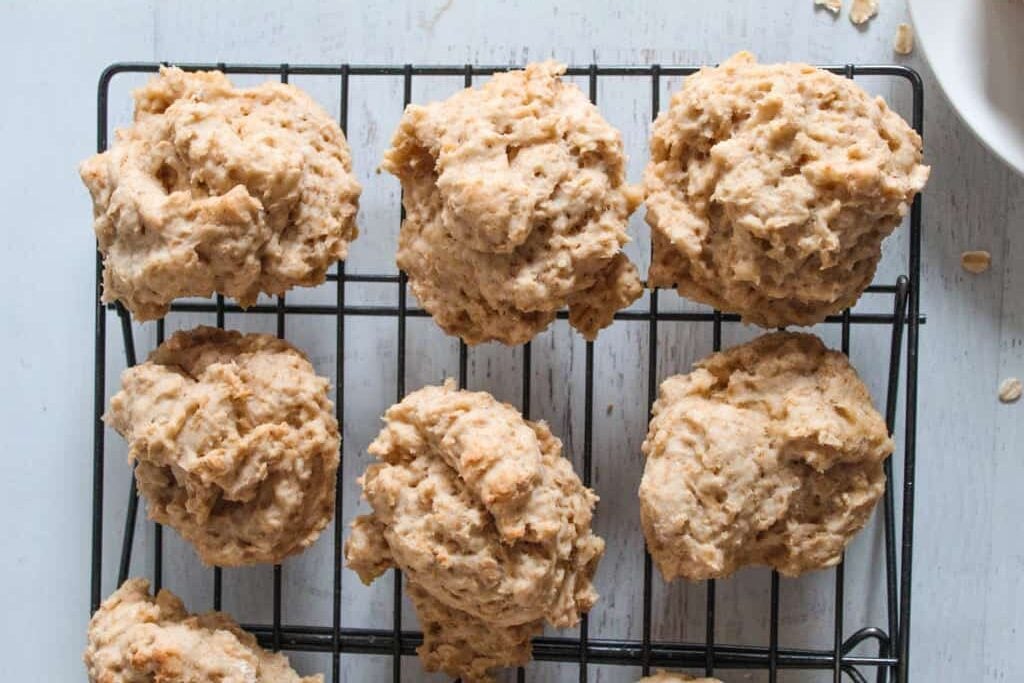
Step Ten: Transfer Rolls to Cooling Rack
These rolls don’t need a long cooling time, but I still like to transfer them to the cooling rack with a flat metal spatula and let them cool until they won’t burn my fingers when I pick them up. This is also handy when I’ve doubled the recipe and intend to use the baking pan again.
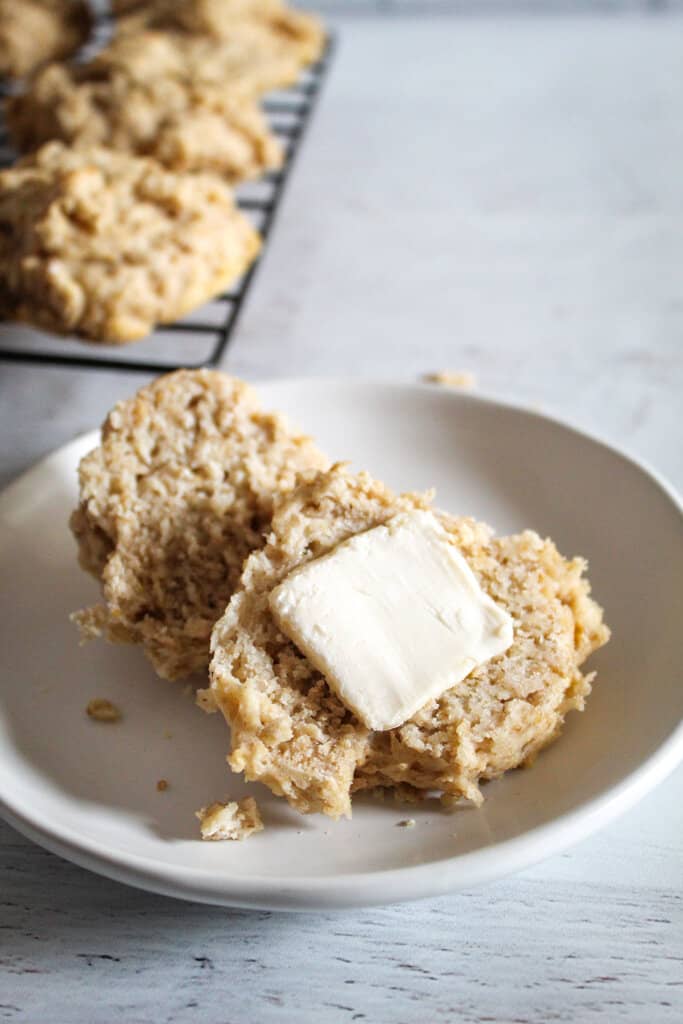
Step Twelve: Serve Warm with Favorite Toppings or Your Favorite Meal
These oatmeal rolls go well with butter and jelly. I also like to serve them with my favorite soups and stews on a cold day.
5 Tips for Soft Gluten-Free Oatmeal Rolls
Gluten-free rolls need a slightly different approach than traditional wheat rolls. These tips will help you get the best texture.
- Measure flour by grams. Gluten-free flours can pack differently in measuring cups, which may lead to dry or dense rolls. Measuring by weight gives you the most consistent results.
- Do not expect the dough to feel like wheat dough. Gluten-free roll dough is usually softer, stickier, and more like a thick batter than traditional bread dough. That is normal.
- Let the rolls rise until they are about 50% larger. They do not need to double in size. Over-proofing can make gluten-free rolls fragile or cause them to sink after baking.
- Use an instant-read thermometer. For the best texture, bake the rolls until the centers reach about 205–210°F.
- Serve warm for the best texture. Like many gluten-free breads, these oatmeal rolls are softest and most enjoyable when served warm.
Troubleshooting Gluten-Free Oatmeal Rolls
Gluten-free yeast dough behaves differently from traditional wheat dough, so don’t worry if the dough looks softer, stickier, or less elastic than regular bread dough. Use this guide to fix the most common issues with gluten-free oatmeal rolls.
| Problem | Likely Cause | Fix |
|---|---|---|
| Rolls are gummy inside | The rolls were underbaked, the dough had too much liquid, or the centers did not fully set before removing them from the oven. | Bake until the internal temperature reaches 205–210°F. Let the rolls cool slightly before pulling them apart so the structure can finish setting. |
| Rolls did not rise | The yeast may have been inactive, expired, or added to water that was too hot or too cold. | Use fresh yeast and check that the water is warm, not hot. The yeast mixture should look foamy before you add it to the dry ingredients. |
| Rolls are dense | Too much oat flour or gluten-free flour may have been added, or the dough did not rise long enough. | Measure the flour by grams for best accuracy. Let the rolls rise for 30–35 minutes, or until they look noticeably puffier. |
| Dough is sticky | This is normal for gluten-free roll dough. It will not feel like traditional wheat dough and should not be kneaded by hand. | Use a scoop or lightly greased hands to portion the dough into the pan instead of trying to knead or shape it like regular bread dough. |
| Rolls are dry | The rolls may have been overbaked or stored uncovered after cooling. | Rewarm the rolls covered with foil to help soften them. Store leftovers in an airtight container once completely cooled. |
Substitutes for Gluten-Free Oatmeal Rolls
One question I seem to get a lot is: Can I replace xanthan gum in gluten-free baking? I get it! Xanthan gum is a common additive in gluten-free baking, but some people’s digestive systems react poorly to it. That can defeat the purpose of replacing the gluten in the first place!
Psyllium husk powder is the best substitute for xanthan gum. Actual scientific experiments indicate that it’s quite good at retaining moisture and helping baked goods rise a little higher – basically everything that xanthan gum can do.
Looking for more xanthan gum replacements? Be sure to visit our handy guide to replacing xanthan gum to learn more.
The salt can be cut in half if you’re on a low-salt diet.
Honey can replace maple syrup at a 1:1 ratio. You may have to adjust the amounts of other liquids and keep a close eye on baking time to prevent over-browning if you use honey. The “sweet” parts of the flavor profile may also be a little different, since honey tends to have more floral notes.
Coconut oil makes a good substitute for olive oil. You can also use butter if you don’t mind that the rolls won’t be dairy-free.
Storing Gluten-Free Oatmeal Rolls
Although I often expect these rolls to disappear on the same day they are baked, they can be stored in a sealed plastic bag or an airtight container at room temperature for up to two days. To serve warm later, cover the rolls with foil and warm them in the oven at 250 F for 10 minutes.
Make-Ahead and Freezing Tips for Gluten-Free Oatmeal Rolls
These gluten-free oatmeal rolls are best served warm the day they are baked, but you can still make them ahead or freeze leftovers with good results.
Can I make the dough ahead of time?
For the best texture, I recommend baking the rolls shortly after the dough rises. Gluten-free yeast dough does not always hold its structure as well as wheat dough, especially after a long refrigerator rise.
If you want to prep ahead, measure the dry ingredients into a bowl and cover them tightly. Then, when you are ready to bake, activate the yeast, mix the dough, let the rolls rise, and bake as directed.
Can I bake the rolls ahead of time?
You sure can. Bake the rolls as directed, then let them cool completely on a wire rack. Once cooled, store them in an airtight container at room temperature if serving the same day.
To refresh before serving, wrap the rolls in foil and warm them in a 300°F oven until heated through.
Can I freeze gluten-free oatmeal rolls?
You can freeze them. Let the rolls cool completely, then place them in a freezer-safe bag or airtight container. For easier reheating, freeze the rolls individually or separate layers with parchment paper.
For the best texture, use frozen rolls within 1–2 months.
How do I reheat frozen rolls?
You can reheat the rolls straight from frozen. Wrap them in foil and warm in a 300°F oven until heated through. For a softer texture, you can place a small piece of parchment or a lightly damp paper towel inside the foil packet, making sure it does not touch the rolls too much.
Avoid overheating, since gluten-free rolls can dry out quickly.
Can I freeze the unbaked dough?
I do not recommend freezing the unbaked dough unless you have tested it. Gluten-free yeast dough can be more delicate than traditional bread dough, and freezing may affect the rise and final texture.
For the most reliable results, bake the rolls first, cool completely, and then freeze.
Serving Ideas for Gluten-Free Oatmeal Rolls
These gluten-free oatmeal rolls have a hearty, slightly rustic flavor that makes them easy to pair with sweet or savory meals.
Serve them warm with:
- Soup or chili
- Beef stew or vegetable stew
- Thanksgiving dinner
- Dairy-free butter
- Jam, apple butter, or honey
- Breakfast eggs or a dairy-free scramble
- Roasted chicken, turkey, or ham
- Mini sandwiches or sliders, if the rolls are sturdy enough after cooling
For the softest texture, warm leftover rolls before serving.
FAQ for Gluten-Free Oatmeal Rolls
While making these oatmeal rolls should be fairly straightforward, we do get questions sometimes! I tried to answer some of the most commonly asked ones here. If you think of one I haven’t answered yet, feel free to ask in the comments section, and we’ll do our best to answer soon!
How can I tell if my oats are really gluten-free?
Oats are naturally gluten-free, but they are often cross-contacted with wheat, barley, or rye during growing, transport, or processing. For this recipe, use oats labeled gluten-free. If you have celiac disease, choose oats from a trusted gluten-free brand and follow your clinician’s advice, since some people with celiac disease may react to oat avenin even when oats are labeled gluten-free.
Can I use quick oats instead of old-fashioned oats?
Old-fashioned rolled oats are the best choice for this recipe because they give the rolls a better texture and structure. Quick oats may absorb liquid differently and can make the dough softer or denser. If you use quick oats, the final rolls may not have the same hearty texture.
Why is the rise time important?
I understand how easy it is to get impatient while waiting for these rolls to rise! The rise time is important because the yeast needs time to produce the carbon dioxide bubbles that give these rolls their fluffy texture. This helps keep them from getting too dense.
Why does the type of flour matter so much in gluten-free baking?
That’s a great question! When choosing flour for gluten-free baking, I like to look at the protein and dietary fiber content. This can give me a ballpark idea of how well it absorbs moisture, which is important for making sure my baked goods don’t come out too dry or too gummy.
Why is it important to measure flour in grams instead of cups?
Gluten-free baked goods can be finicky about the amount of flour. Different gluten-free flours can also vary in density, which mostly means they have more or fewer grams per cup. This matters for many of the same reasons that choosing the correct flour or flour blend does: Too much or too little flour can affect how dry or moist the baked goods turn out.
How can I tell if I underbaked or overbaked my rolls?
Underbaked rolls will often be gummy in the middle. They may appear pale – almost the same color that the batter was – or not fully risen. They also won’t seem hollow if tapped on the top, which can indicate that the batter might not have fully baked or formed its bubbly texture in the middle. This problem can often be solved by baking it for a few more minutes.
Overbaked rolls will usually look “too dark” somewhere, often on the bottom. They will also be too dry. This can usually be solved by reducing the baking time or moving them farther from your oven’s heat source.
Why are my gluten-free oatmeal rolls dense?
Gluten-free oatmeal rolls can turn out dense if too much flour is added, the dough does not rise long enough, or the rolls are underbaked. For best results, measure the flour by grams, let the rolls rise until they look about 50% larger, and bake until the centers reach 205–210°F.
Gluten-free dough will not feel stretchy like wheat dough, so avoid adding extra flour just because the dough feels sticky. A softer, stickier dough usually makes a softer roll.
More Easy Breads to Bake Next
Looking for more rolls? Here are a few of my favorites!
- Buckwheat Biscuits
- How To Make Gluten-Free Bisquick
- Millet Biscuits
- Gluten-Free Angel Biscuits
- Gluten-Free Potato Buns
Whether you need a tender biscuit, a make-ahead baking mix, or a soft bun for sandwiches, these recipes give you more options for every meal. Save a few to try the next time you want warm, homemade bread on the table.
Did You Make These Oatmeal Rolls?
I’d love to hear how they turned out for you! Leave a comment and star rating below to share your results, any swaps you tried, or what you served them with.
Your feedback helps other bakers feel confident trying the recipe and helps me keep creating recipes you’ll love.