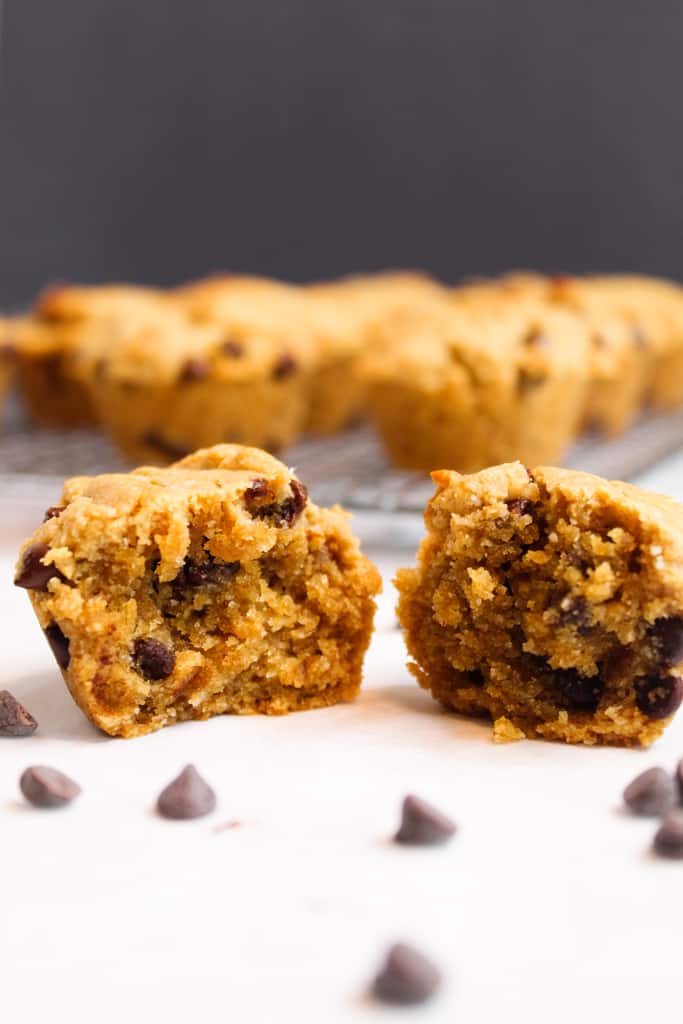
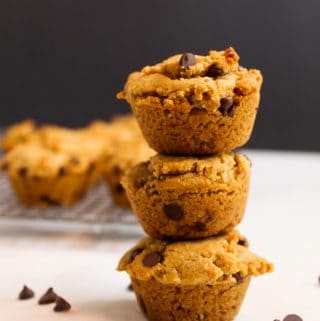
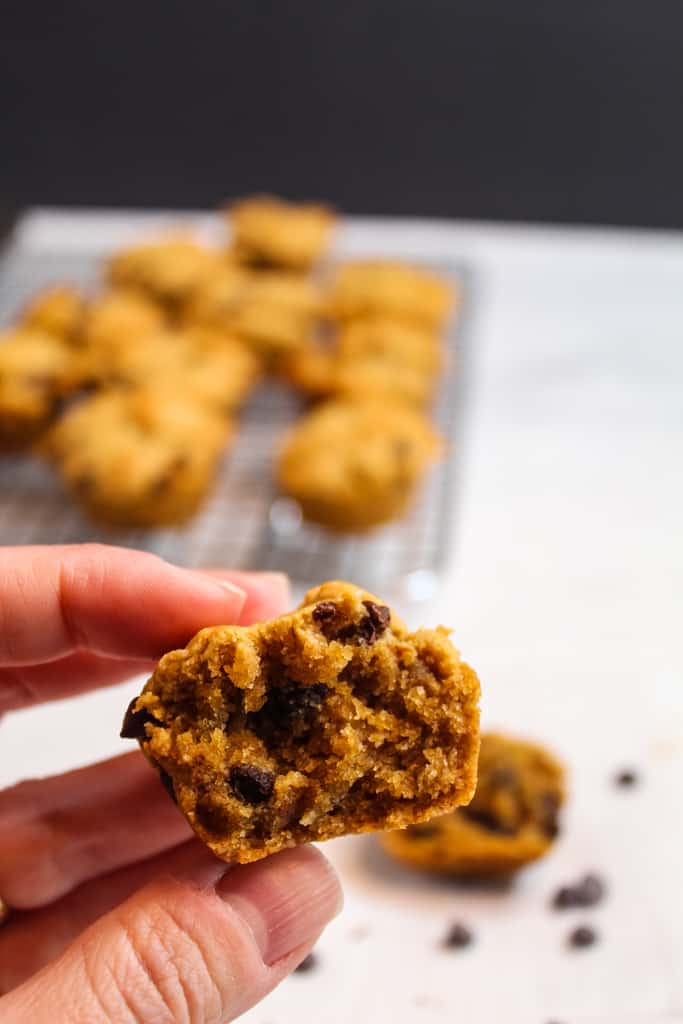
These Gluten-Free Peanut Butter Chocolate Chip Muffins taste dangerously close to dessert, except they’re naturally lower in sugar, incredibly soft, and ready in under 30 minutes.
If you’ve ever struggled with dry gluten-free muffins or peanut butter recipes that turn dense and heavy, this recipe is here to help. These mini muffins are rich and moist, packed with peanut butter flavor, and made with 7 simple pantry staples. They’re dairy-free, easy to customize, and freezer-friendly.
Table of Contents
Whether you need a quick gluten-free breakfast, an after-school snack, a healthier sweet treat, or an easy meal-prep option, these muffins disappear fast and are sure to curb all your cravings.
Why You’ll Love These Gluten-Free Muffins
These muffins strike the perfect balance between rich peanut butter flavor, soft texture, and just enough sweetness. Here are a few more reasons why readers love them:
- Naturally gluten-free and dairy-free
- Lower in sugar than traditional muffins
- Easy, one-bowl recipe
- Soft and moist texture
- Mini muffins cut the bake time in half
- Freezer-friendly
- Kid approved!
- Perfect for breakfast, snacks, or dessert
Plus, since they’re mini muffins, they’re ideal for lunchboxes, quick snacks, and portion-controlled treats.
What Makes Gluten-Free Muffins Different?
If you’re new to gluten-free baking, muffins can sometimes feel tricky. Traditional muffins rely on gluten to create structure and elasticity. Without gluten, baked goods can become dry, dense, or crumbly if the ingredients are not balanced.
The combination of peanut butter, almond flour, eggs, and natural sweeteners provides moisture and structure naturally, without traditional flour or a complex gluten-free flour blend.
I developed this recipe using almond flour because it adds moisture to these muffins. Almond flour is high in natural, healthy fats, which contribute to a soft and tender texture. It also lends a slight nutty sweetness that pairs perfectly with the peanut butter flavors.
The peanut butter is also a big factor in this recipe, as it acts almost like a fat and a binder. This is an extremely simple muffin recipe that doesn’t have the same intense rise of traditional muffins, but relies more on the natural fats in the peanut butter and almond flour to create a soft, rich crumb full of protein and flavor.
This results in a muffin that tastes indulgent while still sticking to a wholesome recipe.
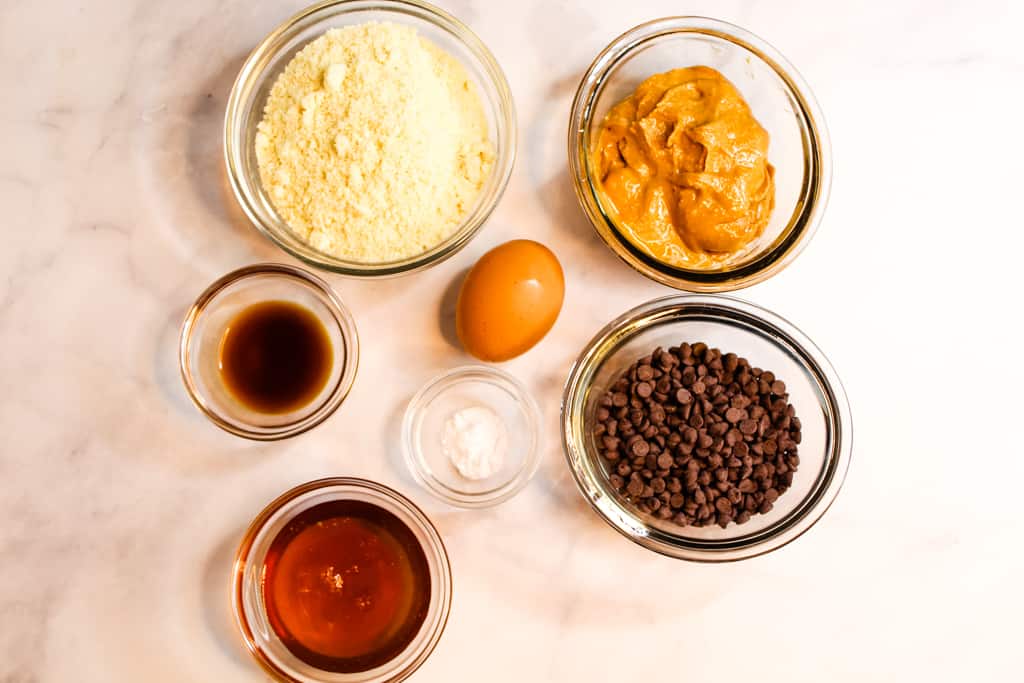
Ingredients List
With a handful of pantry staples, these mini muffins can be pulled hot and fresh from the oven in under 30 minutes! Here’s what you’ll need:
- Peanut Butter: Creamy peanut butter yields the best texture.
- Almond Flour: Use finely ground, blanched almond flour, not almond meal. Almond meal is much coarser and can make the muffins dense or grainy.
- Chocolate Chips: I use dairy-free semi-sweet chocolate chips in this recipe, but you can use your favorite chocolate chips.
- Honey or Maple Syrup: Honey adds moisture and a richer flavor to the muffins. Maple syrup works as a great substitute if preferred.
- Egg: Eggs provide structure, helping the muffins rise and stay soft and fluffy.
- Vanilla: Because there are so few ingredients in these muffins, choosing high-quality ingredients is important. I love this organic vanilla extract!
- Baking Soda: This helps the muffins rise and prevents them from falling flat and dense.
Measurements for each ingredient, along with instructions for making Peanut Butter Chocolate Chip Muffins, are in the printable recipe card below.
Equipment You’ll Need
One reason this recipe is so popular is that it requires minimal equipment. You’ll need:
- Mixing Bowl
- Whisk
- Rubber Spatula
- Mini Muffin Pan
- Muffin Liners or Nonstick Spray
A cookie scoop is another great tool that can help create evenly sized muffins that bake consistently. It’s great to have, but it’s not necessary for this simple recipe.
Printable Gluten-Free Peanut Butter Chocolate Chip Muffins Recipe Card
Ingredients
- 1 large egg
- ½ cup creamy peanut butter
- 3 tbsp honey
- 1 tbsp pure vanilla extract
- 80 grams almond flour, about ¾ cup
- ¼ tsp baking soda
- ½ cup mini semi-sweet chocolate chips
Instructions
- Preheat the oven to 350°F. Spray a mini muffin pan with non-stick cooking spray.
- In a medium bowl, add the egg, peanut butter, honey, and vanilla extract. Mix with a whisk until fully combined.
- Add the almond flour and baking soda to the liquid ingredients and mix until the batter is smooth.
- Gently stir in the chocolate chips.
- Let the batter rest for 5-10 minutes.
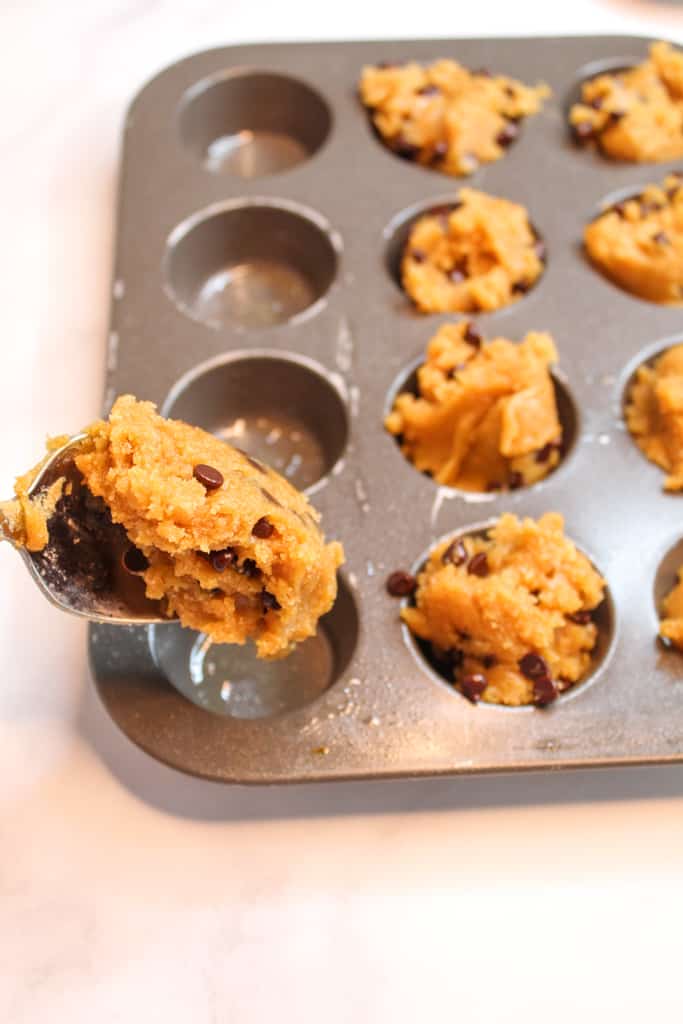
- Use a spoon to portion the batter into the muffin pan, filling each cup about ¾ of the way full.
- Bake for 10-12 minutes, until the muffins are set in the center and spring back when touched.
- Let the muffins cool in the pan for 5-10 minutes before removing them to finish cooling on a wire rack.
Notes
- Use a whisk to mix the ingredients.
- The recipe can easily be doubled and can be adjusted for regular-sized muffins (one batch of this recipe will make about 6 regular-sized muffins). Just watch the baking time as it will need to increase to about 18-20 minutes.
Step-by-Step Instructions: Peanut Butter Chocolate Chip Muffins
With a few simple steps and a one-bowl recipe, you’ll have these mini muffins ready in no time. Just follow along with the steps and images below.
Step 1: Prepare
Preheat the oven to 350ºF and spray a mini muffin pan with non-stick spray or line with mini cupcake liners.
Step 2: Mix Wet Ingredients
In a medium bowl, add the egg, 1/2 cup creamy peanut butter, 3 tbsp honey, and 1 tbsp vanilla extract. Use a whisk to mix until smooth and combined.
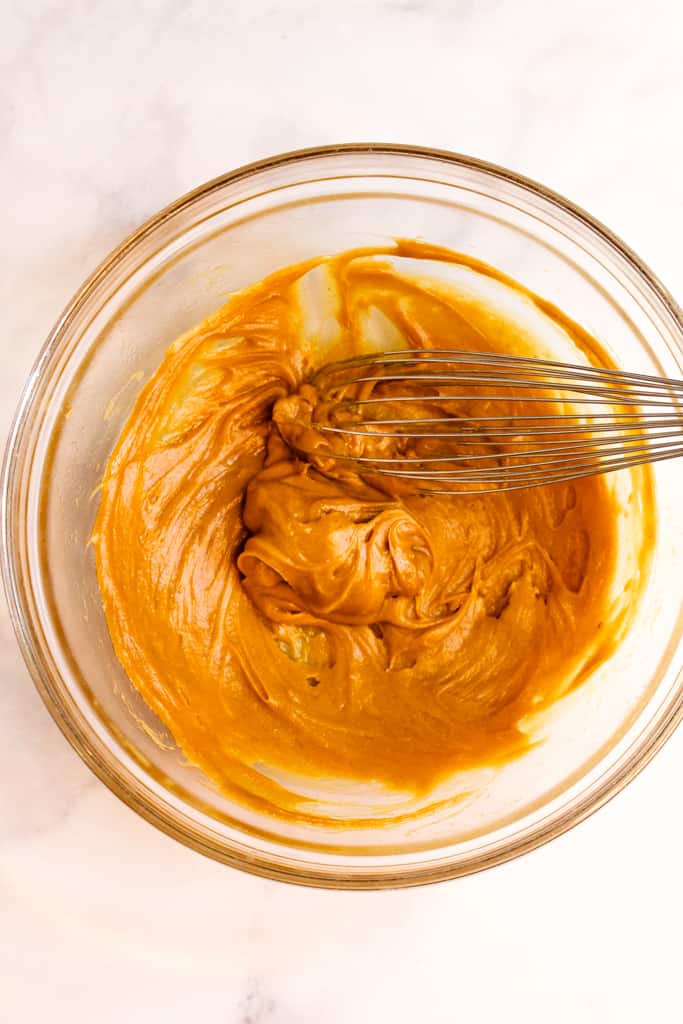
Step 3: Add Dry Ingredients
Add the 3/4 cup (80 grams) almond flour and 1/4 tsp baking soda to the bowl. Whisk to combine. Gently fold in the 1/2 cup of chocolate chips with a rubber spatula. The batter will be thicker than traditional muffin batter and more like soft cookie dough.
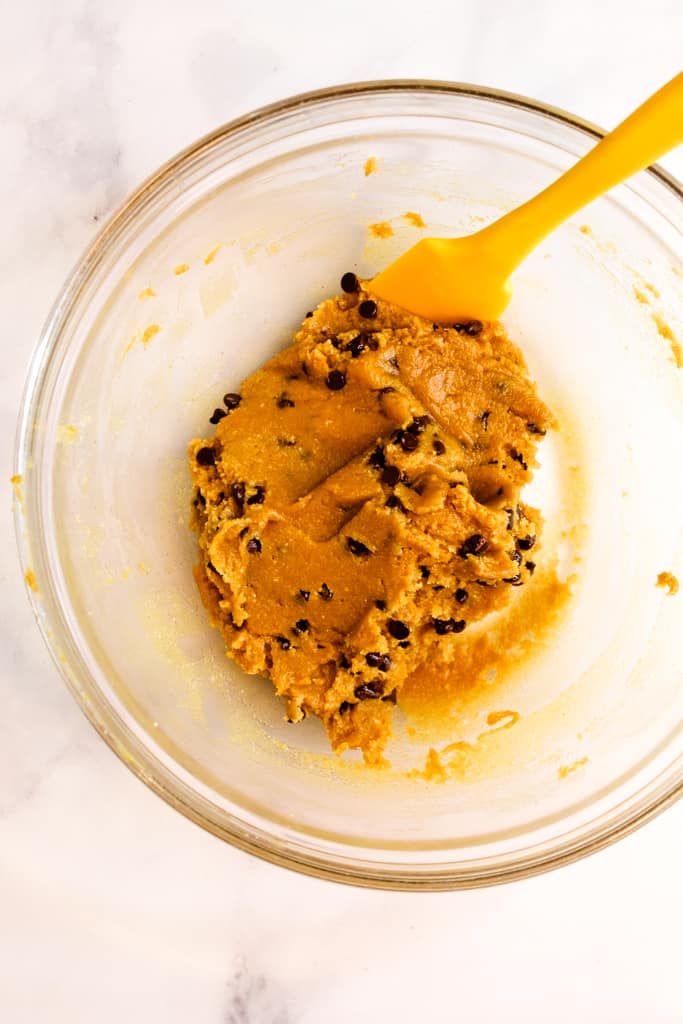
Step 4: Rest the Batter
Let the batter rest for 5-10 minutes to allow the almond flour to hydrate. Do not skip this step, as it will give your muffins a better texture!
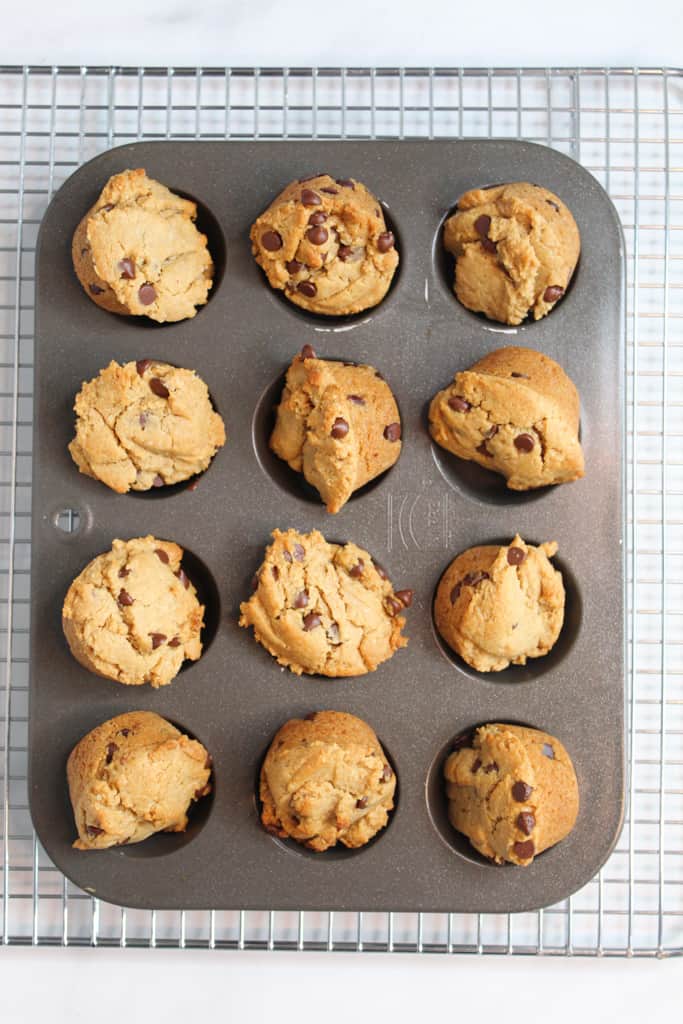
Step 5: Portion the Batter
Use a spoon or cookie scoop to portion the batter into the muffin pan, filling each cup about 3/4 full. You should get about 12 mini muffins.
Step 6: Bake
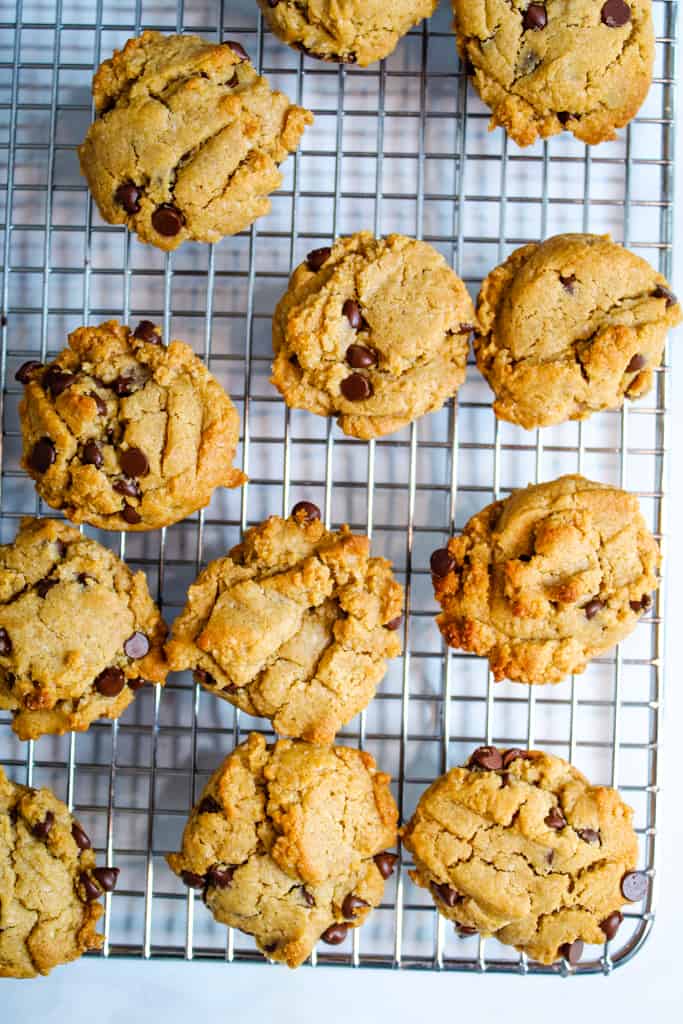
Bake for 10-12 minutes, or until the muffins are set in the center and spring back when touched. You can also use the toothpick test to check. It should come out clean or with just a few moist crumbs to tell when the muffins are done.
Step 7: Cool & Enjoy
Let the muffins cool in the pan for 5-10 minutes before removing them to finish cooling. Enjoy them warm for a tasty treat!
Expert Tips for Perfect Gluten-Free Muffins
Keep these tips and tricks in mind as you make these muffins to get the best results.
Measure Almond Flour Correctly
The best way to measure flour when baking is to weigh it. Whenever weight measurements are written on a recipe, weigh using a kitchen scale. If you don’t have a kitchen scale, you should really get one! Otherwise, you can measure your almond flour by cups, but this can often lead to packing in too much flour, resulting in dense muffins.
Avoid packing the almond flour into the measuring cup. Instead, use a spoon to scoop the flour from the bag into the measuring cup and level it off evenly.
I often link this video as a reminder for both new and seasoned bakers of the proper technique for measuring flour when you don’t have a kitchen scale. But again, get yourself a kitchen scale, you won’t regret it!
Let the Batter Rest
Gluten-free recipes often include a rest time, which is necessary for gluten-free flours to fully hydrate before baking. Allowing the muffin batter to rest for 5 minutes before baking helps hydrate the almond flour, which can significantly improve the muffins’ texture.
Use Room Temperature Ingredients
Room temperature ingredients combine more smoothly into batters and help the muffins bake evenly.
Tip: To quickly bring eggs to room temperature, place them in a bowl of very warm water and let them sit for about 5 minutes. Change the water if needed, as the eggs can quickly cool it off.
Common Mistakes to Avoid
Here are a few more things to keep in mind as you continue on this gluten-free baking journey.
Avoid Overbaking
Gluten-free baked goods dry out quickly when overbaked. These mini muffins cook up quickly, so set a timer and keep an eye on them. Remove the muffins from the oven when the centers are just set, or when a toothpick inserted into the center is clean or with a few crumbs on it.
Using Oily Peanut Butter
Natural peanut butter contains a lot of oil, which can affect the texture of these muffins, making them dense. I don’t recommend using natural peanut butter for this recipe for that reason, but if you do, always stir it thoroughly before measuring.
Overfilling the Muffin Pan
Filling muffin cups too high can cause muffins to overflow and lead to uneven baking. As a rule of thumb, fill the muffin cups about 3/4 full.
Skipping the Cooling
These muffins continue to set after baking. Remove them from the oven when the centers are just set and allow them to cool in the pan for 5-10 minutes. Because they lack gluten, gluten-free baked goods can often be more fragile than traditional baked goods. Removing them too quickly can make them fall apart.
Peanut Butter Chocolate Chip Muffin Variations
One of the things I love most about this recipe is the ability to customize it! Have some fun switching this up to your liking, and be sure to let us know your favorite in the comments below!
Double Chocolate Peanut Butter Muffins
Add 2 tablespoons of cocoa powder and some extra chocolate chips to the batter, then sprinkle them on top. This creates a decadent chocolate flavor. You may need to add a splash of milk to the batter to balance out the added cocoa powder.
Banana Peanut Butter Muffins
Mash one ripe banana into the batter. This adds a natural sweetness and extra moisture. I love adding in a sprinkle of cinnamon too!
Protein Muffins
Add one scoop of vanilla or chocolate protein powder to make these a heartier treat that keeps you full longer. You will need to add a splash of milk to the batter to balance out the extra dry ingredients.
Keto-Friendly Version
Replace the honey with a keto-friendly sweetener and use sugar-free chocolate chips. Here are some great substitutions to try:
- Zero Sugar Honey Substitute
- Sugar-Free Dark Chocolate Chips
Vegan Option
This recipe uses dairy-free chocolate chips to keep these muffins gluten-free and dairy-free, but to make it vegan, substitute the egg for a flax egg or another egg substitute from this list, and swap maple syrup for the honey.
How to Store Peanut Butter Chocolate Chip Muffins
With the help of moist almond flour, these muffins, when stored properly, will stay soft and tender for days.
Store them at room temperature in an airtight container for up to 3 days, or refrigerate for up to 1 week. If you choose to store them in the fridge, warm them up in the microwave for 10-15 seconds before enjoying for the best texture.
As I mentioned above, these muffins are freezer-friendly and perfect for meal prep, for mornings when there’s no time for breakfast, or so you always have a sweet, healthy treat on hand for those cravings.
Place the cooled muffins in a freezer-safe bag or container and store them for up to three months. Reheat them in the microwave for 10-15 seconds to bring back that soft texture.
Nutrition Highlights
Compared to many bakery muffins, these gluten-free peanut butter chocolate chip muffins are:
- Lower in refined sugar
- Higher in protein
- Naturally gluten-free
- Dairy-free
- More filling due to healthy fats
Because they contain almond flour and peanut butter, they tend to keep you fuller longer than traditional muffins made with refined flour.
Peanut Butter Chocolate Chip Muffins FAQs
We’ve broken down some common reader questions to help you with this recipe. Check them out here.
Can I Make These In a Regular Muffin Pan?
If you would prefer to make these in a standard 12-cup muffin pan, this recipe will make about 6 muffins. Fill the cups about 3/4 full, then increase the bake time to 18-22 minutes.
Can I Use Oat Flour Instead?
Gluten-free flours differ in texture, flavor, and how they interact with other ingredients, which is why it’s often best to follow a gluten-free recipe as written. Swapping oat flour for the almond flour will significantly change the texture of these muffins. This recipe was developed with almond flour to create a moist and tender muffin, since almond flour is high in fat and contributes significant moisture and softness, which makes this recipe work best.
Can I Use Crunchy Peanut Butter?
Crunchy peanut butter is an easy way to add extra texture and peanut flavor to this recipe. Opt for a no-stir, crunchy peanut butter that does not have natural oil separation, as natural peanut butters can make the muffins dense in this recipe.
Can I Freeze These Muffins?
These muffins freeze extremely well! Store the cooled muffins in a freezer-safe bag or container for up to 3 months. Reheat them in the microwave for 10-15 seconds and enjoy! This makes them perfect for meal prepping and quick breakfasts.
Can the Recipe Be Doubled?
Since these muffins freeze so well, doubling the recipe is a perfect way to get some batch baking done. Simply double all ingredients. A double batch should fit in a 24-cup mini muffin pan or would make approximately 12 regular muffins. But if needed, bake in multiple batches. These pumpkin muffins also easily double for batch baking.
Final Thoughts
These gluten-free peanut butter chocolate chip muffins are proof that gluten-free baking can be simple, healthy, and delicious.
They’re soft, rich, chocolatey, and perfect for everything from breakfast to dessert. Whether you’re gluten-free, dairy-free, looking for lower-sugar treats, or simply obsessed (like me) with peanut butter and chocolate, this recipe delivers tasty results with minimal effort.
Once you make a batch, don’t be surprised when you come back for more quickly.
More Gluten-Free Baking
Check out these other delicious gluten-free treats. Let us know which recipe you’d like to see next!
Get in Touch!
What did you think of this gluten-free muffin recipe? Do you have a favorite gluten-free recipe to make at home? Comment below to connect with other bakers!