Baking gluten-free bread can feel frustrating, especially when most loaves turn out dense, gummy, or difficult to slice. That’s why a reliable rice flour bread machine recipe is so valuable; it takes the guesswork out of gluten-free baking.
This proven recipe works with different rice flour blends, ingredient ratios, and bread machine settings to guarantee a soft, sliceable loaf. With simple ingredients and an ordinary bread maker, you can finally achieve bread that rises beautifully, holds its shape, and delivers perfect texture.
Table of Contents
In this guide, you’ll learn how to avoid common mistakes that cause gluten-free bread to fail, how to balance moisture and structure, and how to get consistent, bakery-quality results from your bread machine. Once you master this recipe, baking gluten-free rice flour bread becomes straightforward, satisfying, and reliable.
For more variety, you might also enjoy our Soft Flaxseed Bread, another delicious gluten-free loaf that’s nutritious, flavorful, and easy to make.
Ingredient Quick Scan List
The appeal of this recipe lies in its readily available, high-quality ingredients. Here are the things you’ll need to get successful and tasty results from this rice flour bread machine recipe:
- White rice flour
- Eggs
- Water
- Apple cider vinegar
- Active dry yeast
- Oil
- Tapioca flour
- Xantham gum
- Salt
- Dry coconut milk powder
- Sugar
Ingredient Roles & Substitutions
Understand why each ingredient matters and follow every step in this rice flour bread machine recipe for a rich, flavorful loaf. Here, we explain how each essential element contributes to the overall taste, structure, and texture, and provide effective swaps for them.

White Rice Flour
In treats like these, gluten-free rolls, white rice flour is the main ingredient, providing structure. When finely milled, it produces a tender crumble that isn’t gritty, adding lightness and a mild taste. In this recipe, substitution of another type of flour is not recommended.
Eggs
These add structure and tenderness to this bread by providing protein that mimics gluten’s elasticity. It also adds moisture, helps the bread rise properly, and gives it a spongy consistency. There’s no swap for this ingredient in this recipe.
Water
Warm water activates yeast and hydrates the flour to a batter consistency, making it easier to mix. The water’s temperature is important to this recipe because it prevents the solid fat from solidifying.
Apple cider vinegar
Apple cider vinegar enhances the bread’s rise and improves its texture without imparting a vinegary flavor. The acidity also tenderizes the rice flour starch structure and promotes golden browning by adjusting the pH. You can replace this ingredient with any of these substitutes.
Active dry yeast
In this recipe, this yeast is the leavening agent for rising bread. When activated in warm water, it produces CO2 through the fermentation of sugars, creating air pockets that yield taller, chewier loaves with a bread-like flavor. When buying this yeast, make sure it isn’t instant or bread machine yeast.
Vegetable oil
Vegetable oil softens the crumb, retains moisture, and extends shelf life by coating starch particles, helping prevent the dryness common in rice flour loaves. Olive oil can be used as a substitute to add a subtle savoriness, but avoid using butter or other solid fats in place of oil in this recipe.
Tapioca flour
Tapioca flour acts as the key binder in this rice flour bread machine recipe, replacing gluten’s elasticity for better structure and chew. If tapioca flour is unavailable, use cornstarch in equal measure as a substitute. Avoid omitting a binder altogether.
Xanthan gum
This ingredient absorbs water to form a gel-like network that holds air bubbles from leaveners, preventing a crumbly texture and improving sliceability. Xanthan gum is essential to this recipe’s rise and performance, so avoid any swaps.
Salt
Salt enhances flavor and strengthens the batter’s structure. If you are following a low-sodium diet, you can reduce the amount of salt, but avoid omitting it completely, as it contributes to structure and flavor.
Dry coconut milk powder
Ideal for dry gluten-free loaves, dry coconut milk powder adds rich moisture and fat from coconut solids, creating a softer, fluffier crumb without extra liquid. The natural sweetness balances rice flour’s neutrality while aiding browning via milk proteins. There are no suitable substitutes for coconut milk powder in this recipe.
Sugar
Sugar feeds yeast, accelerating CO₂ production for a greater rise, while tenderizing the crumb and promoting golden browning. If necessary, you may substitute with an equal amount of honey or maple syrup, but avoid using artificial sweeteners as a substitute for sugar in this recipe.
Printable Rice Flour Bread Machine Recipe Card
Ingredients
- 2¼ cups white rice flour about 394 grams
- 3 large eggs room temperature
- 1½ cups water warmed to 70 – 80 F
- 3 tbsp vegetable oil
- 1 tsp apple cider vinegar
- 1 cup tapioca starch about 120 grams
- 2 tsp xanthan gum
- 1½ tsp salt
- ½ cup dry coconut milk powder about 60 grams
- 3 tbsp white sugar about 46 grams
- 2¼ tsp active dry yeast
Instructions
- In a medium-sized bowl or a measuring cup, whisk together the eggs, water, oil, and vinegar.
- In a large bowl, add the rice flour, xanthan gum, salt, dry coconut milk powder, and sugar. Mix with a whisk until incorporated.
- Add the liquid to the bread machine pan, then add the flour mixture on top.
- Add the yeast in the very center. Do not mix it in.
- Select the gluten-free setting for a 2-pound loaf, and the medium-crust setting if available.
- When the kneading cycle starts, scrape down the sides of the pan with a spatula and thoroughly mix the batter.
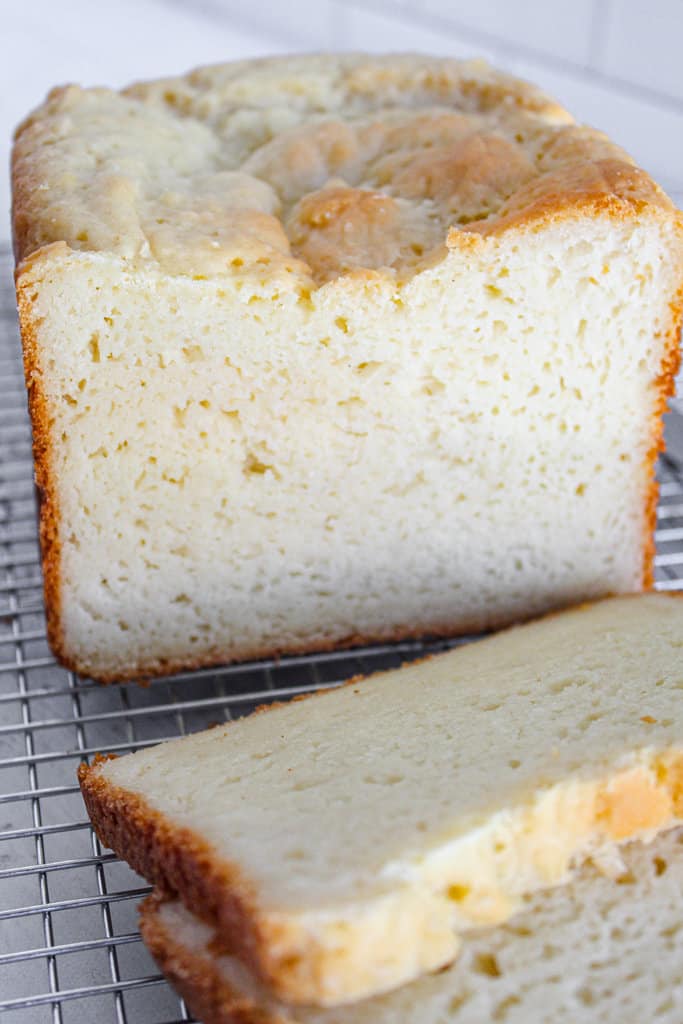
- When the cycle is over, remove the pan and let the bread cool in it for 10–15 minutes on a wire rack.
- Carefully remove from the pan and let it cool completely before cutting.
Notes
- Make sure ingredients are at room temperature and measure them by weight.
- Mix the liquid ingredients together, then the dry ingredients together, before adding to the bread machine pan.
- Once the kneading cycle starts, use a spatula to help the machine mix the batter.
- Let the bread cool completely before cutting; it could be gummy in the center.
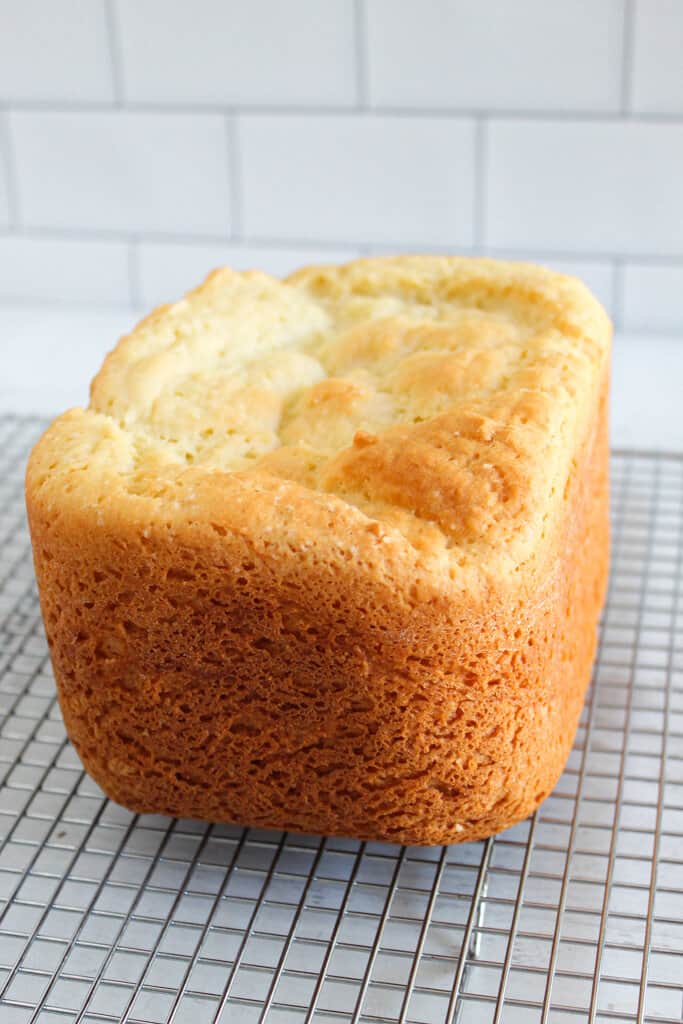
- The bread may dip a little in the middle – that is normal.
Storage Notes
- For the first day, you can cut side down on a board.
- Keep in a paper bag, bread box, or wrapped in a tea towel on the counter.
- Slice fully, separate with parchment, and freeze in an airtight bag.
Nutrition Estimate (Per 1 Cookie)
- Calories: 251 kcal
- Carbohydrate: 39 g
- Protein: 4 g
- Total Fat: 9 g
- Saturated Fat: 6 g
- Unsaturated Fat: 3 g
- Fiber: 1 g
- Sugar: 4 g
- Cholesterol: 41 mg
- Sodium: 342 mg
- Potassium: 48 mg
- Magnesium: 12 mg
- Added sugars: 3 mg
Nutrition
Quick Answer: How to Make The Best Gluten-Free Rice Flour Bread
Ready to dive in? Here’s the easiest way to master this rice flour bread machine recipe and get the perfect texture every single time.
- Use fine-ground white rice flour. You will get a tender loaf and healthy carbs, including resistant starch.
- Activate baking agents with vinegar and water for a reliable rise without yeast.
- Bake at 375°F (190°C). Gluten-free bread bakes best at this temperature because it rises properly, and the crust does not burn.
- Remove the bread from the oven when it turns golden brown.
- Cool for 10 minutes before slicing. Doing this sets the bread crumb structure.
Why You’ll Love This Rice Flour Bread Machine Recipe
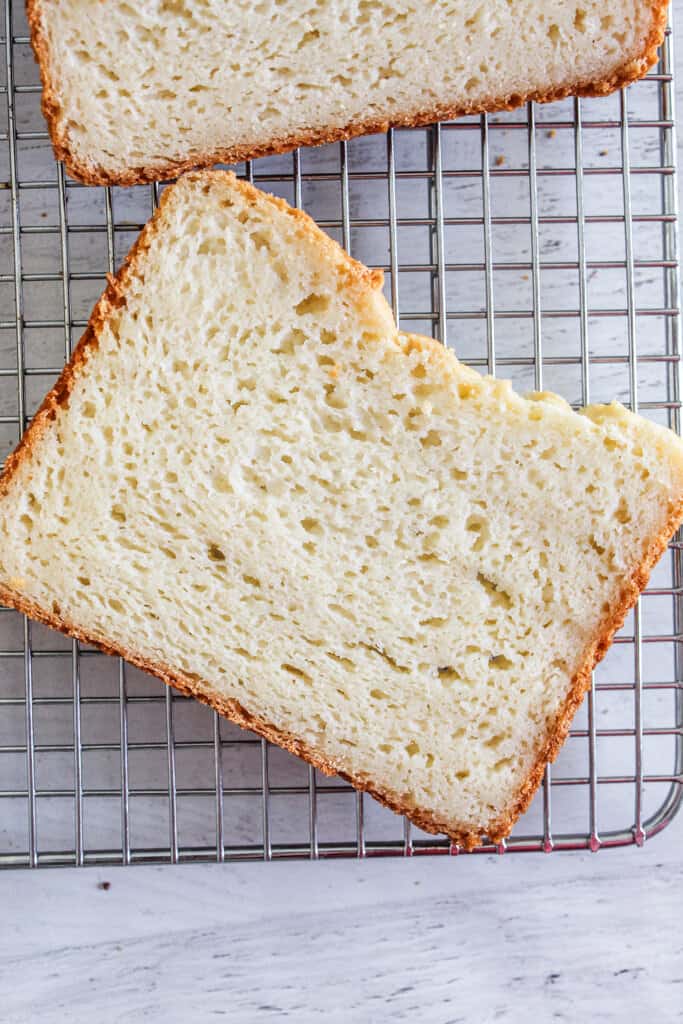
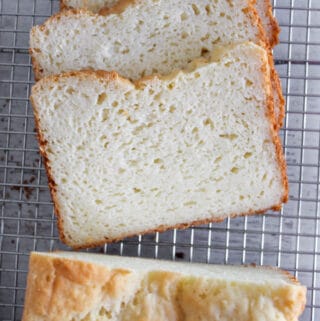
To begin with, this recipe delivers on the texture. Whether you slice it or just tear it apart and take a big bite, the elastic texture you get offers the wholesome comfort of delicious bread.
This rice flour white bread also takes the cake when it comes to prep and baking time. Compared to this millet bread or this cassava bread, which uses a mix-and-bake method, this bread is easier to prepare and bake in a bread machine.
Then there’s the versatility of this bread. It’s great for sandwiches, toast, or as a side for soups and salads. You can also top it with your favorite spreads or turn it into tasty croutons.
What Makes Rice Flour Different in Baking?
Because this recipe relies heavily on rice flour, it’s important to understand what makes it unique in baking. Knowing this will help you set the right expectations and handle any challenges with confidence.

Texture
Unlike wheat flour, rice flour contains no gluten, so it can’t form the elastic network that traps air and gives rise to the chewy textures found in traditional breads. This results in crumbly, tender baked goods unless paired with binders like xanthan gum or tapioca starch.
Flavor
White rice flour, on the other hand, feels smoother and milder, making it great for delicate cookies like these Mexican wedding cookies or soft loaves.
Low water absorption
Rice flour has lower initial water absorption than wheat or cassava flours, absorbing liquid mainly during baking via starch gelatinization, which affects dough hydration needs.
How to Make This Rice Flour Bread Machine Recipe
This step-by-step guide walks you through making a gluten-free bread mix in a bread machine, resulting in a delicious, flavorful loaf every time.
Essential Kitchen Tools
Before you begin baking, here are the tools that will make the process easier and set you up for success.
- Bread Machine — For automating the mixing, rising, and baking of gluten-free rice-flour bread.
- Mixing Bowl — For mixing the dry ingredients.
- Measuring Cups and Spoons — For accurate portioning of water, white rice flour, and other dry ingredients.
- Rubber Spatula or Silicone Spatula — For mixing dry ingredients with wet ones into a thick batter and scraping every bit into the loaf pan.
- Loaf pan — For holding the batter in its shape while baking.
- Oven mitts — For safe pan handling; parchment strip for easy loaf removal.
- Cooling Rack — To allow full air circulation post-bake to prevent a soggy bottom.
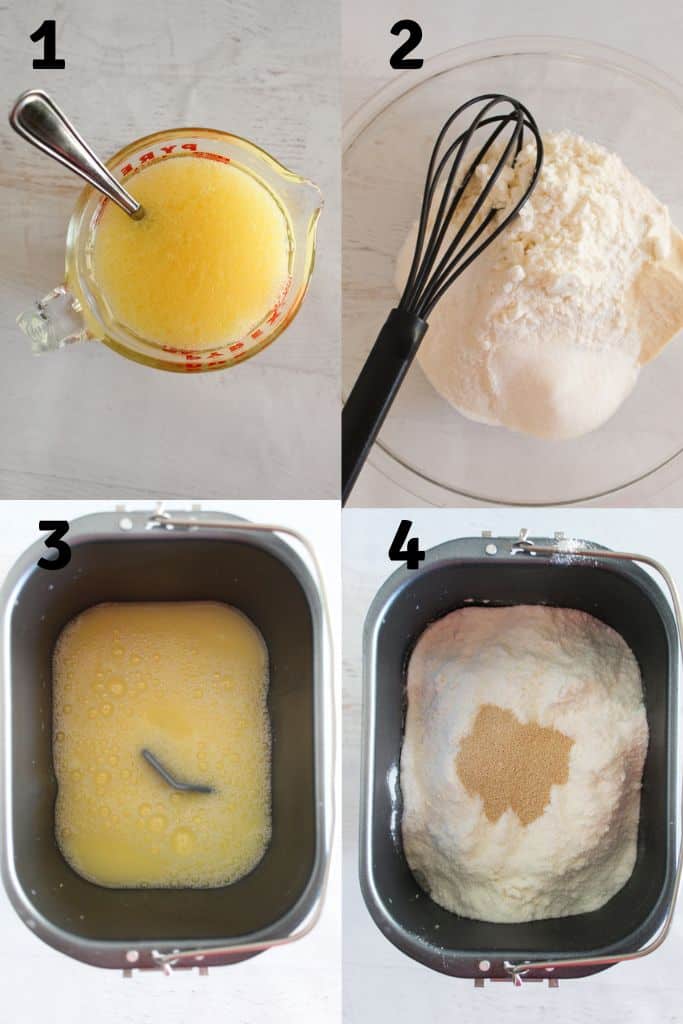
Step 1: Activate the yeast
In a small mixing bowl, combine 1½ cups of warm water with 2¼ teaspoons of active dry yeast, stirring lightly. Let it rest for 5–10 minutes until it turns frothy. This shows the yeast is active and ready to do its job.
Step 2: Mix the dry ingredients
In a large bowl, whisk together 2¼ cups of rice flour, 1½ teaspoons of salt, ½ cup of dry coconut milk powder, 1 cup of tapioca starch, 3 tablespoons of white sugar, and 2 teaspoons of xanthan gum until well combined. This ensures the xanthan gum is evenly distributed, which is key to achieving the right texture in your bread.
Step 3: Mix the wet ingredients
In another bowl, whisk together 3 eggs, 1 tablespoon of vinegar, and 3 tablespoons of vegetable oil until smooth and fully combined.
Step 4: Put the ingredients in the bread machine
Pour the liquid ingredients into the bread machine pan first, followed by the dry ingredients. Add the activated yeast on top. Select the gluten-free setting for a 2-pound loaf, then choose the medium crust option and press the start button.
Step 5: Cool and serve
After about 2 hours and 44 minutes, the bread will be ready. Remove it from the bread machine and let it cool in the pan for 10 minutes. Then transfer it to a wire rack to cool completely. Avoid slicing while it’s still warm, as this can make the texture gummy. Give it time to set properly.
Look out for these doneness cues:
- The internal temperature is 200°F.
- The bottom of the loaf sounds hollow.
Pro Tips for Perfecting Your Rice Flour Bread Machine Recipe
Here are a few key tips to keep in mind when making this rice flour bread machine recipe to help you achieve the best results.
- Weigh flour instead of volume measuring.
- Fine, freshly milled rice prevents grittiness and absorbs water for optimal hydration.
- Before mixing the dry ingredients, sift them. Sifting dry ingredients aerates and breaks clumps for an even rise.
- Many gluten-free batters, including those in these yeast bread recipes, need to rest. So, rest the batter for 5 minutes for the starches to hydrate, then stir again.
- Test doneness at 200°F internal temp, not by color alone.
- Use ingredients that are at room temperature for this recipe. Some of your ingredients will not mix evenly with the others if they are too cold.
- Cool fully on the rack before slicing to set the crumb structure.
Common Challenges and Solutions
As with many forms of cooking, unexpected results can occasionally arise when gluten-free baking. Here are some typical problems you can run into, along with some troubleshooting advice:
Dense Texture
If your bread is denser than you anticipated, it may be because you didn’t use the proper amount of moisture or xanthan gum. Carefully adjust the amounts or try adding more leavening agents.
Hard Crust
If the crust turns out to be excessively hard, you might shorten the baking time or cover the loaf with foil for part of the baking period.
Serving Suggestions For Your Gluten-Free Rice Flour Bread
This rice-flour bread machine recipe yields a versatile sandwich bread that pairs well with both sweet and savory toppings for everyday meals.
Sandwiches
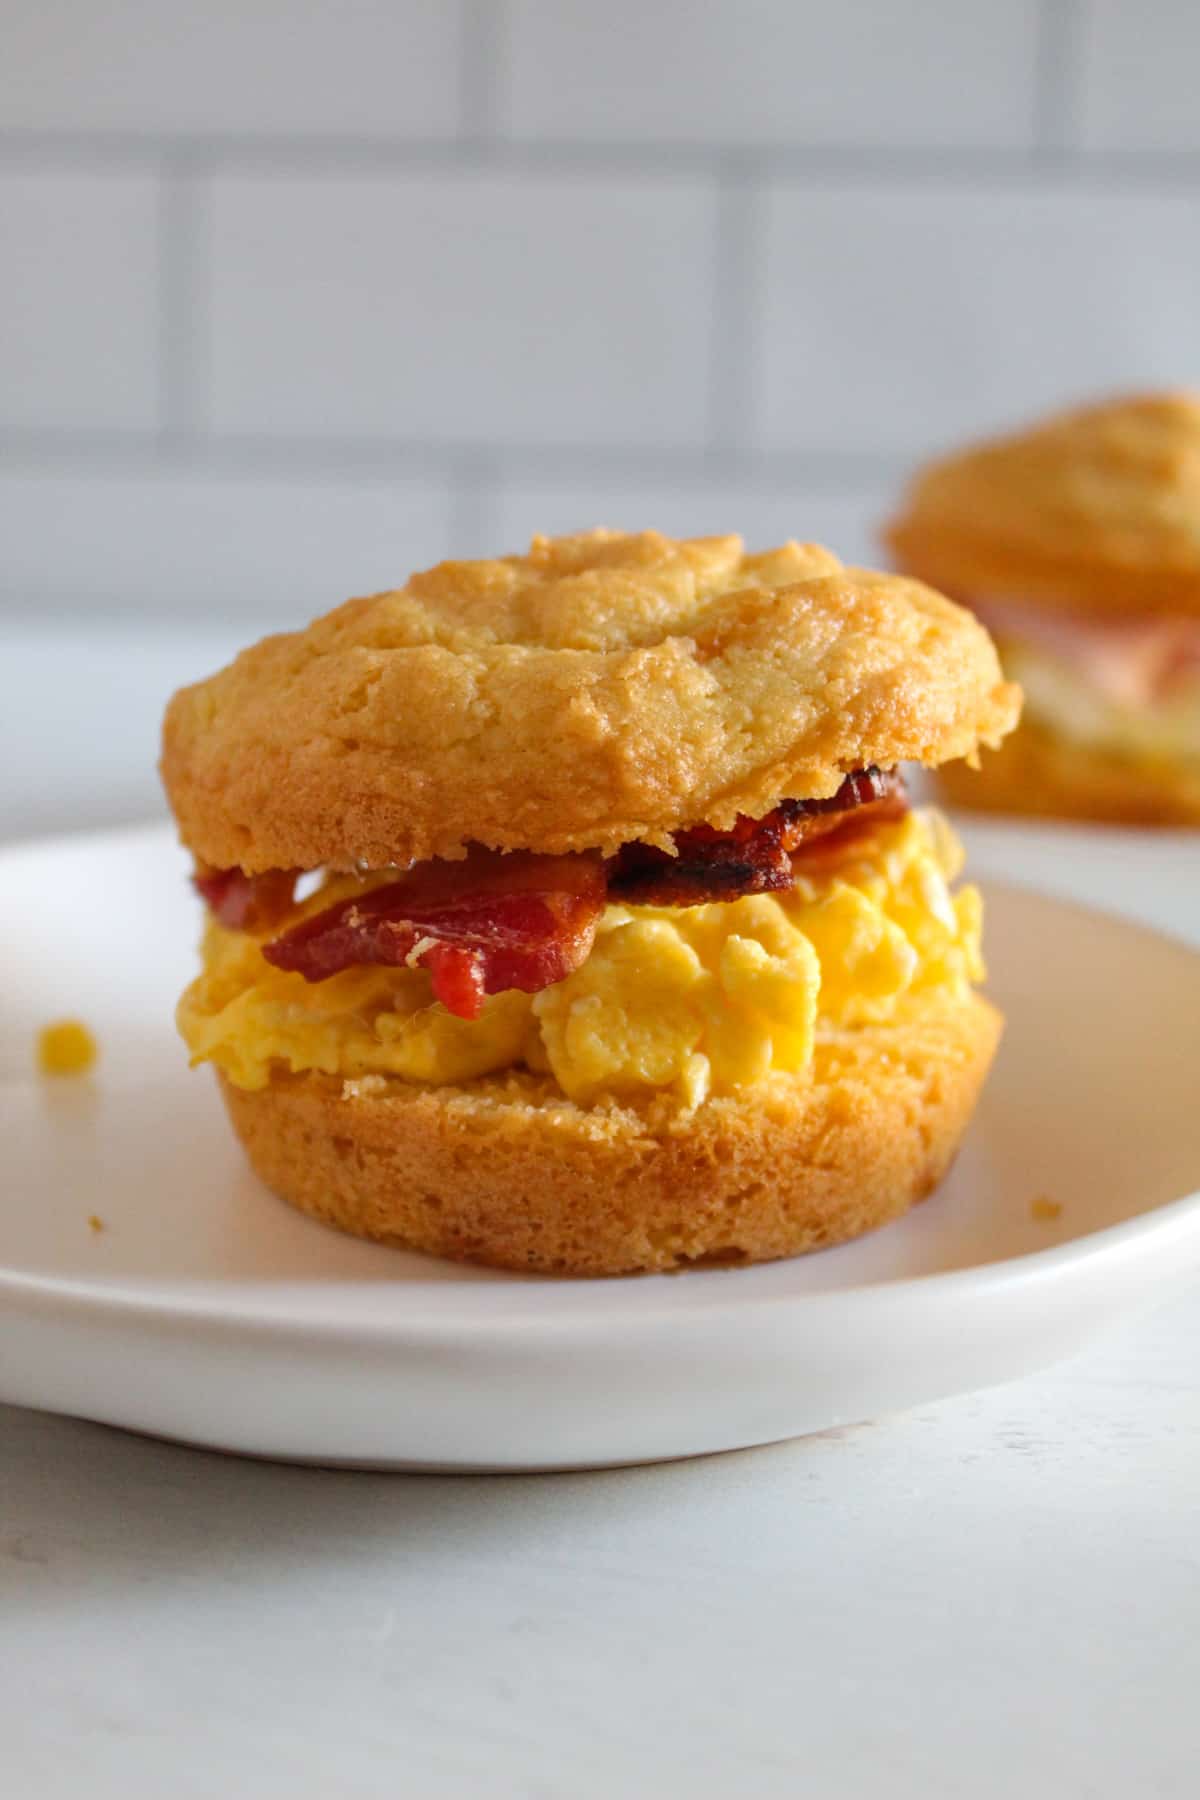
Slice thin for tea sandwiches. For a protein-packed breakfast, use this bread to make a Gluten-Free Breakfast Sandwich with Egg and Cheese. For a more sophisticated option, pair it with fig jam and goat cheese or turkey slices.
Pairing with Butter, Jam, or Nut Butter
This bread toasts crisply without falling apart. Enjoy it with classic spreads like butter and jam to showcase its neutral, soft crumb. For a twist, try peanut butter with a drizzle of honey.
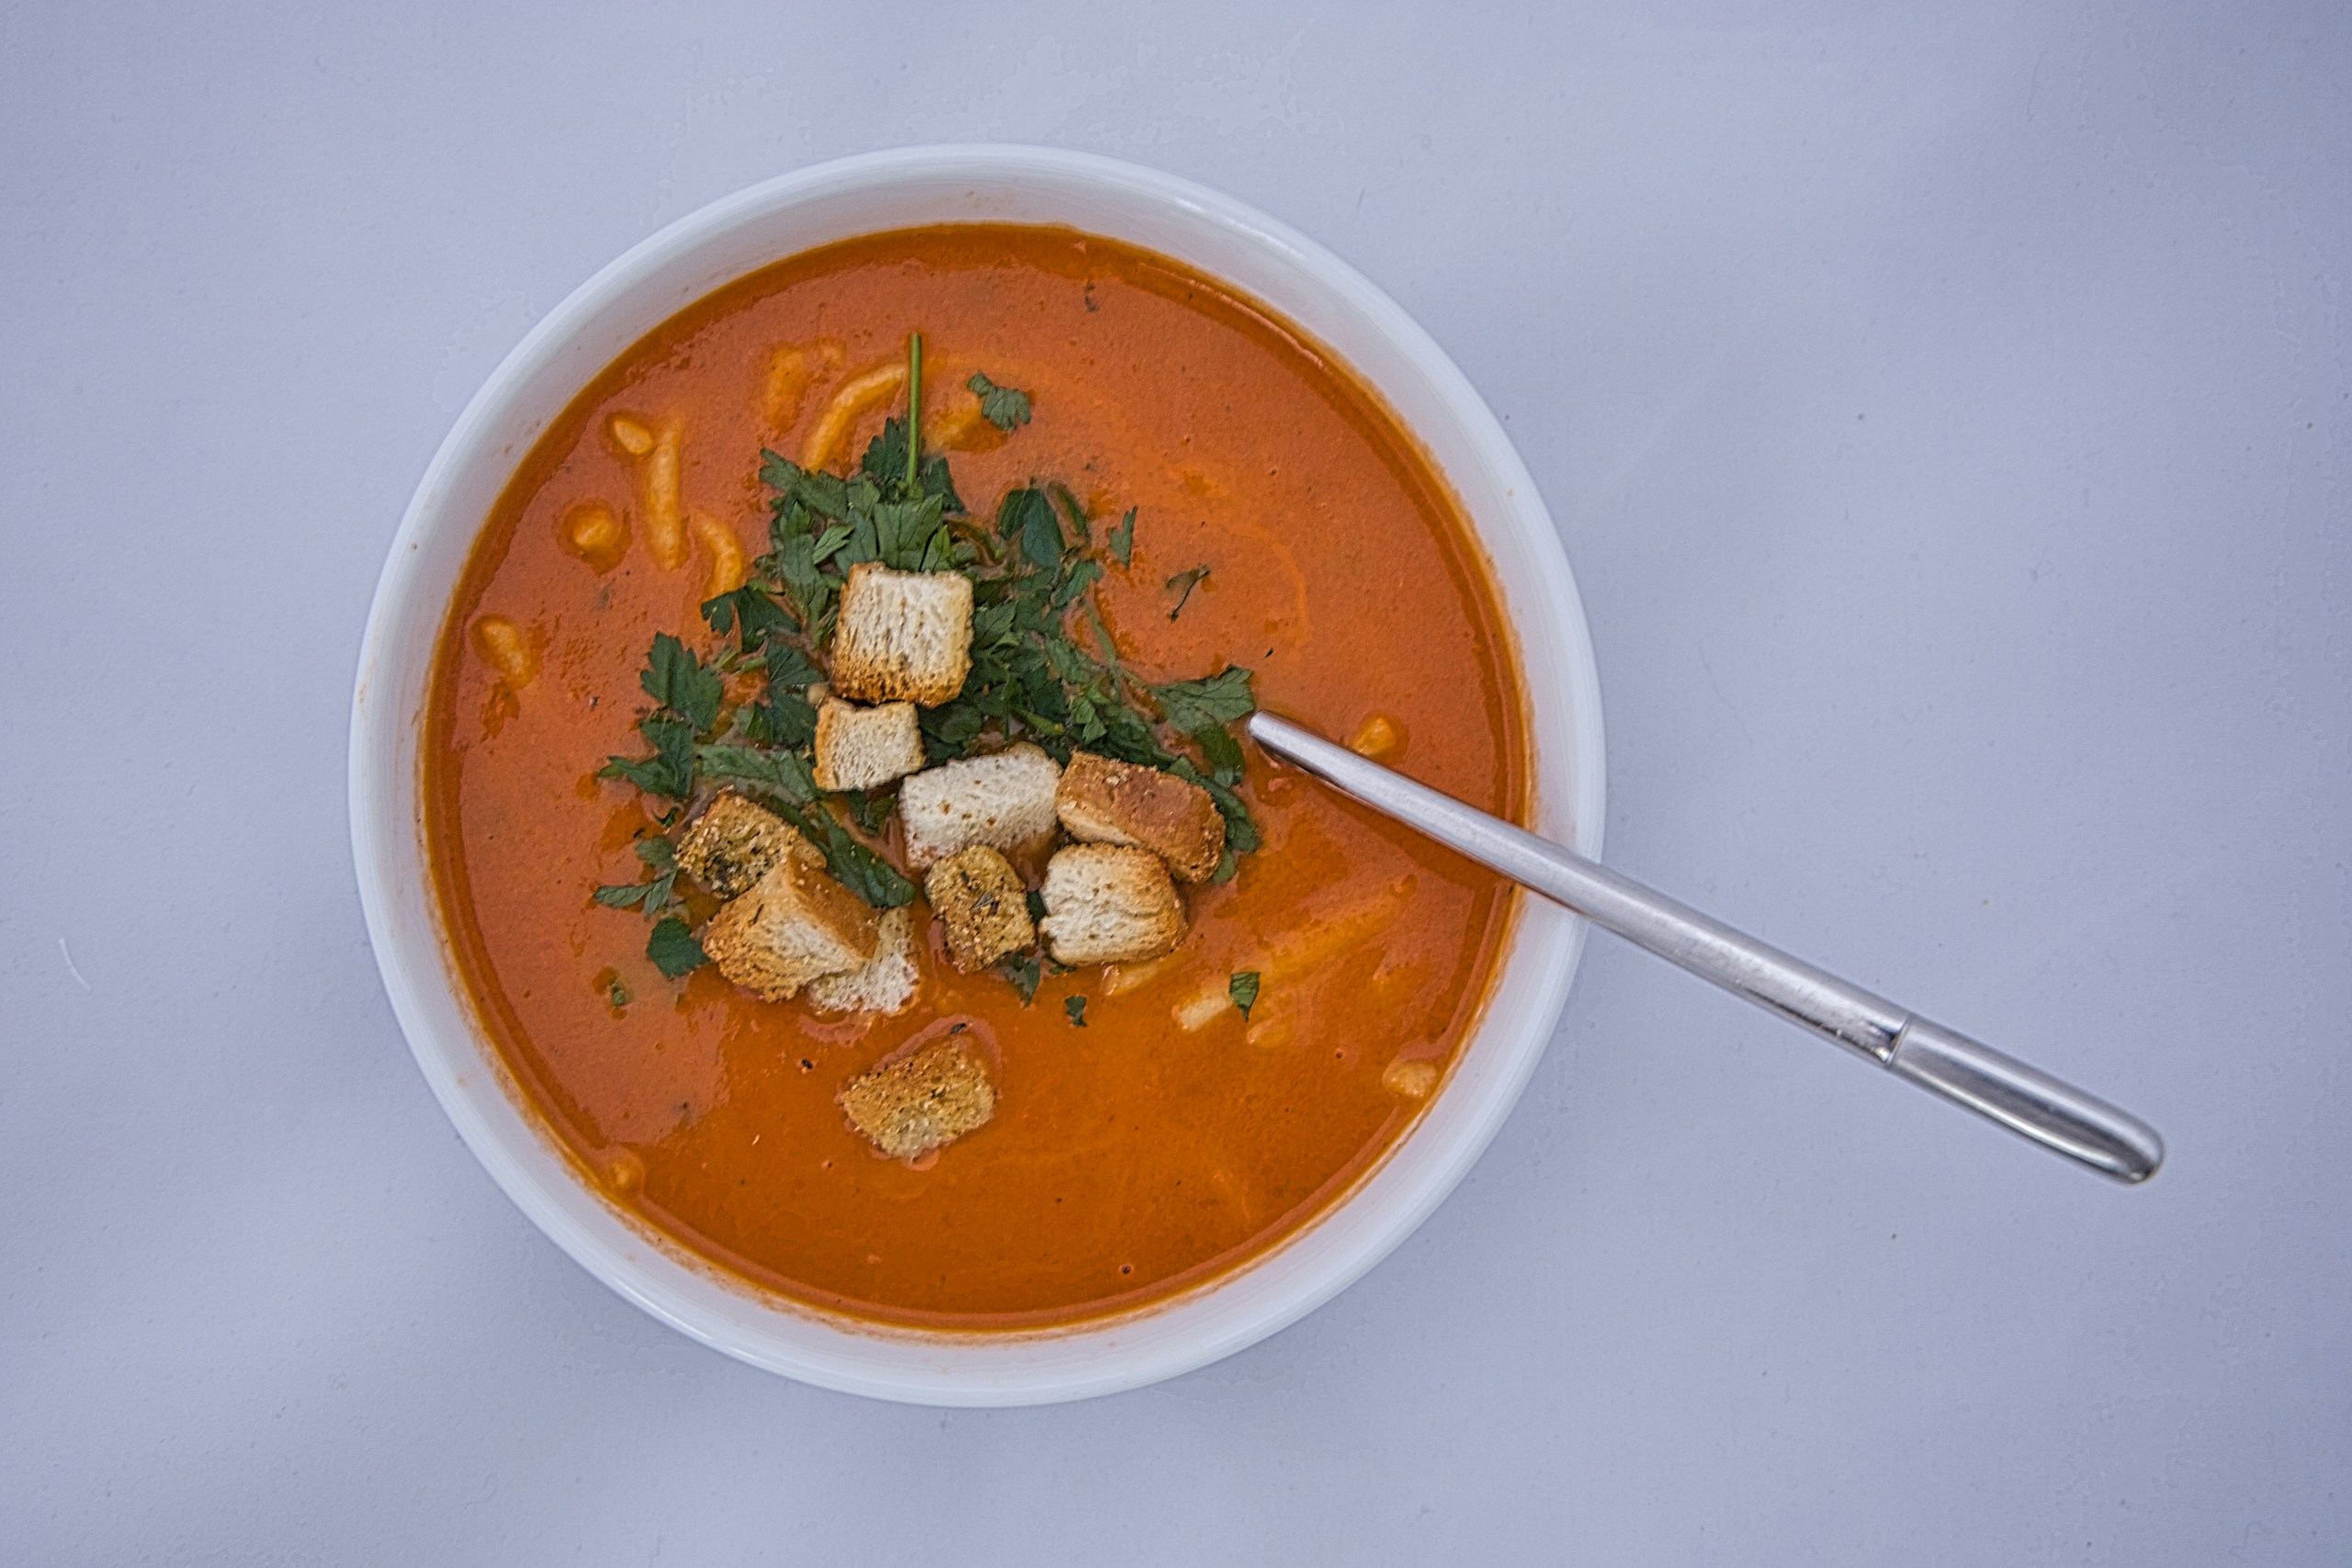
Soups
This rice-flour bread pairs best with hearty, creamy, or broth-based soups that provide a savory contrast. You can enjoy it with rich tomato-based or spicy soups.
Croutons
Once fully cooled, cube it into croutons. Toss in olive oil and herbs, then toast until golden. They are perfect for these vegan spring salads, where they add crunch without gluten.
Panzanella style
Tear into chunks and combine with chopped tomatoes, cucumber, red onion, basil, and vinaigrette. Let it sit for 10 minutes to allow the flavors to meld, mimicking traditional Tuscan bread salad.
Side servings
Slice thickly and serve alongside quinoa tabbouleh, chickpea salad, or green goddess bowls. The bread’s subtle chew contrasts beautifully with fresh veggies and tangy dressings.
How to Store Your Gluten-Free Bread Machine
This bread stays delicious for days after baking. To preserve its texture and flavor, proper storage is key. Here are some effective ways to store and reheat your gluten-free rice flour bread to keep it at its best:
Room Temperature
Use a bread box, paper bag, or tea towel wrap to store at room temperature for 1 to 2 days.
Avoid using plastic bags or refrigerating, as they trap moisture and accelerate staling via starch retrogradation in rice flour.
Freezer Storage
Slice completely, separate with parchment paper, and seal in a freezer bag. This preserves freshness for up to 3 months and allows grab-and-go thawing.
Nutritional Benefits Of This Gluten-Free Rice Flour Bread
This gluten-free rice-flour bread is a nutritious, vegan, fiber-rich option. Here’s a quick look at why it makes a healthy alternative to traditional bread:
Supports Heart Health
To begin with, this bread is naturally low in sodium and cholesterol, which supports better heart health, especially when paired with nutrient-dense toppings like vegetables or healthy spreads.
Lower in Sugar
In addition, this rice flour bread typically contains less sugar than many wheat-based breads, making it a suitable option for those looking to manage their sugar intake or maintain a balanced diet.
Gluten-Free and Gut-Friendly
More importantly, the absence of gluten makes this bread ideal for individuals with celiac disease or gluten sensitivity. At the same time, it may help reduce discomfort and support better digestion for those with sensitive guts.
Easy to Digest and Allergen-Friendly
Lastly, white rice flour is known for its mild, easily digestible nature. Since it’s free from common allergens, this bread is a safe and accessible choice for people of all ages.
Frequently Asked Questions (FAQs)
After mastering this rice-flour bread machine recipe, you might still have a few questions about achieving perfect results every time. Below, we’ve answered some of the most common concerns and provided practical tips so you can confidently bake your own gluten-free loaves.
If you still have questions or need more help, let us know in the comments below.
Can I substitute the rice flour for another flour?
It’s not advisable. This recipe has been tested with white rice flour; using different flours may not yield the same loaf.
Why is my bread gummy or dense?
It’s usually due to overmixing or underbaking. For the best results, weigh your flours precisely, bake until the bread reaches an internal temperature of 205°F, and allow it to cool completely.
Is active dry yeast the same as instant yeast?
In this recipe, it is not. They’re not interchangeable when making this bread.
What if my bread machine doesn’t have a gluten-free setting?
You can use a super rapid cycle instead. The total time should be approximately 2 hours and 44 minutes.
How long does this bread last?
It stays fresh 1–2 days at room temperature when stored properly and freezes well for up to 3 months.
More Recipes for Gluten-Free Baking
If you enjoyed making this gluten-free bread, you’ll likely love baking other nutritious treats using gluten-free flours. Here are a few to try.
- Super thick and fluffy, these gluten-free, dairy-free oat flour pancakes are a delicious and wholesome way to switch up your morning routine.
- With a generous helping of Italian seasoning and a nice, tall rise, the aroma of this gluten-free, dairy-free Italian bread will have your mouth watering in no time.
- Whether you’re vegan, dairy-free, or simply craving a foolproof gluten-free biscuit recipe that actually works, this flaky, buttery, gluten-free biscuit recipe delivers.
- For those looking for a bread made with oat flour, this gluten-free oat bread recipe delivers a rich, nutritious, and flavorful loaf.
If you’re looking for more ways to bake with gluten-free flours, these recipes are a delicious place to start.
Let Us Hear About Your Bread!
The time has come for you to flex your baking skills with this rice flour bread machine recipe! Share your results in the comments, along with any swaps, twists, or serving ideas. And, if something didn’t go quite as planned, feel free to share that too! We are here to help.