Gluten-free bread can be frustrating. One loaf turns out gummy, another crumbles when sliced, and the store-bought options are often expensive, dry, or full of ingredients you’d rather avoid.
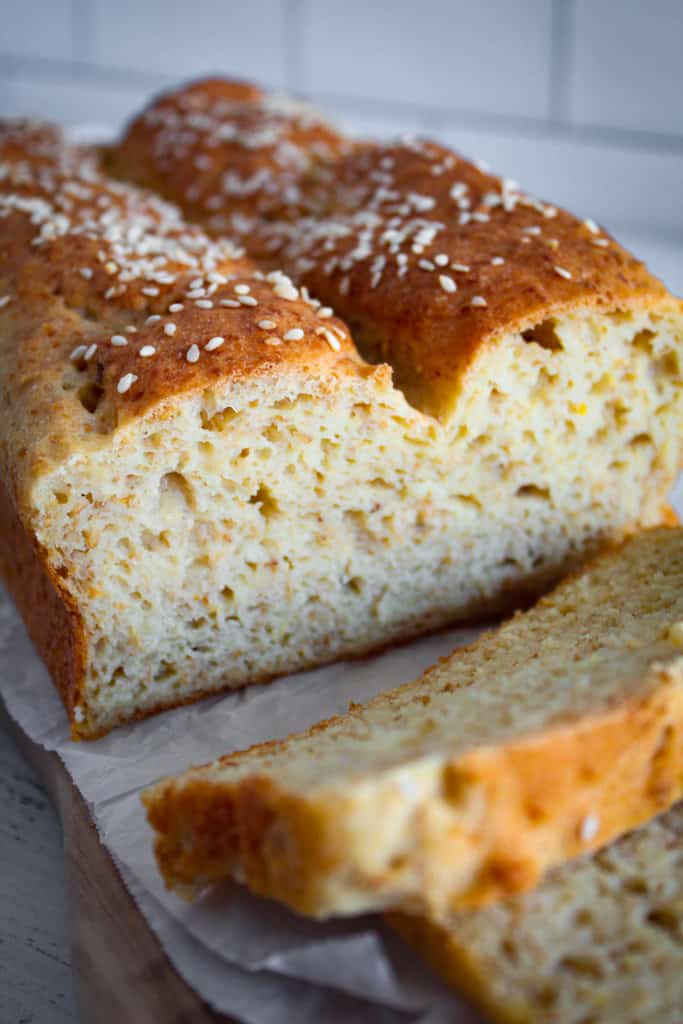
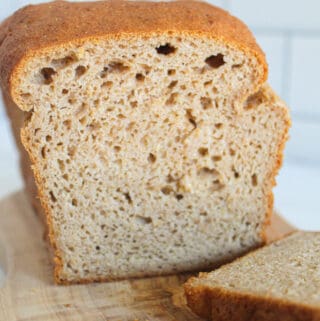
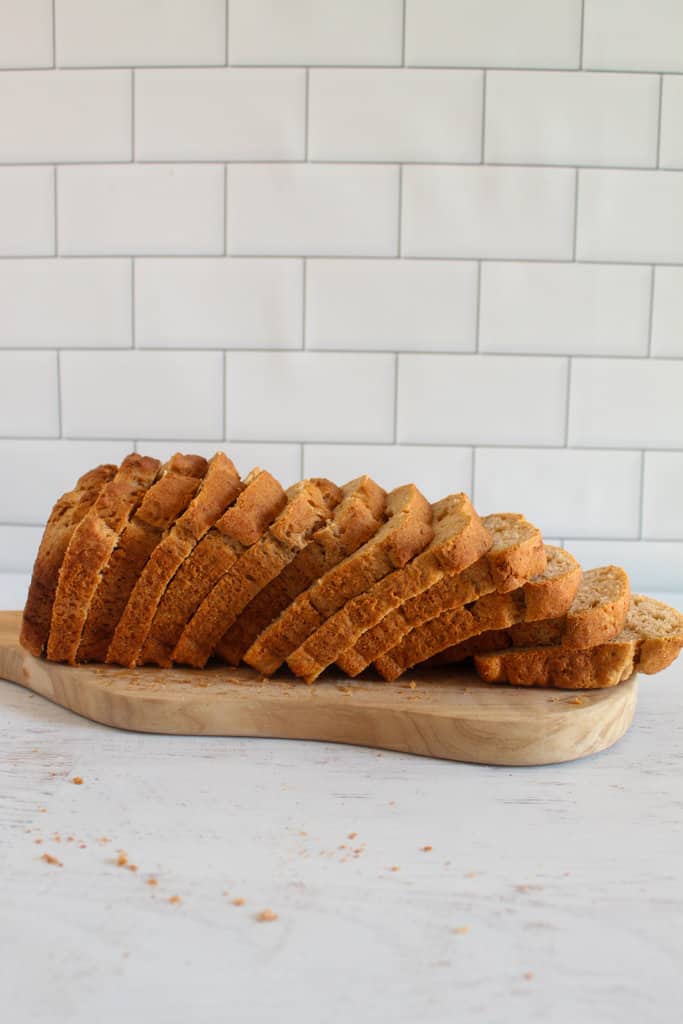
This millet bread solves that problem with a soft, sliceable loaf that works for sandwiches, toast, and everyday meals. Millet flour gives the bread a mild, slightly nutty flavor, while the right blend of gluten-free flours helps create a tender texture that actually holds together.
Table of Contents
If you’ve been looking for a homemade gluten-free bread that tastes familiar, slices cleanly, and doesn’t fall apart the second you spread butter on it, this recipe is a great place to start.

Millet Bread Taste & Texture
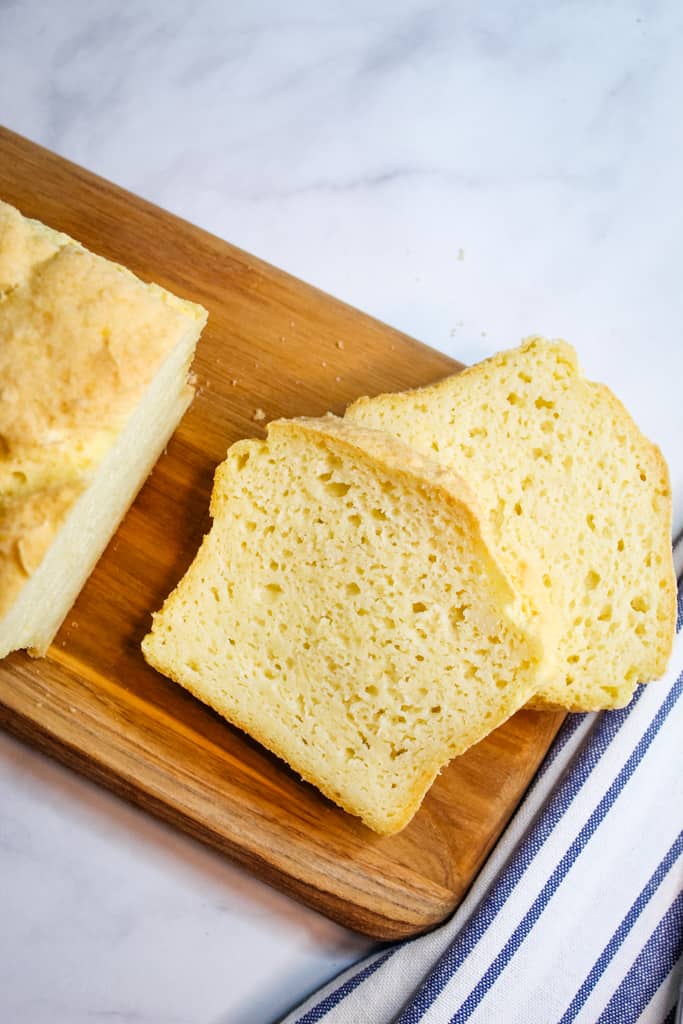
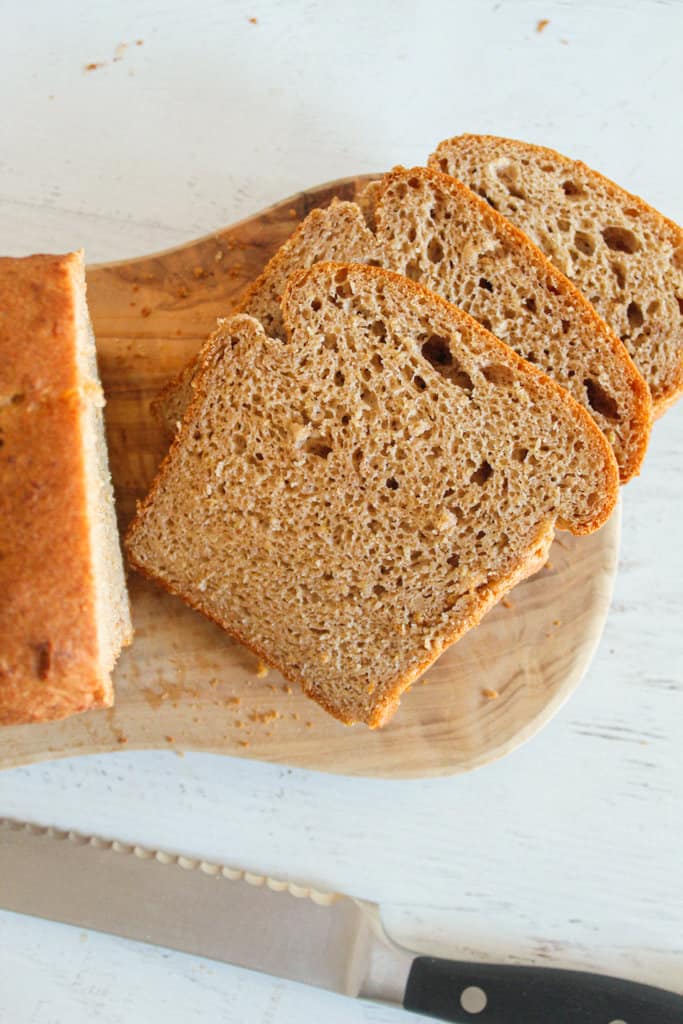
This is one of my favorite gluten-free breads to make because the taste of this millet bread is very, very mild – very close to a store-bought bread. Aside from being naturally gluten-free, the millet flour in this recipe contributes a mildly sweet flavor and a delicate, yet firm crumb.
This is not a “100% millet flour bread,” although millet flour is the main flour in this recipe, it also contains a blend of flours and starches that contribute to the irresistibly soft and chewy texture. Plus, the starch keeps the bread soft, so it doesn’t dry out so quickly.
Gluten-Free Millet Bread at a Glance
If you’ve ever made yeast bread from scratch before, you know it can be a lengthy process. The best thing about this millet bread recipe is how quickly it can be mixed together. You can easily make this recipe from start to finish in just an hour and a half. Here are a few more reasons why this is sure to be your new go-to bread recipe:
- It is both gluten and dairy-free
- You can easily make your own millet flour at home using a high-speed blender if desired (directions are in the ingredients section below)
- It makes the perfect chewy, all-purpose bread with a mild flavor
- It stays fresh for up to 2 days in a well-sealed bag on the counter!

Equipment Needed to Make Millet Bread
I like to start by making sure we have everything we need to make gluten-free bread, including the equipment. If you do a lot of gluten-free baking, you probably already have all this somewhere in the kitchen.
- Digital Food Scale
- Measuring Cup
- Food Thermometer
- Medium Mixing Bowl
- Whisk
- Stand Mixer with Bowl
- Rubber Spatula
- 8″X4.5″ Bread Pan
- Oven
- Wire Cooling Rack
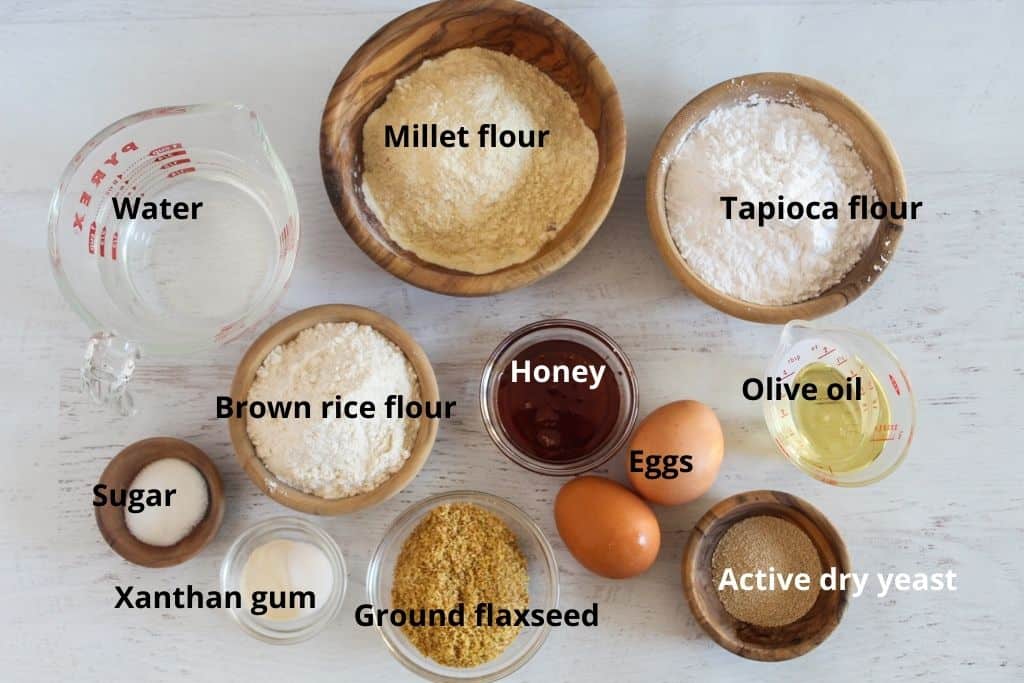
Ingredients for Millet Bread
If you need to run to the grocery store for any of these ingredients, feel free to print or save the recipe card below for easy reference.
Ingredients Quick Scan
- Active Dry Yeast
- Granulated Sugar
- Water
- Millet Flour
- Tapioca Flour
- Brown Rice Flour
- Ground Flaxseed
- Xanthan Gum
- Salt
- Eggs
- Olive Oil
- Honey
Key Ingredient Roles for Millet Bread
I like to take a close look at the ingredients for any gluten-free recipe because “What, exactly, is this?” is a perfectly legitimate question to ask for some of them. Here’s a closer look at the ingredients for millet bread.
Active Dry Yeast
2 teaspoons active dry yeast
I like to think of active dry yeast as the powerhouse of leavening agents. It’s what you use when you need to get the best rise out of your bread dough. Yeast works so well because it’s actually alive! It feeds on sugar to produce the carbon dioxide bubbles needed to achieve the perfect texture in millet bread.
Granulated Sugar
1 teaspoon granulated sugar
The sugar basically gives yeast something to eat while it produces carbon dioxide bubbles.
Water
1 cup hot (but not too hot) water
Besides providing some of the liquid for this bread, water is needed to activate the yeast. One tricky part of working with active dry yeast is getting the water to the exact right temperature. If it’s too cold, the yeast won’t activate. If it’s too hot, the yeast will die.
I aim for about 100 degrees Fahrenheit to make sure it’s neither too hot nor too cold. Checking the temperature with a food thermometer before you add the yeast can help. If the water-yeast mixture starts to look foamy on top after you’ve let it sit for a few minutes, the water is the correct temperature.
Millet Flour
120 grams (about 1 cup) millet flour
Millet flour is a gluten-free flour with a mild nutty flavor. According to the USDA FoodData Central database, it’s about average in protein content for a gluten-free flour (10.8 grams per 100 grams of flour) and leaning toward the low end for dietary fiber (3.5 grams per 100 grams of fiber). So we’ll combine it with the other dry ingredients to produce the soft, tender crumb I like in this bread.
How to Grind Millet Flour
Want your millet flour a little fresher? You can grind your own if you can get your hands on some millet seeds. I recommend grounding only the amount that you will use immediately, as freshly ground millet flour can spoil quickly.
What to remember about working with millet seeds: They’re tiny, and even the larger varieties like pearl millet rarely get bigger than a 2-millimeter diameter. So be careful not to spill them!
Step One: Rinse and Dry Hulled Millet Seeds
Rinse the millet seeds in a colander with small holes. Spread them on a lint-free towel to dry completely. It’s important to give them enough time to dry to avoid excessive moisture in your flour.
Step Two: Grind Millet Seeds in a High-Powered Food Processor
Use a food processor to grind the millet seeds, a little at a time, until they form a fine powder.
Step Three: Sift Any Large Pieces Out of the Flour
Remove any millet seeds that might not have been fully ground from the flour using a fine-mesh sifter. It’s acceptable to run these millet seeds through the food processor again if there’s enough to justify it.
This freshly ground flour is best used immediately. Store any remaining flour in an airtight container in the refrigerator to use within 1 week or freeze it for longer storage. Follow this flour storage guide for more information.
Tapioca Flour
75 grams (about 3/4 cup) tapioca flour
The confusing thing about the form of tapioca we need is that you’ll see “tapioca powder,” “tapioca flour,” and “tapioca starch” used pretty interchangeably in the labeling. Tapioca is a starch extracted from cassava root, so it’s not really a true flour, unlike the millet flour above, which uses more of the whole seed. We don’t want the pearl tapioca typically used in tapioca pudding.
As a starch, tapioca makes a good thickener because it absorbs moisture well. Here, it improves moisture retention in the bread, helping ensure it doesn’t dry out as it bakes.
Brown Rice Flour
75 grams (about 1/2 cup) brown rice flour
Brown rice flour has a slightly lower protein content (7.23 grams per 100 grams) and a slightly higher fiber content (4.6 grams per 100 grams) than millet flour, so they’ll help balance one another in this department. Protein and fiber content affect how well the nutritional content of flour forms the webbing that retains water. This can make a difference between bread that is too dry and crumbly, too gummy, and just right.

Flaxseed Meal
27 grams (about 1/4 cup) flaxseed meal
Flaxseed meal can really wear a lot of hats here. It’s a binder, helps with moisture retention, improves texture, and can sometimes be used as a substitute for other ingredients like eggs and xanthan gum.
Xanthan Gum
1 teaspoon xanthan gum
Xanthan gum excels at absorbing moisture, so you usually won’t need more than 1 teaspoon. It also improves elasticity and pretty much replaces gluten’s binding power.
Salt
1/2 teaspoon salt
Salt helps enhance and balance the flavors of the other ingredients in this millet bread. It can also help control the yeast’s activity.
Important: Don’t use too much salt. Excessive salt can kill the yeast (and, of course, make your bread too salty).
Eggs
2 eggs
Eggs contain a protein that uncoils and binds with the components in other ingredients to make sure the bread doesn’t fall apart after it’s done baking. Be sure to include the yolks, as they also contain an emulsifier that helps the fats and water mix more completely.
Olive Oil
3 tablespoons olive oil
I like to use olive oil because it has a high level of heart-healthy monounsaturated fat. This is important to add richness and a tender crumb to the bread. Use extra-virgin olive oil (EVOO) for the antioxidant content.
Honey
2 tablespoons honey
Honey adds a bit of extra sweetness and a little more moisture to the bread dough. I like to use raw, unfiltered honey to make sure it’s genuine. In the video below, nutritionist Dr. Joanna McMillan explains how to tell the difference between real and fake honey.
Quick Success Tips Before You Bake
For the softest, most sliceable gluten-free millet bread, keep these tips in mind before you start:
- Use a digital scale. Gluten-free flours are easy to overmeasure, which can make the bread dry or dense.
- Do not knead the dough. Gluten-free bread dough is more like a thick batter, and there is no gluten to develop.
- Let it rise only to the top of the pan. Overproofing can cause the loaf to collapse.
- Bake to 205–210°F. Use an instant-read thermometer to make sure the center is fully baked.
- Cool completely before slicing. The loaf needs time to set, so the slices do not turn gummy or fall apart.
Ready to bake? Grab your loaf pan, measure the flours by weight, and follow the recipe below for the best texture.
Printable Millet Bread Recipe Card
Ingredients
- 2 teaspoons active dry yeast
- 1 teaspoon sugar
- 1 cup water 100 F
- 120 grams millet flour about 1 cup
- 90 grams tapioca flour about 3/4 cup
- 75 grams brown rice flour about 1/2 cup
- 27 grams ground flax seed about 1/4 cup
- 1 teaspoon xanthan gum
- 1/2 teaspoon salt
- 2 eggs
- 3 Tablespoons olive oil
- 2 Tablespoons honey
Instructions
- In a measuring cup, add yeast to warm water. Stir to combine. Let sit for 5 minutes.
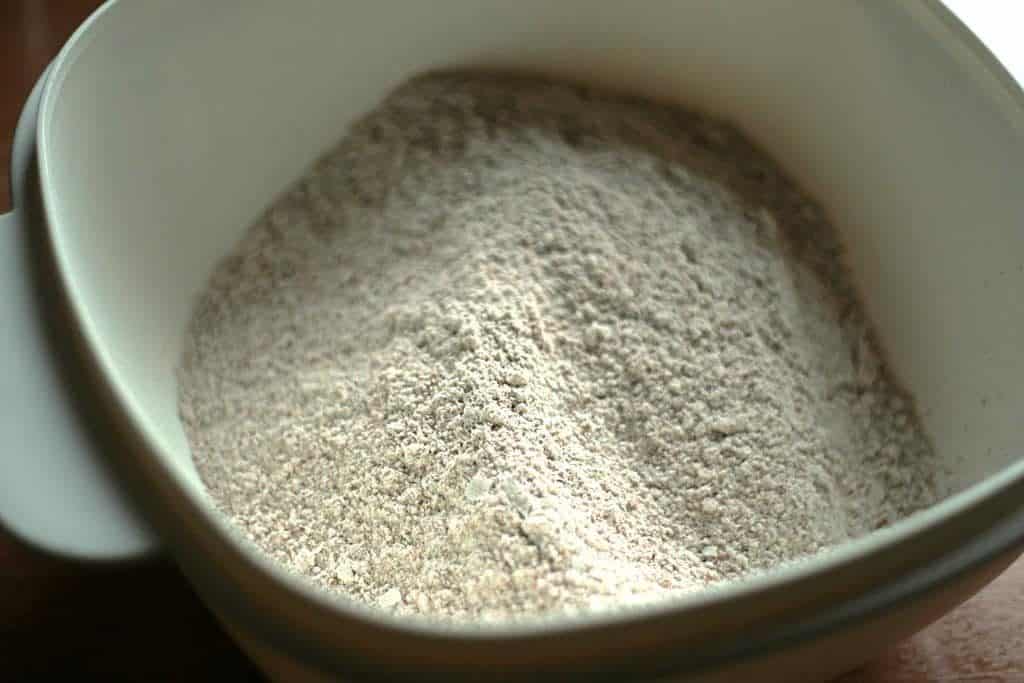
- While the yeast is proofing, whisk together the millet flour, tapioca flour, brown rice flour, ground flax seed, xanthan gum, and salt in a medium bowl that’s separate from the stand mixer bowl.
- When the yeast is done proofing, add the eggs, olive oil, honey, sugar, and yeast mixture to the bowl of your stand mixer. Mix for 30 seconds.
- Add the dry ingredients to the stand mixer and mix for 30 seconds. Scrape batter down with the rubber spatula. Mix on medium speed for 3 minutes.
- Spray a 8″x4.5″ baking pan with cooking spray. Scrape the bread dough into the pan. Make sure the dough is evenly distributed in the pan.
- Let the dough rise for 35 minutes or until it crests over the top of the pan.
- While the dough is rising, preheat your oven to 350 degrees Fahrenheit (176 degrees Celsius).
- When the dough is done rising, put it in the oven. Bake for 35-40 minutes or until an instant read thermometer registers 205-210 degrees Fahrenheit (96-99 degrees Celsius).
- Let the bread cool in the pan for 15 minutes. Turn bread out of the pan onto the wire cooling rack and let cool completely.
- Serve this bread as sandwiches, toast (goes good with avocado!), and/or with jam and butter.
Nutrition
Did you make and love this recipe? Give it your review and rating below! And make sure to follow me on Instagram, Pinterest, and Facebook , too!
How to Make Millet Bread
Now that we have all our equipment and ingredients, let’s jump right into making this bread. It’s not too difficult; the hard part’s being patient while it rises and bakes because it smells so good!

Step One: Activate Yeast
Stir the yeast into the warm water in the measuring cup. Set aside to activate for at least 5 minutes. If it gets sort of foamy on top, it’s working. This process is called proofing.
Step Two: Mix All Dry Ingredients Except Sugar
While the yeast is proofing, whisk together the millet flour, tapioca flour, brown rice flour, ground flaxseed, xanthan gum, and salt in a medium bowl that’s separate from the stand mixer bowl.
Step Three: Use a Stand Mixer to Mix Wet Ingredients and Sugar
When the yeast is done proofing, add the eggs, olive oil, honey, sugar, and yeast mixture to the bowl of your stand mixer. Mix for 30 seconds.
Step Four: Add Flour Mix to Wet Ingredients
Add the dry ingredients to the stand mixer and mix for 30 seconds. Scrape batter down with the rubber spatula. Mix on medium speed for 3 minutes.

Step Five: Add Dough to Loaf Pan
Spray an 8″x4.5″ baking pan with cooking spray. Scrape the bread dough into the pan. Make sure the dough is evenly distributed in the pan.
Step Six: Let Dough Rise
Let the dough rise for 35 minutes or until it crests over the top of the pan.

Step Seven: Preheat Oven
While the dough is rising, preheat your oven to 350 degrees Fahrenheit (176 degrees Celsius).
Step Eight: Bake Bread
When the dough is done rising, put it in the oven. Bake for 35-40 minutes or until an instant-read thermometer registers 205-210 degrees Fahrenheit (96-99 degrees Celsius).
Step Nine: Let Bread Cool
Let the bread cool in the pan for 15 minutes. Turn the bread out of the pan onto the wire cooling rack and let it cool completely.
Step Ten: Serve or Store
I like to use this bread to make sandwiches pretty much right away. It also makes good avocado toast. When you want to keep it simple, this bread goes well with some softened butter and jelly spread on top. Use a bread or serrated knife to slice it.
The whole loaf can be stored in an airtight container or large resealable plastic bag on the counter for up to two days. Slices of the bread can also be frozen in resealable plastic bags if you’d like to store it for longer. Thaw them out in a part of your fridge that isn’t very prone to condensation overnight. They can also be thawed on the counter for an hour or two.
Substitutions for Millet Bread
If you don’t have quite enough millet flour, you can replace up to half of the millet flour with teff flour. Make sure it adds up to 120 grams. (Flours can be different densities, so measuring by cups may not be entirely accurate.) Here’s my handy guide to replacing millet flour, if you’d like to know more about which substitutes work best.
As you might guess, white rice flour is the closest (if not completely exact) substitute for brown rice flour. Sorghum flour can also work with a little additional binder. Here’s a handy guide for replacing brown rice flour.
Need to replace the xanthan gum? If so, I know the reasons can be a little embarrassing, but it’s not just you. Some people’s digestive systems are just extra sensitive to it. Psyllium husk powder or a little extra flaxseed meal can work as substitutes. Here’s our handy guide to replacing xanthan gum.
Pure maple syrup can work as a substitute for the honey.
If you want to skip the proofing step for your yeast, you can try adding instant yeast. I haven’t really tried instant yeast in this recipe, though, so feel free to let us know how it goes in the comments section.
For each egg you want to replace, mix one tablespoon of flaxseed meal with three tablespoons of water. Allow the mixture to sit for a few minutes to form a gel. Then add to the wet ingredients in Step Three above.
I wouldn’t recommend replacing the sugar because it gives the yeast something to work with.
Pro Tips
All gluten-free breads are not created equal. There are many factors that come into play when it comes to achieving the best taste and soft, chewy texture. With a few simple tips, this homemade millet bread will come out perfect every time.
1. Use room temperature ingredients (except for the warm water)
Make sure your ingredients are at room temperature for this bread recipe. The warm water is the only exception here. It needs to be at approximately 100°F to properly activate the yeast. Using room temperature ingredients allows them to easily combine during mixing.
2. Measure the flour by weight
Using a digital kitchen scale to measure the flours by weight will yield the best results in this recipe. Measuring by cup is not quite as accurate as using weight measurements. This will make certain your bread comes out soft and fluffy!
3. Let the batter rise only until it reaches the top of the pan
The bread batter needs time for the yeast to produce enough carbon dioxide for the bread to rise. Allow the batter to rise just until the top rises over the top of the pan, about 35 minutes. Letting the batter rise too much can cause it to overflow or collapse in the oven.
FAQ for This Millet Bread Recipe
While I think this bread is pretty easy to make, we do sometimes get questions! Here, I tried to answer some of the most common questions. If you think of one I haven’t asked yet, feel free to ask in the comments section, and we’ll answer as soon as possible.
If your loaf did not turn out exactly as expected, check the questions below for quick troubleshooting help.
How can I be sure this bread is gluten-free?
Millet and rice flours are naturally gluten-free. Looking for a “certified gluten-free” label on the package is the easiest way to be sure because it means the processing facility took extra steps to avoid cross-contamination.
Can I make this millet bread without a stand mixer?
Using a stand mixer is the easiest way to make sure all the ingredients are combined completely and get the right texture. A powerful hand mixer can also work. Avoid kneading the dough, though, because its consistency is more like a batter than some bread doughs.
Why is my gluten-free millet bread gummy inside?
Gummy bread might be underbaked, or it might not have cooled completely before being sliced. The bread should bake to an internal temperature of 205-210 degrees Fahrenheit. Cooling it completely before slicing gives the center more time to set before slicing.
Besides giving the yeast time to work, the rise time gives dry ingredients like flour and xanthan gum time to absorb moisture. A gummy interior might mean that the dry ingredients didn’t have time to absorb moisture, or there wasn’t enough flour. Too much moisture might also cause gummy bread, so it’s important to make sure you don’t inadvertently add too much water.
Why is my bread too dry or crumbly?
Dry or crumbly bread can indicate that it was overbaked or that too much flour was added. If you suspect that your oven runs a bit hot, it may help to start checking your bread’s doneness a few minutes before the baking time is up. (Calibrating your oven’s temperature sensor may also help.
As you may have noticed, if you do a lot of gluten-free baking, it can be finicky with the amount and type of flour. Not all flours are going to be a 1:1 substitute. It’s also easy to add too much if you try to measure it by cups instead of grams. Adding too much flour, or a type of flour that is notorious for absorbing more moisture than most, can also cause the bread to be too dry.
(Make sure you’re also careful about adding xanthan gum. It’s popular as a thickener in sauces because it’s so good at absorbing moisture. Mixing up teaspoons and tablespoons can lead to the addition of too much xanthan gum, which can also dry out your bread!)
Can I freeze millet bread?
Yes, this millet bread freezes well. For the best texture, let the loaf cool completely, then slice it before freezing. Place the slices in a freezer-safe bag or airtight container. You can also add parchment paper between slices so they are easier to separate.
When ready to eat, thaw slices at room temperature or warm them in the toaster. Toasting is a great way to refresh the texture after freezing.
Can I use instant yeast instead of active dry yeast?
Yes, you can use instant yeast instead of active dry yeast. Instant yeast can usually be mixed directly into the dry ingredients instead of being activated in warm water first.
If you want to make sure your yeast is still active, you can still bloom it in the warm water with the sugar before adding it to the dough. Watch the rise closely, because instant yeast may work a little faster than active dry yeast.
Why did my gluten-free bread collapse after baking?
Gluten-free bread can collapse if it rises too long, has too much moisture, or is not baked all the way through. For this millet bread, let the dough rise only until it reaches the top of the loaf pan. Do not wait for it to rise high above the pan.
Also, make sure the bread is fully baked in the center. A golden crust does not always mean gluten-free bread is done, so use an instant-read thermometer if possible. The center of the loaf should reach 205–210°F before you remove it from the oven.
Is millet flour safe for people with celiac disease?
Millet is naturally gluten-free, but you should still check the package carefully if you are baking for someone with celiac disease. Choose millet flour that is clearly labeled gluten-free, because naturally gluten-free grains can come into contact with wheat, barley, or rye during harvesting, milling, packaging, or storage.
It is also important to avoid cross-contact in your kitchen. Use clean utensils, bowls, pans, measuring tools, and work surfaces when preparing gluten-free bread.
Favorite Ways to Use Gluten-Free Millet Bread
This soft gluten-free millet bread is perfect for more than everyday toast and sandwiches. Its mild flavor works well in both sweet and savory recipes, especially when you want a sturdy bread that can hold up to soaking, baking, or toasting.
Here are a few delicious ways to use it:
- French Toast Casserole: Use sliced or cubed millet bread to make a cozy gluten-free French toast casserole. The bread absorbs the custard mixture while still holding its shape, making it a great option for brunch, holidays, or make-ahead breakfasts.
- Bread Pudding: Turn leftover millet bread into a gluten-free bread pudding. Its lightly nutty flavor pairs well with cinnamon, vanilla, brown sugar, raisins, chocolate chips, or fresh berries.
- Gluten-Free Stuffing: Cube and toast the bread before using it in gluten-free stuffing. The slices dry out nicely, which helps them soak up broth, herbs, onions, celery, and other savory flavors without becoming too mushy.
Whether you slice it fresh, toast it for breakfast, or turn leftovers into something cozy, this millet bread is a versatile gluten-free loaf you’ll find plenty of ways to use.
Try This Millet Bread and Share Your Results
If you make this gluten-free millet bread, I’d love to hear how it turned out! Leave a comment below and let me know if you used it for sandwiches, toast, French toast casserole, stuffing, or another favorite recipe. Your tips and results can help other gluten-free bakers get the best loaf possible.